Kessel Staufix SWA Installation And Operating Manual
Backwater valve for wastewater with or without sewage. clean-out
Hide thumbs
Also See for Staufix SWA:
- Installation and operating manual (96 pages) ,
- Installation and operating manual (72 pages) ,
- Installation and operating manual (20 pages)
Table of Contents
Advertisement
Available languages
Available languages
Quick Links
KESSEL - Rückstauverschluss Staufix SWA für fäkalienfreies Abwasser
ANLEITUNG FÜR EINBAU, BEDIENUNG UND WARTUNG
KESSEL-Reinigungsrohr Controlfix
Installation
Inbetriebnahme
der Anlage wurde durchgeführt von Ihrem Fachbetrieb:
Name/Unterschrift
Datum
Produktvorteile
Für fäkalienfreies Abwasser
Zum Einbau in durchgehende Rohrleitungen
Bei Rückstau selbsttätig schließende Klappen
(variantenabhängig)
Optimale Rohrreinigung
Stufenlose Anpassung an den Bodenbelag durch teleskopisch
höhenverstellbares, drehbares und neigbares Aufsatzstück
Umrüstbar zum Fäkalien-Rückstauautomat
oder Rückstaupumpanlage Pumpfix F
freier Rohrquerschnitt
Einfache Wartung
DIN EN 13564 Typ 2
Einweisung
Ort
Stempel Fachbetrieb
D Seite 1-16
GB Page 17-32
I Pagina 33-48
F Page 49-64
NL Pagina 65-80
PL Strona 81-96
LGA
Landesgewerbeamt Bayern
Bauart
Bauart
Bauart
geprüft
geprü ü ft ft
gepr
und ü ü berwacht
und
und überwacht
berwacht
Änderungsstand: 06/2014
Sachnummer:
010-841
Techn. Änderungen vorbehalten
Advertisement
Chapters
Table of Contents

Related Manuals for Kessel Staufix SWA


Summary of Contents for Kessel Staufix SWA
- Page 1 D Seite 1-16 GB Page 17-32 KESSEL - Rückstauverschluss Staufix SWA für fäkalienfreies Abwasser ANLEITUNG FÜR EINBAU, BEDIENUNG UND WARTUNG I Pagina 33-48 F Page 49-64 NL Pagina 65-80 KESSEL-Reinigungsrohr Controlfix PL Strona 81-96 Produktvorteile Für fäkalienfreies Abwasser Zum Einbau in durchgehende Rohrleitungen Bei Rückstau selbsttätig schließende Klappen...
-
Page 2: Table Of Contents
Inhaltsverzeichnis Verwendung..................Seite Anlagenbeschreibung ............... Seite 1. Allgemein Lieferumfang..................Seite Allgemeine Hinweise ................ Seite Einbau in die Bodenplatte ..............Seite 2. Einbau Vertiefter Einbau in die Bodenplatte..........Seite Einbau in eine freiliegende Abwasserleitung ........Seite Einbau in drückendes Wasser ............Seite Funktionsprüfung nach DIN EN 13564 .......... -
Page 3: Verwendung
Anweisungen im Kap. 5 „Gewähr- leistung“. Das KESSEL-Reinigungsrohr dient als Grund- 1.2 Verwendung Controlfix körper für den KESSEL-Rückstauverschluss Staufix SWA. Die folgende Einbau- und Instal- lationsanleitung gilt hier entsprechend. Da Der KESSEL-Rückstauverschluss Staufix 1.1 Verwendung Staufix SW hier keine Rückstaueinsätze eingebaut sind, SWA ist für durchgehende Ab wasserleitungen... -
Page 4: Allgemeine Hinweise
2. Einbau stauverschluss das Abwasser von oben nicht mehr in den Kanal ab- Es ist nach DIN EN 12056 nicht zulässig, alle Ablaufstellen eines Ge- fließen kann, sondern nach dem Prinzip der kommunizierenden Röhren Allgemeine Hinweise zum Einbau von Rückstausicherungen bäudes - auch die oberhalb der Rückstauebene (Straßenoberkante) - zuerst aus den am tiefsten installierten Ablaufstellen unterhalb der Rück- über Rückstauverschlüsse abzusichern, da beim geschlossenen Rück-... - Page 5 Fallleitungen sind grundsätzlich in Fließrich- Durch das teleskopische Aufsatzstück kann tung hinter dem SWA (ca. 1m) einzuleiten. der KESSEL-Staufix SWA stufenlos an die Dar über hinaus ist eine Beruhigungsstrecke vor han de ne Einbautiefe angepasst werden. vor und hinter dem SWA (mind. 1m) einzu- Bo den nei gun gen bis zu 5°...
-
Page 6: Vertiefter Einbau In Die Bodenplatte
2. Einbau beachten, dass Dichtlippe und Zentriernase lung auf die erforderliche Hö he durchgeführt ist beim Einstecken in das Verlängerungss- bei der Montage nach oben schauen. Die werden kann. stück auf das erforderliche Maß zu kürzen. Zentriernase ist in die Aussparung einzule- gen (siehe Abb. - Page 7 Gegenflansch ei ne Dichtungsbahn einge- Prinzipdarstellung (Bsp. Pumpfix F) klemmt und mit den bei liegenden Schrau- ben verschraubt. Bei Einbau in eine was- serdichte weiße Wanne bietet KESSEL zu- inbaubeispiel „Schwarze Wanne“ inbaubeispiel „Weiße Wanne“ sätzlich eine passende Dichtungsbahn aus...
-
Page 8: Funktionsprüfung Nach Din En13564
3. Inbetriebnahme Funktionsprüfung nach DIN EN13564 ➁ Den Notverschluss (3) mit dem Hand hebel verschließen. Die Verschlussschraube R “ (1) am Deckel ent fernen und den Trichter (2) anschrauben. Klarwasser einfüllen, bis eine Prüfdruckhö he von 10 cm erreicht ist. Verschluss- Die Wasserspiegelhöhe (= Prüfdruckhöhe) im Trichter ist schraube R1/2”... -
Page 9: Inspektion
Alle Teile reinigen rungsteil der Klap penver- 4.2 Wartung (Abb. 7-9) Beiliegende Inspektions- und Wartungskarte c) Dichtungen überprüfen schlüsse mit Gleitmittel ist in unmittelbarer Nähe des Staufix SWA (z. B. Armaturenfett) ein- an zubringen (DIN 1986-3). streichen Klappenhalter (d) Gleitmittel verwenden! - Page 10 4. Inspektion und Wartung Der Rückstauverschluss muss mindestens halbjährlich durch einen Sachkundigen gewar- tet werden. Während der Wartung darf der Rückstauverschluss nicht mit Abwasser beauf- schlagt werden. Notverschluss Dabei ist folgendes durchzuführen: ① Entfernen von Schmutz und Ablagerun- Betrieb ② Prüfen von Dichtungen und Dichtflächen auf einwandfreien Zustand;...
-
Page 11: Montage Der Beiden Deckel
4. Inspektion und Wartung 4.2.1 Montage der beiden Deckel siehe Abb. 11, 12) Deckel je auf einer Seite einführen, die andere Seite nach unten drücken und mit Verriegelungshebeln verschliessen. alle 4 Verschlusshebel verriegeln Abb. 11 Abb. 12... - Page 12 5. Ersatzteile SWA zum Einbau in die freiliegende Abwasserleitung Alle Ersatzteile sind über den Fachbetrieb beziehbar. ➀ SWA-Deckel Zulauf 80013 Bezeichnung Art.-Nr. ➀ SWA-Deckel Auslauf 80014 ➁ Mechanische Klappe 80033 ➂ Einschiebeteil für mechanische Klappe 80034 ➃ Haube 83031 ➄ Übergangsstück 83032 ➅...
- Page 13 5. Ersatzteile SWA zum Einbau in die Bodenplatte Alle Ersatzteile sind über den Fachbetrieb beziehbar. SWA-Deckel Zulauf 80013 Bezeichnung Art.-Nr. ➀ SWA-Deckel Auslauf 80014 ➁ Mechanische Klappe 80033 ➀ ➂ Einschiebeteil für mechanische Klappe 80034 ➃ Dichtungsset (für Deckel Zulauf und Auslauf) 70318 ➃...
- Page 14 1. Ist eine Lieferung oder Leistung mangelhaft, neu zu laufen, jedoch nur im Umfang der Neu- Voraussetzung hierfür ist eine fachmännische so hat KESSEL nach Ihrer Wahl den Mangel lieferung. Montage sowie ein bestimmungsgemäßer Be- durch Nachbesserung zu beseitigen oder eine Es wird nur für neu hergestellte Sachen eine...
- Page 16 Führend in Entwässerung Privater Wohnungsbau ohne Kanalanbindung 1 2 3 4 1 2 3 4 Öffentlicher Bau z.B. Krankenhaus Öffentlicher Bau z.B. Freizeitanlagen 1 2 3 4 Gewerblicher Bau z.B. Hotel Gewerblicher Bau z.B. Industriebau 2 3 5 Gewerblicher Bau z.B.
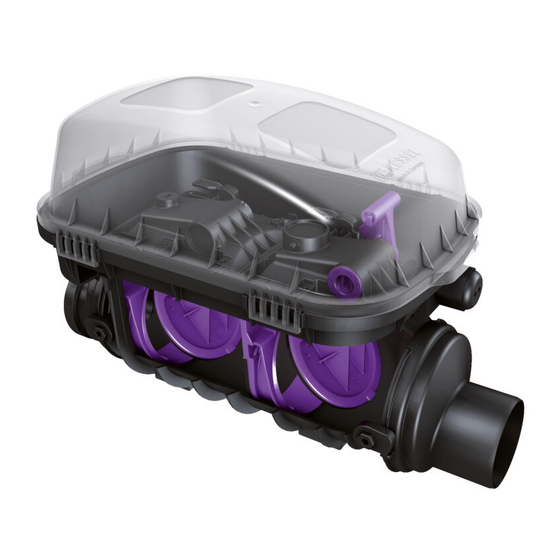
- Page 17 INSTALLATION AND OPERATING MANUAL KESSEL - Staufix SWA Backwater Valve for wastewater with or without sewage KESSEL-Controlfix Clean-Out Product Advantages: For wastewater with or without raw sewage For installation in exposed or concrete slab piping Self closing backwater flap during backwater / flooding (depending on model)
- Page 18 Table of Contents 1. General Application Staufix SWA ..............Page Application Controlfix ................Page Contents of delivery ................Page General instructions................Page Concrete slab installation..............Page 2. Installation Extended depth installation In concrete slab........Page Exposed pipe installation ..............Page Installation in moisture /Groundwater areas ........
-
Page 19: Application Controlfix
In the case that KESSEL Staufix SWA or Controlfix , plea- the drainage pipes connected to the Staufix The Staufix SWA delivery consists of a body / se thoroughly read through this manual SWA will not be used over extended periods of... -
Page 20: General Instructions
2. Installation the backwater flap is in the closed position due to backwater / flooding According to DIN EN 12056 it is not allowed to connect all drainage fix- no wastewater will be able to flow through the backwater valve meaning General instructions for installation of backwater valves tures from a building (including those located above the backwater level that the building’s own wastewater will flood out of the lowest drainage... -
Page 21: Concrete Slab Installation
2. Installation be connected to a backwater valve. The Staufix SWA body should be installed per- fectly horizontal (please see illustration 1). The included gasket should be placed into the re- Please note: cessed area of the housing (as shown in illust-... - Page 22 2.2 Extended Depth Installation (Nr. 83071) hood is dismantled, the feed and drain co- should be coated with a bonding material If the Staufix SWA is to be installed in an high vers must be removed. which sticks to ABS (such as PCI base groundwater or high earth moisture area coat 303).
- Page 23 If the concrete slab will be equipped Installation diagram (example umpfix F) with a membrane or sheet – this sheet is to be connected to the Staufix SWA body with the counter flange supplied with the 83023. oncrete floor with moisture protective...
- Page 24 (this may require significant filling of water since the R1/2" Staufix SWA body must first be completely filled with water ➀ before the filter level is reached). Over a 10 minute peri- od, observe the water level inside the see-thru funnel. If ➂...
-
Page 25: Inspection
Close and lock the ma- mediate vicinity of the Staufix SWA (DIN b) Clean all parts sure lever. nual closure lever 1986-3) - Page 26 4. Inspection and Maintenance The backwater needs to be checked every six months at a minimum by a qualified and licen- sed service technician. During the inspection no wastewater should pass through the backwater valve. Manual closure lever The following should take place during this ins- pection: closed open (operation)
-
Page 27: Assembly Of Both Covers
4. Inspection and Maintenance 4.2.1 Assembly of both covers (see Illustrations 11 and 12) Insert cover housing at an angle as shown and then push other side down. Lock cover in place with the finger clips. All 4 cover closure clips in the locked position Illustr. - Page 28 5. Replacement Parts Staufix SWA for exposed pipe installations ➀ SWA cover (inlet side) 80013 Description Art.-Nr. ➀ SWA cover (outlet side) 80014 ➁ Backwater flaps 80033 ➂ Housing for backwater flap 80034 ➃ Protective cover 83031 ➄ Transition section 83032 ➅...
- Page 29 5. Replacement Parts Staufix SWA for concrete slab installations SWA cover (inlet side) 80013 Description Art.-Nr. ➀ SWA cover (outlet side) 80014 ➁ Backwater flaps 80033 ➀ ➂ Housing for backwater flap 80034 ➃ Gasket set (for cover, inlet and outlet) 70318 ➃...
- Page 30 6. Warranty 1. In the case that a KESSEL product is de- cessarily to the entire product or unit. KES- stallation and user's manual as well as the fective, KESSEL has the option of repairing SEL products are warranted for a period of corresponding norms / regulations.
- Page 32 Leading in Drainage Private homes without public sewage connection 1 2 3 4 1 2 3 4 Public buildings (e.g. hospital) Public buildings (e.g. leisure facility) 1 2 3 4 Commercial buildings (e.g. hotel) Commercial buildings (e.g. industrial / manufacturing facilities) 2 3 5 Commercial buildings (e.g.
- Page 33 ISTRUZIONI PER L’INSTALLAZIONE, L’USO E LA MANUTENZIONE per acque reflue senza sostanze fecali Valvola antiriflusso Staufix SWA KESSEL Tubo di pulizia Controlfix KESSEL Vantaggi del prodotto Per acque reflue senza sostanze fecali Per il montaggio in tubazioni continue Valvole a chiusura automatica in caso di riflusso (secondo la variante)
- Page 34 Indice Uso ....................Pagina Descrizione dell’impianto ..............Pagina 1. In generale Volume della fornitura ............... Pagina Indicazioni generali ................Pagina Montaggio nella piastra di fondo ............Pagina 2. Montaggio Montaggio incassato nella piastra di fondo........Pagina Montaggio in una tubazione di scarico non interrata......Pagina Montaggio in acqua premente ............
-
Page 35: Uso
5 “Garanzia”. 1.2 Uso di Controlfix Il tubo di pulizia KESSEL serve da corpo base per la valvola antiritorno Staufix SWA KES- SEL. Valgono conformemente le seguenti La valvola antiriflusso Staufix SWA KESSEL è... -
Page 36: Indicazioni Generali
2. Montaggio non può più scorrere dall’alto nel canale di scolo, ma, secondo il princi- ESecondo le DIN EN 12056 non è consentito dotare tutti i punti di scari- pio dei tubi comunicanti, fuoriesce prima dai punti di scarico installati più Indicazioni generali sul montaggio di dispositivi antiriflusso co di un edificio –... - Page 37 S/X). Vale analogamente anche per il montag- La seconda guarnizione a labbro deve esse- gio di Controlfix. Il corpo base dello Staufix SWA re applicata nella piastra di copertura, facen- KESSEL deve essere allineato orizzontalmente do attenzione che durante il montaggio la gu- (vedi ill.
-
Page 38: Montaggio Incassato Nella Piastra Di Fondo
2. Montaggio rito nella cavità (vedi ill. 5). Durante il mon- b) Posa delle piastrelle con p.es. Silicoferm S taggio assicurarsi che il funzionamento dei PCI (silicone autoadesivo). Soprattutto per le In caso di montaggio di più di due raccordi in- Attenzione! gruppi nel pozzetto non venga ostacolato dal piastrelle più... - Page 39 Configurazione del principio (p.es. Pumpfix F) tazione. In caso di montaggio in una vasca bianca a tenuta stagna, la KESSEL offre in- oltre una membrana impermeabile adatta in sempio di montaggio “Vasca nera”...
-
Page 40: Controllo Del Funzionamento Conf. Din En 13564
3. Messa in funzione Controllo del funzionamento conf. DIN EN 13564 ➁ Chiudere il dispositivo di chiusura d’emergenza (3) con la leva manuale. Svitare dal coperchio il tappo a vite R ½” e avvitare l’im- buto (2). Versarvi acqua fino a raggiungere un’altezza di pressione di prova di 10 cm. -
Page 41: Ispezione
4. Ispezione e manutenzione 4.1 Ispezione La valvola antiriflusso deve essere ispezio- nata mensilmente dall’utente o dai suoi inca- ricati. A tale proposito controllare il dispositivo di chiusura d’emergenza aprendolo e chiuden- dolo ripetutamente. Assicurarsi che al termine dell’ispezione, il dispositivo di chiusura d’emergenza sia aperto! Ill 8... - Page 42 4. Ispezione e manutenzione La valvola antiriflusso deve essere manutenu- ta almeno semestralmente da un esperto. Du- rante la manutenzione, nella valvola antiriflus- so non deve essere immessa acqua di scarico. A tal fine procedere come segue: Dispositivo di chiusura d’emergenza ①...
- Page 43 4. Ispezione e manutenzione 4.2.1Montaggio dei due coperchi (vedi ill. 11, 12) Inserire ogni volta un coperchio su un lato, premere l’altro lato verso il basso e chiudere con le leve di bloccaggio. Bloccare tutte le quattro leve di chiusura Ill 11 Ill 12...
- Page 44 5. Pezzi di ricambio SWA per il montaggio nella tubazione di scarico non interrata Tutti i pezzi di ricambio possono essere acquistati presso le aziende specializzate. ➀ Coperchio SWA Entrata 80013 Denominazione N. art. ➀ Coperchio SWA Uscita 80014 ➁ Valvola meccanica 80033 ➂...
- Page 45 5. Pezzi di ricambio SWA per il montaggio nella piastra di fondazione Tutti i pezzi di ricambio possono essere acquistati presso le aziende specializzate. Coperchio SWA Entrata 80013 Denominazione N. art. ➀ Coperchio SWA Uscita 80014 ➀ ➁ Valvola meccanica 80033 ➂...
-
Page 46: Manutenzione
La constatazio- duttore. L’inosservanza di tale avverten- ne di vizi evidenti deve essere comuni- Oltre al regime legale, la KESSEL AG ha za può comportare l’esclusione di diritti cata tempestivamente in forma scritta; in prolungato ad anni 20 il periodo di ga- di garanzia. - Page 48 Leader del drenaggio Edilizia residenziale privata senza collegamento alla fogna 1 2 3 4 1 2 3 4 Edilizia pubblica per es. Ospedale Edilizia pubblica per es. Impianti ricreativi 1 2 3 4 Edilizia commerciale per es. Albergo Edilizia commerciale per es.
- Page 49 DIRECTIVES POUR LE MONTAGE, LE SERVICE ET LA MAINTENANCE Clapet anti-refoulement KESSEL Staufix SWA pour tube de nettoyage KESSEL Controlfix pour eaux usées sans matières fécales Avantages du produit Pour eaux usées sans matières fécales Pour pose dans des conduits continus En cas de refoulement, les clapets se referment automatiquement (en fonction des modèles)
- Page 50 Table des matières 1. Généralités Emploi....................Page Description de l’installation............... Page Volume de la livraison ............... Page 2. Pose Instructions générales ..............Page Pose dans la dalle de fondation ............Page Pose dans la dalle de fondation approfondie ........Page Pose dans une conduite d’eaux usées non-protégée ......
-
Page 51: Volume De La Livraison
1.1 Utilisation de la Staufix SWA corps principal pour le clapet anti-refoulement Le clapet anti-refoulement KESSEL Staufix de KESSEL Staufix SWA. La directive de pose SWA a été conçu pour les conduits des eaux et d’installation suivante s’applique en consé- d’égout sans joints dans lesquels circulent... -
Page 52: Instructions Générales
2. Pose Instructions générales pour la pose des clapets anti-retour foulement fermé les eaux usées ne peuvent plus s’écouler depuis haut dans Il n’est pas admissible, d’après la DIN EN 12056 que tous les trous d’évacua- le canal et que d’après le principe des vases communicants rejoignent d’abord tion d’un bâtiment - aussi au-dessus du niveau de refoulement (bord supérieur les trous d’évacuation installés plus profondément en dessous du niveau de de rue) - disposent de clapets anti-refoulement, puisqu’avec un clapet anti-re-... - Page 53 être montées dans le sens du Grâce à la rehausse télescopique, le KESSEL- courant derrière le SWA (environ 1 m). Il faut Staufix SWA peut être adapté de manière conti- disposer, en outre, d’une distance d’apaise- nue à la profondeur de pose disponible. Les in- ment devant et derrière le SWA (au moins 1m).
-
Page 54: Pose Dans La Dalle De Fondation
2. Pose tention à ce que la lèvre d’étanchéité et le nez appropriée aux carrelages moins épais, car elle intercalaire selon la profondeur d’installation. de centrage soient dirigés vers haut. Le nez permet l’application d’un enduit pour atteindre Enduisez les joints d’une couche de graisse. de centrage doit être placé... - Page 55 Exemple de pose „cuve noire“ Exemple de pose „cuve blanche“ Pour le montage dans une cuve étanche blanche, KESSEL propose aussi une bande Fliesen Carrelage Carrelage Fliesen d’étanchéité...
- Page 56 3. Mise en service Contrôle de fonctionnement selon la DIN EN13564 ➁ Fermer la vanne batardeau (3) avec le levier à main. Retirer la vis de fermeture R1/2 “(1) du couvercle et visser la trémie (2). Verser de l’eau claire jusqu’à atteindre une hauteur de pression d’essai de 10 cm.
-
Page 57: Inspection
être placée à proximité directe du b) Retirer le couvercle c) Contrôler les joints couvercles avec un lubrifiant (par Staufix SWA (DIN 1986-3). exemple, de la graisse de robinet- teries) Supports de couvercles (d) Utiliser un lubrifiant ! Attention : ●... - Page 58 4. Inspection et maintenance mestre par un spécialiste. Pendant la mainte- nance le clapet anti-refoulement ne doit pas être alimenté avec des eaux usées. De plus, les points suivants doivent être exé- cutés : ① Retirer la saleté et les dépôts ②...
-
Page 59: Montage Des Deux Couvercles
4. Inspection et maintenance 4.2.1 Montage des deux couvercles voir figures11, 12) Introduire le couvercle par un côté, appuyer sur le bas sur l’autre côté et fermer avec les leviers de blocage. Fig. 11 Verrouiller les 4 leviers de fermeture Fig. - Page 60 5. Pièces de rechange Pose SWA pour pose dans le conduit des eaux d’égout non-protégé Toutes les pièces de rechange sont à votre disposition chez les revendeurs spécialisés. ➀ Marque Article n° ➀ Couvercle SWA entrée 80013 ➁ Couvercle SWA sortie 80014 ➂...
- Page 61 5. Pièces de rechange SWA pour pose dans la dalle de fondation Toutes les pièces de rechange sont à votre disposition chez les revendeurs spécialisés. Marque Article n° ➀ Couvercle SWA entrée 80013 ➁ ➀ Couvercle SWA sortie 80014 ➂ Clapet mécanique 80033 ➃...
- Page 62 6. Garantie 1. Si une livraison ou une prestation est défec- Une garantie ne peut être transmise qu’aux 2. KESSEL rappelle que l'usure n'est pas un tueuse, KESSEL s’engage, selon votre choix, objets nouvellement fabriqués. La durée de défaut pris en compte par la garantie. Il en est à...
- Page 64 Leader en solution d’assainissement Construction de logements privés sans raccordement au réseau d’assainissement public 1 2 3 4 1 2 3 4 Construction de logements privés sans raccordement au Construction publique, réseau d’assainissement public par exemple aménage- ment de loisirs 1 2 3 4 Local à...
- Page 65 KESSEL-terugstroomafsluiter Staufix SWA voor afvalwater zonder fecaliën GEBRUIKSAANWIJZING VOOR INBOUW, BEDIENING EN ONDERHOUD KESSEL-reinigingsbuis Controlfix Productvoordelen Voor afvalwater zonder fecaliën Voor inbouw in doorlopende buisleidingen Bij opstuwing automatisch sluitende kleppen (afhankelijk van variant) Optimale buisreiniging Traploze aanpassing aan de vloerbedekking door telescopisch in hoogte verstelbaar, draaibaar en kantelbaar opzetstuk Om te bouwen tot automatische terugstroombeveiliging voor fecaliën...
- Page 66 Inhoudsopgave Gebruik ..................... Pagina Omschrijving installatie ..............Pagina 1. Algemeen Leveringsprogramma................ Pagina Algemene instructies ................ Pagina Inbouw in de grondplaat..............Pagina 2. Inbouw Verdiepte inbouw in de grondplaat............ Pagina Inbouw in een vrijliggende afvalwaterleiding........Pagina Inbouw in drukkend water ..............Pagina Functiecontrole conform DIN EN 13564 ...........
-
Page 67: Algemeen
Het leveringsprogramma van de KESSEL- Geachte klant, 1.3 Leveringsprogramma en heropend. Het is aan te bevelen om de noo- Staufix SWA bestaat uit het basislichaam met Voordat u de automatische terugs- dafsluiter gesloten te houden bij vrij lange be- bedrijfs- en noodafsluiter (vervalt bij troombeveiliging van KESSEL Staufix drijfsonderbrekingen. -
Page 68: Algemene Instructies
2. Inbouw kan instromen, maar volgens het principe van de communicerende bui- Het is volgens DIN EN 12056 niet toegestaan alle afvoerpunten van een zen eerst uit de op het diepste punt geïnstalleerde afvoerpunten bene- Algemene instructies voor de inbouw van terugstroombeveiligingen gebouw - ook de punten boven het terugstroomniveau (bovenrand van den het terugstroomniveau (doorgaans kelderruimten) stroomt en daar- de straat) - via terugstroomafsluiters te beveiligen, omdat bij een ges-... - Page 69 2. Inbouw Staufix SWA dient horizontaal te worden uitge- Bij het aanleggen van de grondleidingen lijnd (zie afb. 1). Attentie a.u.b.: moet te allen tijde DIN EN 12056 worden op- De bijgevoegde profiellipafdichting in de gevolgd! Afvoerleidingen moeten te allen tijde groef van het tussenstuk leggen en invetten.
-
Page 70: Verdiepte Inbouw In De Grondplaat
2. Inbouw De tweede lipafdichting moet in de afdek- schikt, omdat tot op de vereiste hoogte kan lengstuk wordt gestoken. plaat worden aangebracht. Hierbij moet wor- worden gespateld. den opgepast dat afdichtingslip en centreer- b) Verlijmen van de tegels bv. met PCI-Silco- Bij de inbouw van meer dan twee tus- Attentie! neus bij de montage naar boven wijzen. - Page 71 Abdichtung Unterbeton Pakkingset (83023) • contraflens • afdichtingsbaan ➀ KESSEL-Pumpfix F, Staufix FKA, Stau- ➃ Tussenstuk DN 100 met persaf- fix SWA, Controlfix dichtingsflens van RVS art.nr. 27198 ➁ Pakkingset art.nr. 83023 ➄ Elastomere sperbaan art.nr. 27159 ➂ Verlengstuk art.nr. 83071 Inbouw met verlengstuk (bestelnr.
-
Page 72: Functiecontrole Conform Din En13564
3. Inbedrijfstelling Functiecontrole conform DIN EN13564 ➁ De noodafsluiter (3) met de handhendel afsluiten. De sluitschroef R1/ “ (1) op het deksel verwijderen en de trechter (2) opschroeven. Helder water inbrengen tot een testdrukhoogte van 10 cm is bereikt. Sluitschroef De hoogte van de waterspiegel (= testdrukhoogte) in de R1/2”... -
Page 73: Inspectie
4. Inspectie en onderhoud 4.1 Inspectie De terugstroomafsluiter moet één maal per maand door de exploitant of diens gemach- tigde worden geïnspecteerd. Hierbij moet de noodafsluiter worden gecon- troleerd door hem meerdere malen te ope- nen en te sluiten. Attentie a.u.b., dat na beëindiging van de in- spectie de noodafsluiter geopend moet zijn! Afb. - Page 74 4. Inspectie en onderhoud De terugstroomafsluiter moet minimaal eens per half jaar door een deskundige worden on- derhouden. Tijdens het onderhoud mag de te- rugstroomafsluiter niet worden belast met af- valwater. Noodafsluiter Hierbij moet het volgende worden uitgevoerd: ① Verwijderen van vuil en afzettingen voor gebruik ②...
-
Page 75: Montage Van De Twee Deksels
4. Inspectie en onderhoud 4.2.1 Montage van de twee deksels zie afb. 11, 12) Deksel telkens op één kant inbrengen, de andere kant naar beneden drukken en afsluiten met vergrendelingshendels. Alle vier de sluithendels vergrendelen Afb. 11 Afb. 12... -
Page 76: Onderdelen
5. Onderdelen SWA Voor inbouw in de vrijliggende afvalwaterleiding Alle onderdelen zijn te koop via het gespecialiseerde bedrijf. ➀ SWA-deksel toevoer 80013 Benaming Art.nr. ➀ SWA-deksel afvoer 80014 ➁ Mechanische klep 80033 ➂ Inschuifonderdeel voor mechanische klep 80034 ➃ 83031 ➄... - Page 77 5. Onderdelen SWA voor inbouw in de grondplaat Alle onderdelen zijn te koop via het gespecialiseerde bedrijf. SWA-deksel toevoer 80013 Benaming Art.nr. ➀ SWA-deksel afvoer 80014 ➁ Mechanische klep 80033 ➀ ➂ Inschuifonderdeel voor mechanische klep 80034 ➃ Afdichtingsset (voor deksel toevoer en afvoer) 70318 ➃...
- Page 78 De garantietermijn bedraagt 24 maanden vering of door de levering van een toestel zon- vanaf de levering aan onze partner. § 377 van 2. KESSEL wil met nadruk stellen dat slijtage der schade. Indien de bijkomende levering het Duitse Handelswetboek zijn verder van geen tekortkoming van het product is.
- Page 80 Toonaangevend in waterafvoertechniek Particuliere woningbouw zonder aansluiting op riool 1 2 3 4 1 2 3 4 Utiliteitsbouw bv ziekenhuis Utiliteitsbouw bv vrijetijdsvoorzieningen 1 2 3 4 Bedrijfsmatige bouw bv hotel Bedrijfsmatige bouw bv industriële bouw 2 3 5 Bedrijfsmatige bouw bv tankstations 1 2 3 4 Particuliere woningbouw...
- Page 81 INSTRUKCJA ZABUDOWY, OBSłUGI I KONSERWACJI Zawór zwrotny KESSEL Staufix SWA do ś cieków bez fekaliów Korpus/czyszczak KESSEL Controlfix Zalety produktu Do ścieków bez fekaliów Do zabudowy na przewodzie kanalizacyjnym Samoczynnie zamykające się klapy przy przepł ywie zwrotnym (zależnie od wariantu) Optymalne czyszczenie rury Pł...
- Page 82 Spis treści 1. Informacje ogólne Zastosowanie ....................strona Opis urządzenia....................strona Zakres dostawy ....................strona 2. Zabudowa Wskazówki ogólne..................... strona Zabudowa w pł ycie podł ogowej ..............strona Gł ębsza zabudowa w pł ycie podł ogowej............ strona Zabudowa na swobodnym przewodzie kanalizacyjnym ........strona Zabudowa w występującej wodzie ..............
-
Page 83: Informacje Ogólne
ś cieki. Zamykanie awaryjne umożliwia W zakres dostawy zaworu zwrotnego KESSEL ręczne zamykanie i otwieranie przewodu matycznego zaworu zwrotnego Staufix SWA Staufix SWA wchodzi korpus oraz zamknięcie ś ciekowego. Zaleca się, aby w przypadku względnie korpusu/czyszczaka Controlfix robocze i zamknięcie awaryjne (brak w przypadku dł... -
Page 84: Zabudowa
2. Zabudowa Ogólne wskazówki na temat zabudowy zabezpieczeń przeciwzalewowych zwrotnym woda nie może już spł ywać z góry do kanał u, tylko zgodnie z zasadą Wedł ug normy PN EN 12056 nie jest dopuszczalne zabezpieczenie wszystkich naczyń poł ączonych najpierw występuje z najniżej zainstalowanych miejsc miejsc odpł... - Page 85 Rys. 2 Rys. 3 gruntową wynosi 2 m. 2.1 KESSEL-Staufix SWA do zabudowy w pł ycie podł ogowej (nr art. 73100.10 S/X, 73125.10 S/X, Należy przewidzieć pustą rurę na kable do 73150.10 S/X, 73200.10 S/X). Odnosi się odpowiednio późniejszego wykonania dozbrojenia.
-
Page 86: Gł Ębsza Zabudowa W Pł Ycie Podł Ogowej
2. Zabudowa skierowane do góry. Nosek centrujący wł ożyć w można nał ożyć produkt do odpowiedniej Nasadkę przy wkł adaniu przedł użkę należy rowek (p. rys. 5). Podczas zabudowy należy wysokoś ci. odpowiednio skrócić. zwrócić uwagę na to, by dział anie agregatów w b) Ukł... - Page 87 Uszczelnienie Zestaw uszczelek (83023) • Przeciwkoł nierz • Taś ma uszczelniająca 1. KESSEL-Pumpfix F, Staufix FKA, Staufix SWA, 4. Łącznik DN 100 z dociskowym koł nierzem uszczelniającym ze stali nierdzewnej nr art. 27198 Controlfix 2. Zestaw uszczelek nr art. 83023 5.
-
Page 88: Uruchomienie
3. Uruchomienie Kontrolowanie funkcjonowania wg normy PN EN13564 Zamknięcie awaryjne (3) zamknąć za pomocą dźwigni ręcznej. Usunąć ś rubę zamykającją R “ (1) z pokrywy i przykręcić lejek (2). Wlać czystą wodę, do osiągnięcia wysokoś ci min. 10 cm. Wysokoś ć poziomu wody (= wysokoś ć kontrolną) w lejku należy obserwować... -
Page 89: Inspekcja I Konserwacja
Zdjąć pokrywę b) wyczyś cić wszystkie częś ci dnicę zamykania klap nasma- Staufix SWA (DIN 1986-3). c) Sprawdzić uszczelki rować ś rodkiem antyadhezyj- nym (np. smar do armatur). Uchwyt klapy(d) Należy użyć... - Page 90 4. Inspekcja i konserwacja Podczas konserwacji zawór zwrotny nie może być wypeł niony ś ciekami. Należy przy tym: 1. Usunąć zanieczyszczenia i osady Zamknięcie awaryjne 2. Sprawdzić uszczelki i powierzchnie uszczelniane, czy nadal są w nienagannym stanie; w razie zamknięte praca koniecznoś...
-
Page 91: Montaż Obu Pokryw
4. Inspekcja i konserwacja 4.2.1 Montaż obu pokryw (patrz rys. 11, 12) Pokrywy wsunąć po bokach, inną stroną wcisnąć na dół i zamknąć dźwigniami mocującymi. Zablokować wszystkie 4 dźwignie zamykające. Rys. 11 Rys. 12... -
Page 92: Części Zamienne
5. Części zamienne SWA do zabudowy na przewodzie swobodnym Wszystkie częś ci zamienne można zamówić w zakł adzie specjalistycznym. Oznaczenie Nr art. Dopł yw pokrywy SWA 80013 Odpł yw pokrywy SWA 80014 Klapa mechaniczna 80033 Częś ć wsuwana klapy mechanicznej 80034 Pokrywa 83031... - Page 93 5. Części zamienne SWA do zabudowy w pł ycie podł ogowej Wszystkie częś ci zamienne można zamówić w zakł adzie specjalistycznym. Oznaczenie Nr art. Dopł yw pokrywy SWA 80013 Odpł yw pokrywy SWA 80014 Klapa mechaniczna 80033 Częś ć wsuwana klapy mechanicznej 80034 Zestaw uszczelek (do dopł...
-
Page 94: Gwarancja
6. Gwarancja 7647> ?(<68> 6+*05(1C*, *?>9?*?(350, F*0,2@< 40,90D*> ,F30 +69:(8*?656 <(+30<> :6<(8 -084( ,99,3 4( 78(<6 <>)68; 97696); 769:D76<(50( *?> ;9:,82( ?69:(50, ;9;50D:( 5( *?> :,H <(+30<> 786+;2: 084( <>8(G50, 05-684;1, H, ?;H>*0, 50, 1,9: <(+C $6 9(46 +6:>*?> )AD+@< 2:@8, 76<9:(5C < <>502; <(+30<,1 2659:8;2*10 ?69:(50, <>40,5065>... - Page 96 Wiodący producent systemów odwadniania Budownictwo mieszkaniowebez podłączenia do kanalizacji Budynki użyteczności 2 3 4 publicznej, np. szpitale 2 3 4 Budowle ogólnodostępne np. obiekty rekreacyjne 2 3 4 Działalność gospo- darcza np. hotele Budownictwo przemysłowe 2 3 5 Budownictwo handlowo-usługowe np.
Need help?
Do you have a question about the Staufix SWA and is the answer not in the manual?
Questions and answers