
Related Manuals for NTI XTENDEX ST-IPFOUSB4K-L-LCVW


Summary of Contents for NTI XTENDEX ST-IPFOUSB4K-L-LCVW
- Page 1 ST-IPFOUSB4K-L/R-LCVW 4K HDMI USB KVM Extender with Video Wall Support Over IP via Two LC Singlemode/Multimode Fiber Optic Cables MAN374 REV 7/17/20...
-
Page 2: Table Of Contents
INTRODUCTION ................................1 FEATURES AND FUNCTIONS............................2 CONFIGURATION................................4 Setup Mode Configuration................................. 4 Operation Mode Configuration ................................5 System......................................5 Network ......................................9 Functions ..................................... 11 Video Wall Functions ................................... 19 INSTALLATION(TX/RX) ..............................23 USB over IP and KM over IP installation ............................23 Panel Button and Hotkey Operation .............................. -
Page 3: Introduction
INTRODUCTION The XTENDEX® 4K(30Hz) HDMI USB KVM Extender over IP via Fiber provides remote KVM (USB keyboard, USB mouse (USB1.x/USB2) and 4Kx2K UHD HDMI monitor) access to a USB computer up to 9,842 feet (3,000 meters) away via a duplex LC singlemode fiber optic cable and 1,804 feet (550 meters) using duplex LC multimode fiber optic cable. -
Page 4: Features And Functions
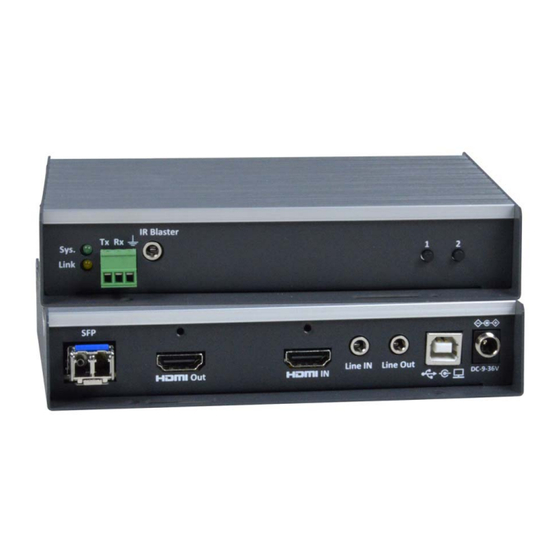
FEATURES AND FUNCTIONS ST‐IPFOUSB4K‐L‐LCVW Local Unit (TX) No. Connector Description Connect to managed Gigabit SFP Switch port or directly to RX 1 SFP Port using duplex LC fiber optic cable with pre-installed transceiver 2 HDMI OUT Local HDMI loop-out 3 HDMI IN Supports HDMI input video source up to 4K30Hz 4 Line in... - Page 5 ST‐IPFOUSB4K‐R‐LCVW Remote Unit (RX) No. Connector Description Connect to managed Gigabit SFP switch port or directly to TX using 1 SFP Port duplex LC fiber optic cable with pre-installed transceiver 2 HDMI Out Connect to HDMI screen by HDMI-to-HDMI cable 3 Mic. IN 3.5mm Mic.
-
Page 6: Configuration
CONFIGURATION Use TX/RX Configuration Web page to configure. There are Setup mode and Operation mode for the Configuration Web page. Setup mode can be used in the event you change the IP address of the unit in Operation mode and forget what it is. The Setup Mode IP address cannot be changed. -
Page 7: Operation Mode Configuration
Operation Mode Configuration To enter TX/RX Operation mode Configuration Web page: Set PC IP 10.0.1.1, Net Mask 255.0.0.0. Open Browser (we recommend Chrome), then enter TX/RX IP address 10.xx.xx.xx (the IP address can be found on the bottom of the unit). - Page 8 Configuration You can export the current settings to a configuration file, or import configuration from an external file. Enter Configuration ---> Click Save Configuration to export configuration, click Upload Configuration to import configuration. Utilities Commands ---> Factory Default ---> To reset the device to the factory default. Command --->...
- Page 9 EDID (TX only, not in RX) The TX provides flexible EDID selections: Copy EDID from EDID Master --->TX will get EDID from the RX with EDID Master setting. Copy EDID from 1 connecting RX after powered On--->TX will get EDID from the 1 connected RX.
- Page 10 Statistics Display system status for State Machine, Network, Video EDID, Video Screen attachment, Video Timing. ...
-
Page 11: Network
Network IP Setup (TX/RX) The system supports Auto IP, DHCP, and Static(default) for the IP configuration: Auto IP ---> 169.254.xxx.xxx (Auto), Subnet Mask 255.2555.0.0, Default Gateway 192.168.0.1 DHCP ---> Get IP from DHCP Server Static ---> Enter IP Address, Subnet Mask, Default Gateway, click Apply . ... - Page 12 In Unicast mode, you can select the Connection Method from First Available, OSD Transmitter List, TX IP and Direct Connection. RX supports the following Connection Methods: First Available: the RX will connect to the first available TX when powered on. Multicast IP 225.0.10x.xxx: the RX will connect to the TX with the same Multicast IP address specified here.
-
Page 13: Functions
Functions Device Name (TX/RX) To set TX/RX Device name, enter ---> Functions ---> Device Name --->input name (8 characters max) ---> Apply to save the Device Name. Video over IP (TX) Features Include: Enable Video over IP (Default: Enabled) Video/Graphic Mode :Select Video Mode for video play smoothly. Select Graphic Mode for static picture KVM application. - Page 14 Video over IP (RX) Functions ---> Video over IP : Enable Video over IP (Default Enabled). Enable Video Wall : Enable this setting for the Video Wall output. Copy EDID from this Video Output : To assign this RX as the EDID Master.
- Page 15 USB over IP (TX) Enable USB over IP ---> Check to enable TX’s USB over IP feature (default Enabled). It works as a 5-port Virtual HUB when TX is attached to a USB port on the PC. Up to 5 Virtual USB ports will be sequentially linked to the connected RX USB devices. There are 4 USB ports on each RX, but only the ports with devices attached (up to 5 total) will occupy the TX’s Virtual USB port.
- Page 16 USB over IP KMoIP ports (RX) There are 2 x USB 1.1 and 2 x USB 2.0 ports on each RX. These 4 USB ports can be configured for USB-over-IP or KM-over-IP devices. The USB-over-IP devices will be virtually linked to the TX’s 5 VirtualUSB ports; the KM-over-IP devices will be linked and shared with the TX’s K/M over IP HID emulation port.
- Page 17 Hotkey (RX) The RX supports Hotkey for OSD Menu. To choose the RX OSD Hotkey: Functions ---> Hotkey ---> select the Hotkey from the list: <Ctrl><Ctrl>, <Shift><Shift>, <Alt><Alt>, or <Scroll><Scroll> (default: Ctrl Ctrl).
- Page 18 Serial over IP (TX/RX) Serial over IP ---> Enable/Disable (default Enabled). Operation Mode Type 1: for Unicast application where user can dynamically link with any target RX. Type 2: for Multicast application where TX RS-232 will link with all of connected RXs (default).
- Page 19 Audio Output (RX) If the TX’s input audio is in HDMI, you can route the audio output on Line Out of the RX: Functions ---> Audio Output ---> check “HDMI Audio De-Embedder”. Click Apply to save the setting and reboot. (default Disabled) ...
- Page 20 Multi-Screen Setting (TX) The system supports Multi-Screen feature which is useful for PC with multiple screen outputs. As above TX Multi-Screen Setting Web page: Main Video : Enable this setting if this TX is connected to the PC’s main video output. Note: Any TX with Main Video setting disabled will not be shown on the OSD Transmitter List.
-
Page 21: Video Wall Functions
Video Wall Functions Remote Unit function only (RX) The RX comes with a Video-Wall feature. Multiple RXs can receive the same video stream and display on multiple screens in a grid. You can setup the Video-Wall either by using OSD (On Screen Display) or the Web page. The following section provides information for the Web page method of Video Wall setup. - Page 22 Basic Setup Enter RX Web page ---> Video Wall ---> Basic Setup . Bezel and Gap Compensation Enter the value for OW (Outside Width), OH (Outside Height), VW (View Width), VH (View Height) in 0.1mm units ---> Apply . Wall Size and Position Layout Select the value for Vertical Monitor Count, Horizontal Monitor Count, Row Position, Column Position from the drop-down menu --- >...
- Page 23 Video-Wall Advanced Setup The Advanced Setup can be used for special effects which are not included in Basic Setup. There are two steps in advanced setup: Step 1: Choose one or more target RXs to apply setup to. Step 2: After the targets are selected, changes can be applied in Step 2. ...
- Page 24 Screen Layout (Row x Column) Define the Video Wall size, select the Row and Column count from the drop-down menu. Row Position : Set the Row position for the selected target RX. (start from 0) Column Position :Set the Column position for the selected target RX. (start from 0) Horizontal Shift :Shift target screen horizontal to left/right in 1 pixel units.
-
Page 25: Installation(Tx/Rx)
INSTALLATION(TX/RX) 1. The factory default Connection Method for RX is “First Available”, and TX is in Multicast mode with its default Multicast IP (shown on the label). It means all TXs will send packets with default Multicast IP (225.0.10x.xxx), and all RXs will find the first available TX for connection. - Page 26 14. There are 2 methods to gain the access rights for a USB-over-IP port: 14.1 Pressing and hold for 3 sec.the RX Link button . 14.2 Press “U” key to toggle when the Transmitter List OSD menu is displayed. The RX monitor will display “Requesting USB” to indicate starting a USB-over-IP connection, and message of “Starting USB”...
- Page 27 ...
-
Page 28: Panel Button And Hotkey Operation
Panel Button and Hotkey Operation Press TX “Button 1” button to lock/unlock RX Keep pressing TX “Button 1” button for 3 seconds to lock/unlock the RX’s USB and KMoIP ports. The RX will display “Locked by TX” OSD message on the screen when it is locked. Press TX “Button 2”... - Page 29 While in the Transmitter List OSD Menu, you can: Press U to request/release USB-over-IP. Press F5 to refresh the Transmitter List. Press F8 to switch in between Name/IP/OSD modes. Press V to enter Video-Wall configuration. Press W to send the current display to other RX or RXs with VWall ID. ...
-
Page 30: Specifications
SPECIFICATIONS Local Unit Compatible with a USB computer (PC, SUN and MAC) with Ultra-HD HDMI output. Multiplatform support: Windows 2000/XP/Vista/7/8/10, Windows Server 2000/2003/2008/2012, Solaris, Linux, FreeBSD, and MAC OS 9/10. One female HDMI connector for source. One female HDMI connector for display. -
Page 31: Warranty Information
Environmental Operating temperature: 32 to 122°F (0 to 50°C). Storage temperature: -4 to 185°F (-20 to 85°C). Operating/storage relative humidity: 0 to 80% non-condensing RH. Regulatory Approvals RoHS TAA compliant Max Distance Using singlemode 9-micron cable, extend to 9,842 feet (3,000 meters). ...
Need help?
Do you have a question about the XTENDEX ST-IPFOUSB4K-L-LCVW and is the answer not in the manual?
Questions and answers