Table of Contents
Advertisement
Quick Links
Advertisement
Table of Contents

Related Manuals for NTI ST-IPUSB4K-L-VW


Summary of Contents for NTI ST-IPUSB4K-L-VW
- Page 1 ST-IPUSB4K-L/R-VW 4K2K HDMI with USB Over Gigabit IP Ethernet Setup Guide...
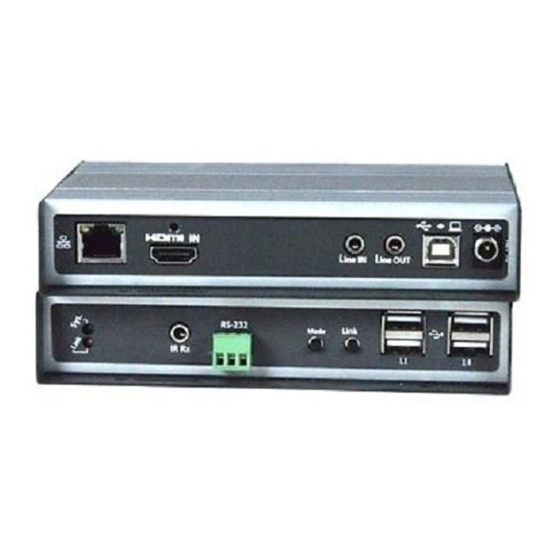
- Page 2 Panel and Connectors ST-IPUSB4K-L-VW Transmitter No. Connector Description Connect to Gigabit Ethernet switch or directly to Receiver. Gigabit Ethernet 2 HDMI in Connect to HDMI Source, or use HDMI-to-DVI adapter cable for DVI source. Audio line in, it will be extended to the Line Out of the Receiver.
- Page 3 ST-IPUSB4K-R-VW Receiver No. Connector Description Connect to Gigabit Ethernet switch or directly to Transmitter. Gigabit Ethernet 2 HDMI Out This HDMI output connector supports HDMI 4K2k, 1080p output. Microphone Input, it will be extended to the Line Out of Transmitter. 3 Mic.
-
Page 4: Operation Mode Configuration
Configuration The TX/RX unit built with Web page that supports Setup mode and Operation mode configuration. Setup Mode Configuration 1. Press and Hold the unit’s [Button 1]/[Link] button and Power ON until Green and Amber LED blinking then release the [Button 1]/[Link] button. -
Page 5: Network Configuration
The firmware upgrade takes about 3 min., it will display “DONE Rebooting…” to indicate the unit has been upgraded and rebooted. Network Configuration The TX/RX provides the following Network related settings: To change IP Enter TX/RX Operation Mode Web page [Network] --->[IP Setup] --->select Auto IP, DHCP, Static --->... -
Page 6: Functions Configuration
Functions Configuration The TX/RX provides Operation mode Web page for Functions Configuration. The following screenshot shows RX Web page as an example (TX is similar): To change Device Name Enter TX/RX Operation mode Web page ---> [Functions] ---> [Device Name] --->... -
Page 7: Multi-Screen Setting
IP] ---> [Timeout for detecting video lost] ---> select the Timeout value (default 10 sec.) Enter RX Operation mode Web page ---> [Functions] ---> [Video over IP] ---> [Turn off screen on video lost] ---> check/uncheck to Enable/Disable (default Enable) ... - Page 8 There is a RX option of “Mirror”, when it is enabled, the associated RXs will connect to the same TX as the Main RX is connecting. This enables multiple RXs to display the same TX as a splitter. Video Wall Configuration (RX only) ...
- Page 9 Reset to Basic Setup: Reset the target(s) to the setting of “Basic Setup”. Stretch Type: Fit In: Stretch the full screen to the whole wall. Stretch Out: keep picture aspect ratio and stretch out of the screen if needed. ...
-
Page 10: Installation
Installation The system factory default Connection Method for RX is “First Available”, and TX is in Multicast mode with its default Multicast IP which shown on the label. This means all of TXs will send packets with its default Multicast IP (225.0.xxx.xxx), and all of RXs will find the first available TX for connection. - Page 11 The KM-over-IP means that USB port will work as HID device only for keyboard/mouse emulation, the PC don’t get BIOS “Keyboard Error” if there is no real keyboard attached during boot up. It is not necessary to gain USB access right for the KM-over-IP port. The TX (PC) can be shared with multiple RXs for keyboard/mouse access in KM-over-IP mode.
- Page 12 picture indicates, the top line “TX01 (1/2)” means the current connection is “TX01” and there are 2 pages and currently it’s on page 1. The TX with an asterisk (*) mark indicates the current connected TX. You can select TX by the↑↓←→key and <Enter>, or 1 ~ 8 key to immediately connect to that TX. Press F5 to refresh Transmitter List.
Need help?
Do you have a question about the ST-IPUSB4K-L-VW and is the answer not in the manual?
Questions and answers