
Related Manuals for Motomaster 011-1962-8


Summary of Contents for Motomaster 011-1962-8
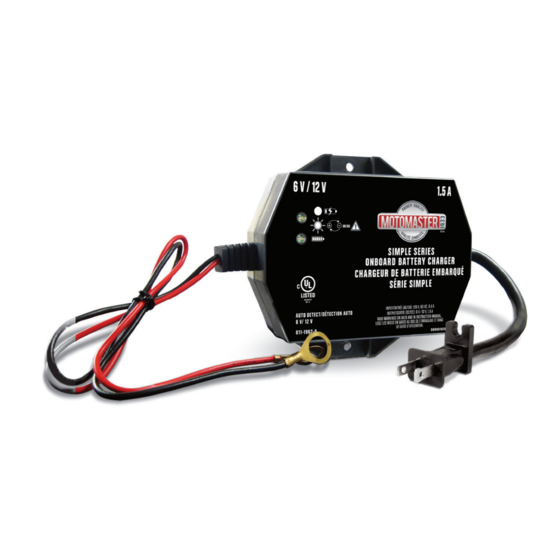
- Page 1 011-1962-8 ® SIMPLE SERIES Onboard Battery Charger IMPORTANT SAFETY INSTRUCTIONS. INSTRUCTION SAVE THESE INSTRUCTIONS. MANUAL This manual contains important safety and operating instructions. 0099002017-01...
-
Page 2: Warranty
This MotoMaster product carries a three (3) year warranty against defects in workmanship and materials. At its discretion, MotoMaster Canada agrees to have any defective part(s) repaired or replaced free of charge, within the stated warranty period, when returned by the original purchaser with proof of purchase. -
Page 3: Table Of Contents
d l i TABLE OF CONTENTS Warranty Safety Connecting Your Battery Mounting Your Charger Operation LED Indicators Charging Your Battery Battery Charging Times Automatic Voltage Detection Bad Battery Desulfation Mode Completion of Charge Maintain Mode (Float Mode Monitoring) Maintaining a Battery Maintenance Troubleshooting Technical Specifications... -
Page 4: Safety
011-1962-8 | contact us 1-888-942-6686 INTRODUCTION The MotoMaster Simple Series Onboard Battery Charger features advanced ® tabs microprocessor technology making battery charging faster, easier, and safer than ever before. This manual will explain how to use the charger safely and effectively. - Page 5 d l i To reduce risk of electric shock, unplug charger from outlet before • attempting any maintenance or cleaning. Turning off controls will not reduce this risk. WARNING – RISK OF EXPLOSIVE GASES. WORKING IN VICINITY OF A LEAD-ACID BATTERY IS DANGEROUS. •...
- Page 6 011-1962-8 | contact us 1-888-942-6686 Use charger for charging a LEAD-ACID battery only. It is not intended to • supply power to a low-voltage electrical system other than in a starter- tabs motor application. Do not use battery charger for charging dry-cell batteries that are commonly used with home appliances.
- Page 7 d l i PREPARING TO CHARGE • If necessary to remove battery from vehicle to charge, always remove grounded terminal from battery first. Make sure all accessories in the vehicle are off, so as not to cause an arc. Be sure area around battery is well ventilated while battery is being charged. •...
-
Page 8: Connecting Your Battery
011-1962-8 | contact us 1-888-942-6686 CONNECTING YOUR BATTERY FOLLOW THESE STEPS WHEN BATTERY IS INSTALLED IN VEHICLE. tabs WARNING: A SPARK NEAR THE BATTERY MAY CAUSE A BATTERY EXPLOSION. TO REDUCE THE RISK OF A SPARK NEAR THE BATTERY: Position AC and DC cords to reduce risk of damage by hood, door, or •... - Page 9 d l i FOLLOW THESE STEPS WHEN BATTERY IS OUTSIDE VEHICLE. WARNING: A SPARK NEAR THE BATTERY MAY CAUSE A BATTERY EXPLOSION. TO REDUCE THE RISK OF A SPARK NEAR THE BATTERY: • Check polarity of battery posts. POSITIVE (POS, P, +) battery post usually has a larger diameter than NEGATIVE (NEG, N, –) post.
-
Page 10: Mounting Your Charger
011-1962-8 | contact us 1-888-942-6686 ASSEMBLY tabs Remove all cord wraps and uncoil the cables prior to using the battery charger. MOUNTING INSTRUCTIONS MOUNTING THE CHARGER TO THE FENDER WELL Fig. 1 The charger can be mounted directly to... - Page 11 d l i d l i ELECTRICAL INSTALLATION The output leads of the charger are terminated with 3/8˝ dia. ring lugs. Route and secure the AC cord and the output wiring away from the gas line, carburetor or other hot, sharp, moving or pinch parts to avoid damage to the insulation (Fig.
-
Page 12: Operation
011-1962-8 | contact us 1-888-942-6686 OPERATION LED INDICATORS tabs Red LED (solid): The charger is charging the battery. • Red LED (flashing): The connections are reversed, or the battery is bad. • Green LED (solid): The battery is fully charged and the charger is in •... -
Page 13: Automatic Voltage Detection
d l i AUTOMATIC VOLTAGE DETECTION The charger is equipped with Auto Voltage Detection, which automatically detects whether the battery is 6 V or 12 V and then charges accordingly. BAD BATTERY If charging cannot be completed normally, the charger’s output is shut off and the Red LED will flash. -
Page 14: Maintain Mode (Float Mode Monitoring)
011-1962-8 | contact us 1-888-942-6686 MAINTENANCE MODE (FLOAT MODE MONITORING) When the Green LED is lit, the charger has completed charging and started tabs maintenance mode. In this mode, the charger keeps the battery fully charged by delivering a small current when necessary. -
Page 15: Maintenance
d l i MAINTENANCE A minimal amount of care can keep your battery charger working properly for years. Clean the ring terminals each time you are finished charging. Wipe off • any battery fluid that may have come in contact with the ring terminals, to prevent corrosion. -
Page 16: Troubleshooting
011-1962-8 | contact us 1-888-942-6686 TROUBLESHOOTING PROBLEM POSSIBLE CAUSE SOLUTION tabs Charger will not • Poor connection. • Ensure battery posts turn on when are clean and making properly connected. proper contact with the ring terminals. - Page 17 d l i PROBLEM POSSIBLE CAUSE SOLUTION Red LED is flashing. • Ring terminals are • Reverse the connection connected in reverse. of the ring terminals. • Desulfation failed. • Have the battery checked. • Maintain current is too • Do not charge and high.
-
Page 18: Technical Specifications
011-1962-8 | contact us 1-888-942-6686 model no. 011-1962-8 | contact us 1-888-942-6686 TECHNICAL SPECIFICATIONS tabs Input voltage 120 V AC Input frequency 60 Hz Input current 0.4 A Output Voltage 6 V or 12 V continuation tabs Output current 1.5 A/6 V DC... - Page 20 w a r n i n g s n o t e s c o n t i n u a t i o n t a b s t a b s h e a d l i n e b a r s...
- Page 22 w a r n i n g s n o t e s c o n t i n u a t i o n t a b s t a b s h e a d l i n e b a r s...
- Page 24 w a r n i n g s n o t e s c o n t i n u a t i o n t a b s t a b s h e a d l i n e b a r s...
- Page 26 w a r n i n g s w a r n i n g s n o t e s n o t e s c o n t i n u a t i o n t a b s c o n t i n u a t i o n t a b s t a b s t a b s...
- Page 28 w a r n i n g s n o t e s c o n t i n u a t i o n t a b s t a b s h e a d l i n e b a r s...
- Page 30 w a r n i n g s n o t e s c o n t i n u a t i o n t a b s t a b s h e a d l i n e b a r s...
- Page 32 w a r n i n g s n o t e s c o n t i n u a t i o n t a b s t a b s h e a d l i n e b a r s...
- Page 34 w a r n i n g s n o t e s c o n t i n u a t i o n t a b s t a b s h e a d l i n e b a r s...
- Page 36 w a r n i n g s n o t e s c o n t i n u a t i o n t a b s t a b s h e a d l i n e b a r s...
- Page 38 w a r n i n g s n o t e s c o n t i n u a t i o n t a b s t a b s h e a d l i n e b a r s...
Need help?
Do you have a question about the 011-1962-8 and is the answer not in the manual?
Questions and answers