Motomaster CLASSIC Series Instruction Manual
Hide thumbs
Also See for CLASSIC Series:
- Instruction manual (16 pages) ,
- Instruction manual (16 pages)

Related Manuals for Motomaster CLASSIC Series


Summary of Contents for Motomaster CLASSIC Series
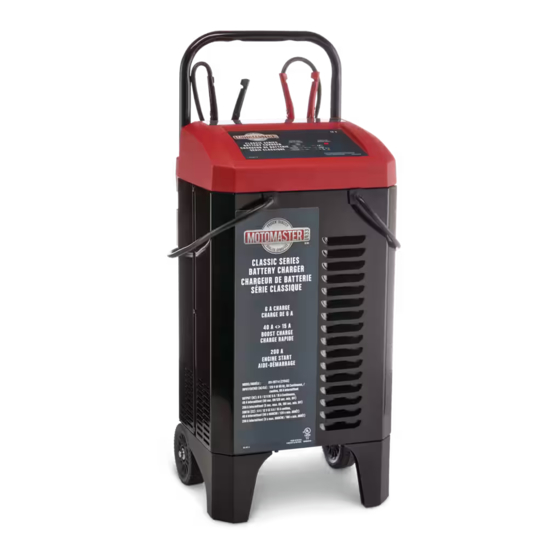
- Page 1 011-1977-4 ® CLASSIC SERIES Battery Charger IMPORTANT: INSTRUCTION Please read this manual carefully before running this battery charger MANUAL and save it for reference. 0099002023-00...
-
Page 2: Warranty
This MotoMaster product carries a three (3) year warranty against defects in workmanship and materials. At its discretion, MotoMaster Canada agrees to have any defective part(s) repaired or replaced free of charge, within the stated warranty period, when returned by the original purchaser with proof of purchase. -
Page 3: Table Of Contents
d l i TABLE OF CONTENTS Warranty Safety Connecting Your Battery Know Your Charger Operation Charging Your Battery Battery Charging Times Aborted Charge Desulfation Mode Completion of Charge Maintain Mode (Float Mode Monitoring) Maintaining a Battery Power-Up Auto Start Using the Engine Start Feature Maintenance Troubleshooting Technical Specifications... -
Page 4: Safety
011-1977-4 | contact us 1-888-942-6686 INTRODUCTION • To reduce risk of electrical shock, unplug the tabs charger from the outlet before attempting This MotoMaster battery charger features ® any maintenance or cleaning. advanced microprocessor technology making • DO NOT expose charger to rain or snow. - Page 5 d l i d l i USING AN EXTENSION CORD NEVER smoke or allow an open spark or • flame in the vicinity of the battery or engine. The use of an extension cord is NOT Batteries generate explosive gases. recommended.
- Page 6 headline bars headline bars model no. 011-1977-4 | contact us 1-888-942-6686 tabs tabs PREPARING TO CHARGE CHARGER LOCATION DO NOT expose charger to rain or snow. For batteries with removable vent caps, if • • required, add distilled water to each cell until Locate the charger as far away from the •...
-
Page 7: Connecting Your Battery
d l i BATTERY IN VEHICLE BATTERY IN VEHICLE (NEGATIVE GROUNDED) (POSITIVE GROUNDED) Before connecting and disconnecting the DC Before connecting and disconnecting the DC output clamps, remove the AC plug from the output clamps, remove the AC plug from the electrical outlet. - Page 8 headline bars headline bars model no. 011-1977-4 | contact us 1-888-942-6686 tabs tabs BATTERY REMOVED FROM VEHICLE Position yourself and the free end of cable Before connecting and disconnecting the DC output clamps, remove the AC plug from the as far away from battery as possible, then connect the negative (black) charger clip to electrical outlet.
-
Page 9: Know Your Charger
d l i START/STOP BUTTON LED INDICATORS Press to immediately begin charging your properly • Charging (yellow) LED lit: connected battery. If the button is not pressed, The charger is charging the battery. charging should begin automatically in 30 seconds. •... -
Page 10: Operation
headline bars model no. 011-1977-4 | contact us 1-888-942-6686 tabs CHARGING YOUR BATTERY BATTERY CHARGING TIMES Ah – Amp Hour Follow the instructions in the Connecting CCA – Cold Cranking Amps Your Battery section to connect your battery, RC – Reserve Capacity and then connect the charger to a live AC NR –... -
Page 11: Desulfation Mode
d l i DESULFATION MODE MAINTAINING A BATTERY If the battery is left discharged for an extended This product charges and maintains 12 V period of time, it could become sulfated and not batteries. The maintain mode technology allows accept a normal charge. If the charger detects you to safely charge and maintain a healthy a sulfated battery, the charger will switch to a battery for extended periods of time. -
Page 12: Using The Engine Start Feature
headline bars headline bars model no. 011-1977-4 | contact us 1-888-942-6686 USING THE ENGINE START FEATURE ENGINE STARTING NOTES tabs tabs During the starting sequence listed above, the Your battery charger can be used to jump start charger is set to one of four states: your car if the battery is low. -
Page 13: Maintenance
d l i MAINTENANCE A minimal amount of care can keep your battery charger working properly for years. • Clean the clamps each time you are finished • Coil the input and output cords neatly when storing the charger. This will help prevent charging. -
Page 14: Troubleshooting
headline bars model no. 011-1977-4 | contact us 1-888-942-6686 tabs PROBLEM POSSIBLE CAUSE SOLUTION The charger will not • AC outlet is dead. • Check for open fuse or circuit turn on when properly breaker supplying AC outlet. connected. • Poor electrical connection. •... - Page 15 d l i PROBLEM POSSIBLE CAUSE SOLUTION The Red LED is blinking. • The battery voltage is still below 10 V • The battery may be defective. Make after 2 hours of charging. sure there are no loads on the battery. (or) If there are, remove them.
-
Page 16: Technical Specifications
60 Hz Input current 6 A cont., 65 A int. continuation tabs Output voltage 12 V Output current 12 V DC 6 A/15 A cont. 40 A/200 A int. notes warnings Made in Mexico Motomaster Canada Toronto, Canada M4S 2B8...
Need help?
Do you have a question about the CLASSIC Series and is the answer not in the manual?
Questions and answers