Table of Contents
Advertisement
Quick Links
Necessary tools:
Pencil,ruler
Fretwaw
Workshop file
Sand paper
Glue ( waterproof )
Hot glue gun
Drill ø2 mm
Crosshead screwdriver
Scissors, craft knife
Soldering iron,solder
Paints, Brush
PARTS LIST
Plywood
Styrodur
Wood strip
Self tappers
Motor
Micro switch
Battey battery
Wiring
Propeller
Distance piece
E113141#1
113.141
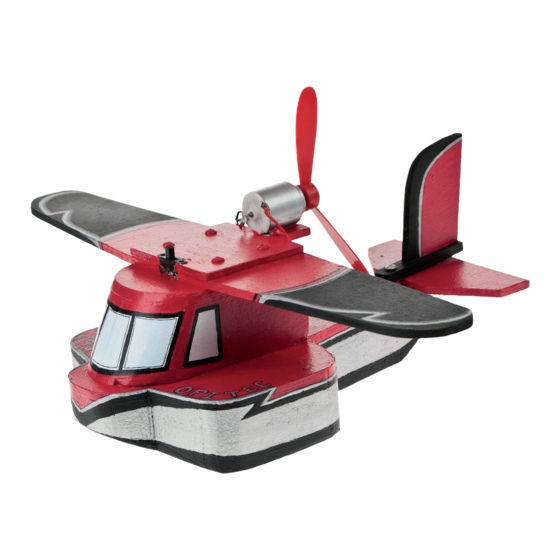
S e a p l a n e
The OPITEC range of projects is not intended as play
toys for young children.They are teaching aids for young
people learning the skills of Craft, Design and Technolo-
gy.These projects should only be undertaken and tested
The finished projects are not suitable to give to children
under 3 years old. Some parts can be swallowed. Dan-
Quantity
Size (mm) Description
1
300x210x4
Basic form, Wings, Rudder
Basic form
1
200x200x30
Support,Rudder
1
75x10x5
Joining
5
1
ø20 Motor
1
19x6
Switch
1
Energy source
1
500
Cable
1
Propeller
Spacer
1
Please Note
with the guidance of a fully qualified adult.
ger of suffocation!
Part-Nr.
1
2
3
4
6
7
8
9
10
11
1
Advertisement
Table of Contents

Subscribe to Our Youtube Channel
Related Manuals for Opitec 113.141


Summary of Contents for Opitec 113.141
- Page 1 Workshop file Sand paper Please Note Glue ( waterproof ) The OPITEC range of projects is not intended as play Hot glue gun toys for young children.They are teaching aids for young Drill ø2 mm people learning the skills of Craft, Design and Technolo- Crosshead screwdriver gy.These projects should only be undertaken and tested...
- Page 2 Instructions 1. The pattern s for the hull construction (4) can be traced on to the Styrodur foam (2) and cut out with a Fretsaw. Angle the front and rear ca 20 degrees with a worshop file as shown. Trace the parts (b+c) from the plans on the styrodur remainder and cut them out Cutting plan (Styrodur): Front Front...
- Page 3 Instructions 5. Assemble and glue the parts together as shown. 6. Take the wings (g+h) and glue them in place as shown. Leave to dry thoroughly. Make sure that the slot for the switch faces forward and that the wings line up with each other (See diagram). 7.
- Page 4 Ø 2 Instructions 9. Take the wooden strip (3) and cut it to 60mm long and round the ends. Drill Ø 2 Ø 2 the 2mm hole. Glue the tail fin (i) on the wooden strip (3) glue it in the middle of the strip lined up with the back.
- Page 5 Instructions Wings + Base Scale1:1 Wing Wing Patterns Styrodur + Plywood 2mm-hole ..drill only in the plywood! Scale 1:1 E113141#1...
- Page 6 E113141#1...
- Page 7 Instructions Pattern Cover, Roof, Fin Scale 1:1 Roof Cover tail plane E113141#1...
Need help?
Do you have a question about the 113.141 and is the answer not in the manual?
Questions and answers