Table of Contents

Subscribe to Our Youtube Channel
Related Manuals for Avalue Technology BMX-T522-SK


Summary of Contents for Avalue Technology BMX-T522-SK
- Page 1 BMX-T522-SK Fanless Intel® 6th Gen Core™ SoC i7/i5/i3 & Celeron® Processor Mini ITX Box PC Quick Reference Guide Ed –07 June 2017 Copyright Notice Copyright 2017 Avalue Technology Inc., ALL RIGHTS RESERVED. Part No. E2017BMSKA0R...
- Page 2 Disclaimer Avalue Technology Inc. reserves the right to make changes, without notice, to any product, including circuits and/or software described or contained in this manual in order to improve design and/or performance. Avalue Technology assumes no responsibility or liability for the...
-
Page 3: Table Of Contents
Serial port 1~6 connector (COM1~6) ..................12 2.1.2 General purpose I/O connector 1 (GPIO1) ................12 2.1.3 General purpose I/O connector 2 (GPIO2) ................13 Installing SD card (BMX-T522-SK) ..............14 Installing Hard Disk (BMX-T522-SK) ..............15 BMX-T522-SK Quick Reference Guide... -
Page 4: Getting Started
Place all electronic components in a static-dissipative surface or static-shielded bag when they are not in the chassis. 1.2 Packing List 1 x BMX-T522-SK Other major components include the followings: — Adapter — Power Cord 4 BMX-T522-SK Quick Reference Guide... -
Page 5: System Specifications
AT/ATX mode Switchable Through Jumper (Default: ATX mode) Power Connector Type Lockable DC Jack Dimension 180 x 182 x 76 (L x W x H) Weight 2.3 kg Color Black Fanless BMX-T522-SK Quick Reference Guide... - Page 6 Reference IEC 60068-2-29 Testing procedures Test Eb : Bump Test Mechanical Shock Test 1. Wave form:Half Sine wave 2. Acceleration Rate:10g for operation mode 3. Duration Time:11ms 4. No. of Shock:Z axis 300 times 6 BMX-T522-SK Quick Reference Guide...
- Page 7 0°C ~ 55°C (32°F ~ 131°F) (w/SSD, M.2), ambient w/ air flow Operating Humidity 0% ~ 90% Relative Humidity, Non-condensing Storage Temperature -20°C ~ 75°C (-4°F ~ 167°F) Note: Specifications are subject to change without notice. BMX-T522-SK Quick Reference Guide...
-
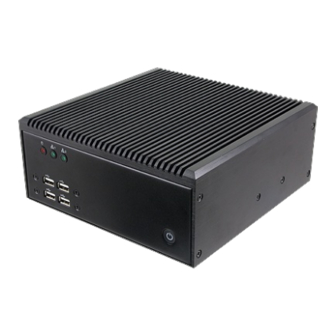
Page 8: System Overview
BMX-T522-SK 1.4 System Overview 1.4.1 Front/Rear/Side View 8 BMX-T522-SK Quick Reference Guide... - Page 9 4 x USB3.0 connector USB3.0 COM1~6 Serial port 1~6 connector DC power-in connector DCIN HDMI HDMI connector DP1/2 DP connector 1/2 Line-out Line-out audio jack Mic-in audio jack Mic-in GPIO1/2 General purpose I/O connector 1/2 SD card slot BMX-T522-SK Quick Reference Guide...
-
Page 10: System Dimensions
BMX-T522-SK 1.5 System Dimensions (Unit: mm) 10 BMX-T522-SK Quick Reference Guide... -
Page 11: Hardware Configuration
Quick Reference Guide 2. Hardware Configuration For advanced information, please refer to: 1- EMX-SKLUP User’s Manual Note: If you need more information, please visit our website: http://www.avalue.com.tw BMX-T522-SK Quick Reference Guide 11... -
Page 12: Bmx-T522-Sk Connector Mapping
BMX-T522-SK 2.1 BMX-T522-SK connector mapping 2.1.1 Serial port 1~6 connector (COM1~6) Signal PIN PIN Signal 2.1.2 General purpose I/O connector 1 (GPIO1) Signal PIN PIN Signal 12 BMX-T522-SK Quick Reference Guide... -
Page 13: General Purpose I/O Connector 2 (Gpio2)
Quick Reference Guide 2.1.3 General purpose I/O connector 2 (GPIO2) Signal PIN PIN Signal BMX-T522-SK Quick Reference Guide 13... -
Page 14: Installing Sd Card (Bmx-T522-Sk)
BMX-T522-SK 2.2 Installing SD card (BMX-T522-SK) Step1. Insert SD card into SD slot. 14 BMX-T522-SK Quick Reference Guide... -
Page 15: Installing Hard Disk (Bmx-T522-Sk)
Quick Reference Guide 2.3 Installing Hard Disk (BMX-T522-SK) Step1. Remove 10 screws from rear and each side before removing back cover. Step2. Secure HDD by means of 8 screws. Step3. Re-assemble your system back through previous steps to complete the installation.
Need help?
Do you have a question about the BMX-T522-SK and is the answer not in the manual?
Questions and answers