Table of Contents
Advertisement
Quick Links
Package Content
Inspect the packaging carton. Make sure the Optiview H.264 DVR is properly delivered. Remove
all items from the box and make sure the box contains the following items.
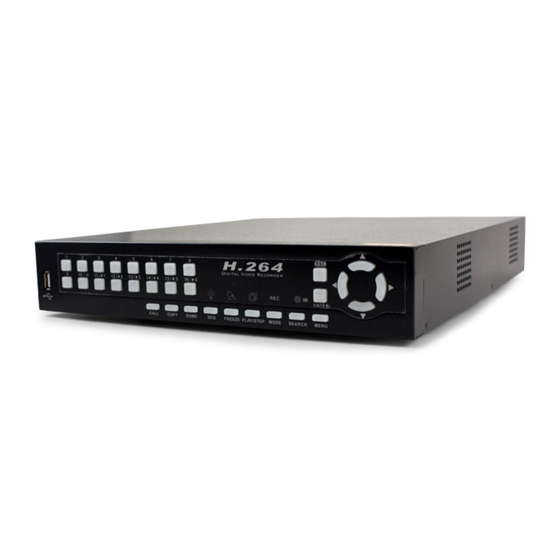
Optiview H.264 DVR
Function Keys on the Front Panel
1
Channels (4 / 8 / 16)
2
ENTER
3
ESC
4
Direction Keys
5
CALL
Rear Panel Connectors
1
USB Connectors
2
LAN 10/100M (RJ-45)
Main Monitor – VGA
3
(Optional)
4
Call Monitor Audio Out
Optiview
Optiview H.264 DVR
Setup Guide
6
COPY
7
DOME
8
SEQ (Sequence)
9
FREEZE
10
PLAY/STOP
5
Call Monitor
6
Video Input (BNC)
Alarm In, RS-485, &
7
Audio In
8
Main Monitor Audio Out
Power
Power
Adapter
Cord
11
MODE
12
SEARCH
13
MENU
9
Main Monitor - BNC
10
Power Jack
UTP Input
11
(Optional)
Software
User's
CD-CMS
Manual
Advertisement
Table of Contents

Related Manuals for Optiview H.264


Summary of Contents for Optiview H.264
- Page 1 Optiview H.264 DVR Setup Guide Package Content Inspect the packaging carton. Make sure the Optiview H.264 DVR is properly delivered. Remove all items from the box and make sure the box contains the following items. Power Power Software User’s Optiview H.264 DVR...
-
Page 2: Description Of Connectors
Description of Connectors There are three USB 2.0 ports (2 at rear + 1 at front) to allow users to USB Connector connect external USB devices to the unit, such as a USB ® ThumbDrive or a USB mouse. The DVR is capable of networking. Once the unit is connected to the LAN 10/100M LAN network, users can remotely access the unit through the remote (RJ-45) -
Page 3: Pin Definition Of Alarm I/O, Rs-485, & Audio In
Pin Definition of Alarm I/O, RS-485, & Audio In 4ch-Model: Definition Definition Definition Alarm In 1 Ground Alarm In 2 Audio In 4 Ground Alarm In 3 Audio In 3 Ground Alarm In 4 RS485 D+ Alarm Out COM RS485 D- Audio In 2 Alarm Out C Ground... -
Page 4: Basic Setup
Setup; other setting will be automatic arranged by the unit. Consider application needs and select a Preset Configuration setting from <Best Quality>, <Standard>, and <Extended Record>. Detailed information refers to Optiview H.264 DVR User’s Manual, Preset Record Configuration. -
Page 5: Network Setup
Note that ID number must match the ID address defined by the dome camera. To configure the RS-485 parameters, select <System Setup> from OSD main menu, and then select <RS485 Setup>. The default Optiview H.264 DVR RS-485 settings are 9600 Baud, 8 Data Bits, 1 Stop Bit and No Parity. -
Page 6: Basic Playback Operation
Dome Camera Control Keys: Set / Go Preset Pan / Tilt Iris Close Enter Dome Camera Toggle Hint Screen Iris Open Control Mode Enter / Auto Focus Near Zoom Out Focus Far Zoom In Basic Playback Operation Searching Recorded Video by Time: Press SEARCH button to enter the Search menu. -
Page 7: Using Remote Software
Click <OK> to accept the settings and close the <Security Settings> screen. Using the Remote Software: Start the IE and enter the IP address of the Optiview H.264 DVR in the address bar. The ActiveX controls and plug-ins dialog will show twice for confirmation; click <YES> to accept ActiveX plug-ins. - Page 8 Version verification starts automatically to verify whether DVRRemote was installed. This process may take up to 30 seconds. When the software is completely downloaded and installed, the Login Screen is displayed. Enter the username and password. The default usernames and passwords are admin: 1234, user: 4321.
- Page 9 DVRRemote Playback To Playback Remote Video: Click <Play> on the main window toolbar, and then <Remote Playback> tab. The <From> and <To> on top of the screen display the date and time from which recorded video is available for playback. Choose <Playback>...
Need help?
Do you have a question about the H.264 and is the answer not in the manual?
Questions and answers