Advertisement
Quick Links
Please read this entire manual before proceeding with installation.
What is in the box:
Quick-Release Base Kit:
(2) Base brackets
(1) Stiffening plate
(4) Knobs with washers
The Base Kit is required for either the other two bracket options below. You
may have purchased only one of these so the other may not be in your order:
Adjustable Brackets Kit:
(2) adjustable bracket assemblies
(1) 7/8" Aluminum crossbar
(2) M6 x 16 screws
(2) M6 lock washers
(2) M6 flat washers
(4) M5 Phillips truss screws
(4) M5 plastic flat washers
(4) soft rubber washers
MadStad Robo Knob Brackets
Adjustable Windshield Mount
™
Yamaha FZ-09
BASE KIT
ADJUSTABLE
BRACKETS
KIT
Advertisement

Related Manuals for MadStad Engineering Robo Knob Brackets

Summary of Contents for MadStad Engineering Robo Knob Brackets
- Page 1 MadStad Robo Knob Brackets Adjustable Windshield Mount Yamaha FZ-09 ™ Please read this entire manual before proceeding with installation. What is in the box: Quick-Release Base Kit: (2) Base brackets (1) Stiffening plate (4) Knobs with washers BASE KIT The Base Kit is required for either the other two bracket options below. You...
- Page 2 FLYSCREEN Flyscreen Kit: (2) fly screen brackets (with well nuts) (1) Fly Screen (4) M5 Phillips screws (4) M5 plastic flat washers (4) soft rubber washers BASE KIT INSTALLATION Everything attaches to the Quick-Release Base so let’s get that installed first. It has a 6-point attachment which are the four very visible screws on the front of the bike above the headlight, and the two screws that sit sideways at the front of the top triple clamp.
- Page 3 The instructions for installation are in the images on this page and the next. NOTE: Before beginning, we recommend that you remove the two side screws completely at first, and apply a drop of blue thread locker to each one. Although they may stay tight just fine, this extra procedure will insure that they don’t vibrate loose over time.
- Page 4 Make sure all six screws are tightened before continuing.
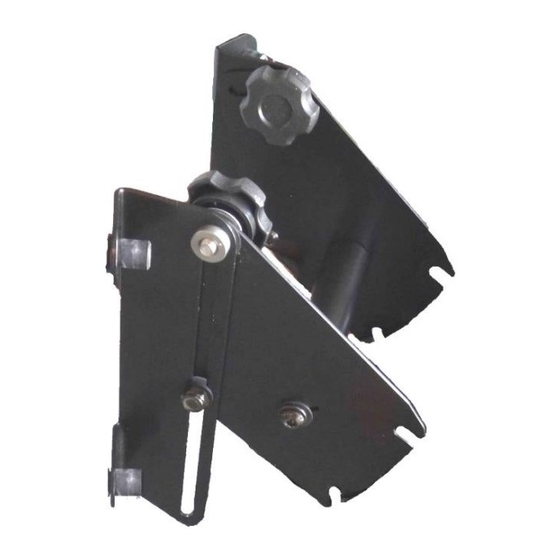
- Page 5 ADJUSTABLE BRACKETS INSTALLATION The adjustable brackets are connected with a crossbar. It’s probably easiest to slide the two brackets into the base first and then attach the crossbar. The base will keep them in place and make this process easier. STEP 1: Slide the slotted bottoms of the adjustable brackets into the knob screws on the base.
- Page 6 STEP 2: Once both adjustable brackets are in, put the crossbar between them at the crossbar hole in the center of the upright brackets. You will note that there is a hole with a slot, and that the crossbar has a pin sticking out of one end.
-
Page 7: Windshield Installation
Windshield Installation Once bracket adjustment is complete, the windshield attaches to the brackets with T-screws and rubber washers as shown below. Insert all four screws and washers into the four windshield holes as shown at right before attempting to attach the windshield onto the RoboBrackets. We recommend that you first install the upper and lower screws on one side, then install the upper and... - Page 8 FLY SCREEN INSTALLATION M5 truss screw Rubber washer The fly screen attaches to the Plastic flat washer quick-release base just like the Fly Screen adjustable brackets do, with slotted brackets that slip in under the knobs. First you will have to assemble the brackets onto the fly screen. Please refer to the hardware diagram above for hardware placement and the photo below for bracket position.
- Page 9 Adjusting the Robo Knob Brackets The knob screws on the MadStad adjustable brackets allow the windshield to slide and tilt. These knob screws must always be tightened securely before riding. DO NOT attempt to adjust the brackets while riding! You must come to a complete stop before making adjustments.
- Page 10 PIVOT SCREWS The MadStad mount has a pivot screw on each set of brackets, located near the center of the bottom bracket. A nylon lock nut keeps the screw snugly in place, yet allows the brackets to slide back and forth. It is adjusted at the factory to have a minimum of play yet still allow the brackets to move.
-
Page 11: Returns And Warranty
Disclaimer Neither MadStad Engineering nor its owners shall be liable for any damages, consequential or inconsequential, resulting from the use of our products. Installation of any of our products constitutes acceptance of these terms. It is the responsibility of the user to make sure all fasteners are... - Page 12 MadStad Engineering, Inc. 1451 E. Jefferson Street Brooksville, Fl 34601 U.S.A. Phone: 352-848-3649 Web Site: http://www.madstad.com Email: support@madstad.com Thank you for your support, and ride safely! April 12, 2018...
Need help?
Do you have a question about the Robo Knob Brackets and is the answer not in the manual?
Questions and answers