Table of Contents
Advertisement
Quick Links
Advertisement
Table of Contents

Related Manuals for Data I/O FLX500


Summary of Contents for Data I/O FLX500
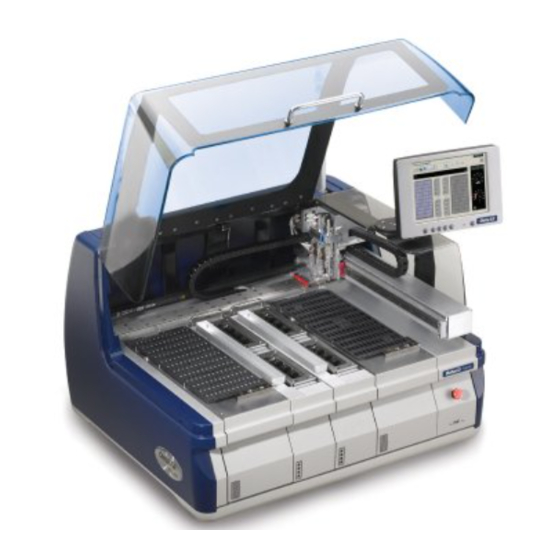
- Page 1 Contents Contact Us M a i n t a i n i n g t h e Flash Programming Handler After initial set up— Please run and record the Performance Verifica- tion Kit to establish a reference speed. 096-0257-002D...
- Page 2 FLX500 Data I/O endeavors to ensure that the information in this document is accurate. Data I/O assumes no liability for errors, or for any incidental, consequential, indirect, or special damages, including, without limitation, loss of use, loss or...
-
Page 3: Table Of Contents
Contents 1 … Tools and Materials • 1 Installing a Keyboard and Mouse • 1 Log File • 3 Adding Antivirus Software • 4 Run PV-Kit • 5 Spares Kits • 6 Hazardous Substance Restrictions • 6 2 … Periodic Maintenance • 9 Gantry Movement and Alignment •... - Page 4 Data I/O FLX500 —ii—...
-
Page 5: Tools And Materials
Installing a Keyboard and Mouse The FLX500 incorporates a touch screen; however, some maintenance procedures require the use of a keyboard and mouse. The keyboard and mouse plug into the back of the FLX500. See Fig- ure 1 on the next page. —1—... - Page 6 Data I/O FLX500 Chptr 1 On early models using PS/2 ports, the system power must be recycled after connecting a key- board and mouse. Connecting a keyboard and mouse depends on your model. See the configuration in Figure 1 that matches your model.
-
Page 7: Log File
USB port first. See Figure 1. (Power does not need to be cycled.) Log File The FLX500 provides a log file that helps when diagnosing problems. The file name has the date and time the log was created and ends with .txt. -
Page 8: Adding Antivirus Software
Data I/O FLX500 Chptr 1 Two good ways to view the log files are: • In the diagnostics—Tap Tools > Enter PIN (Personal Identification Number) > Tap OK > and View Log at bottom. • Connecting a keyboard and mouse— see previous headings. -
Page 9: Run Pv-Kit
(PPH) to compare to if you experience trouble in the future. All hardware required to run the PV-Kit job, including 16 devices, came with the FLX500. Con- tact Data I/O for information about ordering replacement parts for the PV-Kit. -
Page 10: Spares Kits
Data I/O FLX500 Chptr 1 Spares Kits A Basic Spares Kit is available for the FLX500. Data I/O Part Number Basic Spares Kit 952-0377 Hazardous Substance Restrictions Disposal of FLX500 Dispose in a separately managed collection for electronic equipment (per Directive 2002/96/EC) or return to Data I/O (no charge). - Page 11 1 … Tools and Materials Hazardous Substance —7—...
- Page 12 Data I/O FLX500 Chptr 1 blank page —8—...
-
Page 13: Periodic Maintenance
2 … Periodic Maintenance WARNING High voltage.— Do not remove any panels or FLX500 covers on the . There are no customer-ser- viceable parts behind the covers. High voltage may be present and exposed if covers are removed. High voltage can cause injury or death. -
Page 14: Gantry Movement And Alignment
Data I/O FLX500 Chptr 2 FLX500 NOTE: Once a year, Programmer Module performance can be verified or returned to Data I/O for verification. See Annual Performance Verification on page Gantry Movement and Alignment The FLX500 gantry scans fiducials on the Tray Modules and Programmer Modules using an optical sensor on the PNP Head. -
Page 15: Weekly Maintenance
Perform the system Self-test once each week to verify proper operation of all internal electronic systems. NOTE: The Self-test runs automatically FLX500 when power is applied to the unit. To run the Self-test: End a job if one is running. - Page 16 Data I/O FLX500 Chptr 2 Clear all devices or cards from the sockets and from the work surface. Close the FLX500 Application with the Exit button. Turn off the power by pressing the power switch (right side) once and releasing. Then push it and release once more to turn it on again.
- Page 17 2 … Periodic Maintenance Weekly Maintenance clean so the PNP Head optic sensor can accu- rately detect the position of the modules. NOTE: A fiducial scan is run automatically when starting a job if any modules have been changed and for the first job after startup. The scan can also be run any time via the Diagnostic Windows.
- Page 18 Data I/O FLX500 Chptr 2 Figure 5—A Programmer Module fiducial. Module surfaces may be too dark or too bright for a successful scan and may need to be pol- ished (if too dark) or scuffed (if too bright). For optic values and correcting surface reflection, see Fiducial Scan Errors on page 28.
-
Page 19: Monthly Or Quarterly Maintenance
Calibration Tool, a 4 mm hex key (Allen wrench), and a PIN (Personal Identi- fication Number) to access the Diagnostics Windows (after tapping the Tools button). Figure 6—The FLX programmer calibration tool is Part Number 615-7054 (and came with your 2009 or later FLX500). —15—... - Page 20 Data I/O FLX500 Chptr 2 Figure 7—The Alignment Window within the Diag- nostics tools offers probe offset calibrations. Cleaning the Cover and Work Surface Tools Required: • isopropyl alcohol and cloth Lightly clean the cover and work surface with isopropyl alcohol on a cloth every four months.
- Page 21 2 … Periodic Maintenance Monthly or Quarterly Perform the following probe blowout procedure quarterly and at times when pick failures occur often. This interval is dependent on the amount of machine use and air quality. Adjust your inter- val as required. For example, preventing the probes from drawing in air for long periods of non-use—using Automatic Air Management (see the on-screen Diagnostic Help) or manually...
- Page 22 Data I/O FLX500 Chptr 2 Figure 9—Air tubes on barbed fittings—one for each probe—and air filters. Use clean and dry compressed air .48-.62 MPa (70-90 PSI max) to blow into one tube. Stop and start the compressed air flow sev- eral times.
- Page 23 2 … Periodic Maintenance Monthly or Quarterly Replace Parts in Reverse Order NOTE: If filters are dirty (not white by sev- eral shades and possibly have visible debris) replace the filters with new ones: see Step 6.– of Checking Air Filters on page 20. 12.
-
Page 24: Annual Maintenance
Data I/O FLX500 Chptr 2 Annual Maintenance • Checking Air Filters • Gantry Lubrication • Annual Performance Verification Checking Air Filters The PNP Head uses two air filters. Visually check the filters for dirt each year (filters are not white by several shades and possibly have visi- ble debris). - Page 25 Repeat for the lower filter. Release the Emergency-stop button. Gantry Lubrication The FLX500 has two Ball Rail Systems in the gan- try. The larger rail defines the X-axis (left-right) and the smaller rail, which is on the PNP Arm, defines the Y-axis (front-back).
- Page 26 Data I/O FLX500 Chptr 2 Using the supplied tube with a needle end, apply the lube to the two holes on the bot- tom side of the carriage. Since the holes on the top side are not acces- sible, apply the lube generously to the upper V-groove with a soft, lint-free cloth.
- Page 27 Diagnostic Adapter Board 910-2200-003 Once a year, perform the Performance Verifica- tion using the DAB, or send the FLX500 Program- mer Modules to Data I/O for performance verification. Include the PPH results from the PV-Kit when sending the FLX500 unit to Data I/O.
- Page 28 Data I/O FLX500 Chptr 2 blank page —24—...
-
Page 29: Troubleshooting
3 … Troubleshooting For troubleshooting items not found here, see the FLX on-screen Diagnostics Help for a thorough troubleshooting tree. This Help is only available when in the diagnostics area of the software interface (opened with the Tools button). The Diagnostics Windows require a PIN (Personal Identification Number) for access. -
Page 30: Rerunning The Pv-Kit
Data I/O FLX500 Chptr 3 Rerunning the PV-Kit If you suspect a problem with the FLX500, you can check to see if the problem is the FLX500 and not a device, algorithm, or power source, by rerunning the PV-Kit job. All hardware required to run the PV-Kit job, including 16 devices, came with the FLX500. -
Page 31: Actuating A Programmer Without Power
. . . the same as when it was new, then you can gen- erally eliminate suspected problems with the FLX500. The problem may have to do with your device, algorithm, job file, etc. (things related to device or job file). -
Page 32: Fiducial Scan Errors
For help removing the adapter, see the on-screen Help. Fiducial Scan Errors If the FLX500 fails to program after the PNP Head scans the modules, there may be a problem with the scanning. NOTE: For accurate scanning, the fiducials and sensors must be clean and the FLX cover must be closed. - Page 33 3 … Troubleshooting Fiducial Scan Errors Figure 16—PNP Head optic sensor digital display showing a reading of 12. The reading on the top surface of the module should be approximately in the range 1000--2500. If it is too high (>2500), then roughen the top surface with 400 grit sandpaper.
-
Page 34: Insufficient Vacuum
Data I/O FLX500 Chptr 3 Insufficient Vacuum If you notice insufficient vacuum on the probe tips (e.g., devices are dropped), perform the Vac- uum Check: see Check Vacuum on page 19. If some of the checks fail (red Xs on report when the details check box is checked) then check that: •... -
Page 35: Pin
For contact information see Customer Support on page 35. Electrical Fuse The FLX500 uses one fuse that is located at the back of the machine below the power connec- tion. If you suspect the fuse has failed, replace it with another 5 Amp, 250 Volt fuse—5 x 20 mm. - Page 36 Data I/O FLX500 Chptr 3 Figure 17—Fuse Access is in the Back. Closed (top) and open. The nearest fuse is a spare. The spare fuse slides out left/right unlike the main fuse. To remove the active fuse (farthest in), press down lightly on the drawer while pushing up on the fuse.
-
Page 37: Correspondence
4 … Correspondence If you wish to contact Data I/O Technical Sup- port or a service center, see the following pages for information we need from you as well as how to contact us. —33—... -
Page 38: Information We Need
Data I/O FLX500 Chptr 4 Information We Need Please remember to include the following: The FLX Serial Number. It is printed on the • communication wall that is visible when the modules are removed. Figure 18—The Serial Number Label is visible after removing the modules. -
Page 39: Customer Support
6464 185th Ave NE, Suite 101 Redmond, WA USA 98052 Telephone: 425-881-6444 USA: 800-3-DATAIO (1-800-332-8246) Fax: 425-867-6972 E-mail: support@dataio.com Web Address: www.dataio.com Germany www.dataio.de China www.dataio.cn Other Countries Contact your local Data I/O representative. To find your local representative, visit http://www.dataio.com/contact/repsearch.asp —35—... - Page 40 Data I/O FLX500 Chptr 4 blank page —36—...
-
Page 41: Sign-Off Charts
5 … Sign-off Charts Serial Number ______________________ The charts on the following pages can be used to record maintenance performed on the FLX: Daily Sign-off ... 38 Weekly Sign-off ... 43 Monthly/Quarterly Sign-off ... 45 Annual Sign-off ... 46 PV-Kit Performance ... -
Page 42: Daily Sign-Off
Data I/O FLX500 Chptr 5 Daily Sign-off Clean the sockets, page 10. Date Initials Notes —38—... - Page 43 5 … Sign-off Charts Daily Sign-off Daily Sign-off Date Initials Notes —39—...
- Page 44 Data I/O FLX500 Chptr 5 Daily Sign-off Date Initials Notes —40—...
- Page 45 5 … Sign-off Charts Daily Sign-off Daily Sign-off Date Initials Notes —41—...
- Page 46 Data I/O FLX500 Chptr 5 Daily Sign-off Date Initials Notes —42—...
-
Page 47: Weekly Sign-Off
5 … Sign-off Charts Weekly Sign-off Weekly Sign-off Run the Self-test, page 11. Clean the probe tips, page 12. Clean the fiducials and sensors, page 12. Date Initials Notes —43—... - Page 48 Data I/O FLX500 Chptr 5 Weekly Sign-off Date Initials Notes —44—...
-
Page 49: Monthly/Quarterly Sign-Off
5 … Sign-off Charts Monthly/Quarterly Sign-off Monthly/Quarterly Sign-off Calibrate Probe Offset, page 15. Clean the cover and work surface, page 16. Maintaining air flow, page 16. Date Initials Notes —45—... -
Page 50: Annual Sign-Off
Data I/O FLX500 Chptr 5 Annual Sign-off Check the air filters, page 20. Lubricate the gan- try, page 21. Return the FLX unit to Data I/O for performance verification, page 23. Date Initials Notes —46—... -
Page 51: Pv-Kit Performance
5 … Sign-off Charts PV-Kit Performance PV-Kit Performance Run the PV-Kit job and record the PPH. See Run PV-Kit on page 5, or Rerunning the PV-Kit on page Date Initials —47—... - Page 52 Data I/O FLX500 Chptr 5 blank page —48—...
-
Page 53: Index
Data I/O Representatives • 35 Diagnostic Adapter Board • 23 Disposal • 6 Dropped devices • 30 Fiducials • 12 cleaning • 28 scanning errors Filters • 20 Firmware version • 34 FLX500 version number • 34 Fuse • 31 —49—... - Page 54 Data I/O FLX500 Index Gantry • 10 calibration lubrication • 21, • 22 moving • 20 • 21 X- and Y-axes Hazardous substances • 6 China RoHS disposal • 6 Identifying problems • 26 Keyboard connection • 1 Log file •...
- Page 55 Pick failures • 30 PIN • 31 Place failures • 30 PNP Head • 20 air filters • 28 optic sensor probes • 12 PPH (parts per hour) • 26 Probe height calibration • 15 Probe Offset • 15 Probe tip air pressure •...
- Page 56 Data I/O FLX500 Index Statistics • 5, • 26 Throughput • 5, • 26 Tools required for • 4 adding Antivirus • 20 checking air filters • 16 cleaning cover • 12 cleaning fiducials • 12 cleaning probe tips •...
- Page 57 FLX500 ...
- Page 58 FLX500 programmable media experts...
Need help?
Do you have a question about the FLX500 and is the answer not in the manual?
Questions and answers