AJAX KeyPad User Manual
Hide thumbs
Also See for KeyPad:
- User manual (23 pages) ,
- Quick start manual (5 pages) ,
- Short manual (2 pages)
Table of Contents
Advertisement
Quick Links
KeyPad is a wireless indoor touch-sensitive keyboard for managing the Ajax
security system. With this device, the user can arm and disarm the system and
see its security status. KeyPad is protected against attempts to guess the
passcode and can raise a silent alarm when the passcode is entered under
duress.
Connecting to the Ajax security system via a secured
KeyPad communicates with the
sight.
KeyPad operates with Ajax hubs only and does not support connecting via
or
uartBridge
The device is set up via the
Buy keypad KeyPad
KeyPad User Manual
Updated June 25, 2020
hub
at a distance of up to 1,700 m in line of
integration modules.
Ajax apps
Jeweller
for iOS, Android, macOS, and Windows.
radio protocol,
ocBridge Plus
Advertisement
Table of Contents

Related Manuals for AJAX KeyPad


Summary of Contents for AJAX KeyPad
- Page 1 KeyPad is a wireless indoor touch-sensitive keyboard for managing the Ajax security system. With this device, the user can arm and disarm the system and see its security status. KeyPad is protected against attempts to guess the passcode and can raise a silent alarm when the passcode is entered under duress.
-
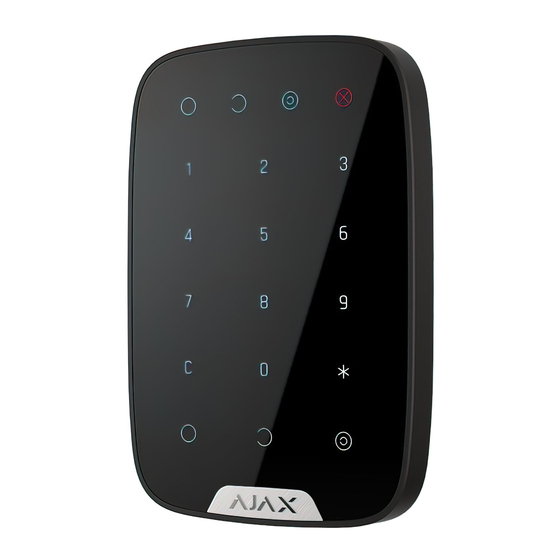
Page 2: Functional Elements
Functional elements 1. Armed mode indicator 2. Disarmed mode indicator 3. Night mode indicator 4. Malfunction indicator 5. The block of numerical buttons 6. “Clear” button 7. “Function” button 8. “Arm” button 9. “Disarm” button 10. “Night mode” button 11. Tamper button 12. -
Page 3: Operating Principle
If the battery is low, the backlight switches on at a minimum level, regardless of the settings. If you do not touch the keyboard for 4 seconds, KeyPad dims the backlight, and after another 12 seconds, the device switches to the sleep mode. - Page 4 KeyPad can notify a security company of the system being disarmed by force. The Duress Code — unlike the panic button — does not activate sirens. KeyPad and the app notify of successful disarming the system, but the security company receives an alarm.
- Page 5 3. Select Add — the countdown will begin. 4. Switch on KeyPad by holding power button for 3 seconds — it will blink once with the keyboard backlight. For detection and pairing to occur, KeyPad should be located within the coverage of the wireless network of the hub (at the same protected object).
-
Page 6: Selecting The Location
If KeyPad failed to connect to the hub, switch it off for 5 seconds and retry. The connected device will appear in the app device list. Update of the device statuses in the list depends on the detector ping interval in the hub settings (the default value is 36 seconds). - Page 7 If the device has low or unstable signal strength even after moving, use a radio signal range extender KeyPad is designed for operation when xed to the vertical surface. When using KeyPad in hands, we cannot guarantee successful operation of the sensor keyboard.
- Page 8 The tamper mode of the device, which reacts to the detachment of or damage to the body Displays the status of using the ReX range Routed Through ReX extender Firmware Detector rmware version Device ID Device identi er Settings 1. Devices 2. KeyPad 3. Settings...
- Page 9 First eld Device name, can be edited Selecting the virtual room to which the device is Room assigned Selecting the security group to which KeyPad is Arming/Disarming Permissions assigned Selecting the way of veri cation for arming/disarming KeyPad passcode only...
- Page 10 Opens the KeyPad User Manual Disconnects the device from the hub and Unpair Device deletes its settings KeyPad allows to set both general and personal passcodes for each user. To install a personal passcode: 1. Go to pro le settings (Hub Settings...
-
Page 11: Functionality Testing
The double-sided adhesive tape may be only used for temporary attachment of KeyPad. The tape will run dry in course of time, which may result in the falling of the KeyPad and damage of the device. 2. Put KeyPad on the attachment panel and tighten the mounting screw on the... -
Page 12: Complete Set
As soon as the KeyPad is xed in SmartBracket, it will blink with the LED (Fault) — this will be a signal that the tamper has been actuated. If the malfunction indicator did not blink after installation in SmartBracket, check the status of the tamper in the... -
Page 13: Warranty
EN 50131- 1, EN 50131-3, EN 50131-5-3 Warranty Warranty for the “AJAX SYSTEMS MANUFACTURING” LIMITED LIABILITY COMPANY products is valid for 2 years after the purchase and does not apply to the pre-installed battery. If the device does not work correctly, you should rst contact the support...
Need help?
Do you have a question about the KeyPad and is the answer not in the manual?
Questions and answers