Table of Contents
Advertisement
Quick Links
REQUIRED TOOLS
AND MATERIALS:
• 2 Capable Adults
• Tape Measure
• Safety Glasses
• Stepladder 8 ft.
(2.4m)
• (2 each) Wrenches
1/2"
3/4"
AND/OR
• Socket Wrenches and Sockets
(Deep-Well Sockets are
Recommended).
• An Extension is
Recommended.
1/2"
3/4"
OPTIONAL TOOLS
AND MATERIALS:
• Large & Small Adjustable
Wrenches
© COPYRIGHT 2015 by SPAldING
this manual, accompanied by sales receipt, should be saved and kept on hand as a
convenient reference, as it contains important information about your model.
ReAd ANd uNdeRstANd
opeRAtoR's mANuAl
befoRe usING thIs uNIt.
fAIluRe to folloW
opeRAtING INstRuctIoNs
could Result IN INjuRy
oR dAmAGe to pRopeRty.
Toll-Free Customer Service Number for U.S: 1-800-558-5234, For Canada: 1-800-284-8339,
For Europe: 00 800 555 85234 (Sweden: 009 555 85234), For Australia: 1300 367 582
Internet Address:
Arena Slam Rim
Owners Manual
Adult Assembly Required.
WARNING!
www.spalding.com www.spalding.com.au
1
Write model Number
from box here:
05/15
Id# M789141
Advertisement
Table of Contents

Related Manuals for SPALDING Arena Slam Rim


Summary of Contents for SPALDING Arena Slam Rim
- Page 1 Toll-Free Customer Service Number for U.S: 1-800-558-5234, For Canada: 1-800-284-8339, For Europe: 00 800 555 85234 (Sweden: 009 555 85234), For Australia: 1300 367 582 Internet Address: www.spalding.com www.spalding.com.au 05/15 Id# M789141 © COPYRIGHT 2015 by SPAldING...
- Page 2 sAfety INstRuctIoNs fAIluRe to folloW these sAfety INstRuctIoNs mAy Result IN seRIous INjuRy oR pRopeRty dAmAGe ANd WIll voId WARRANty. Owner must ensure that all players know and follow these rules for safe operation of the system. to ensure safety, do not attempt to assemble this system without following the instructions carefully. check entire box and inside all packing material for parts and/or additional instruction material.
- Page 3 NOTICE TO ASSEMBLERS Adult Assembly Required. Dispose of ALL packaging materials promptly. As with all products, periodically inspect for loose small parts. Assembled unit MUST be filled with sand or water at ALL times. ALL basketball systems, including those used for DISPLAYS, MUST be assembled and installed according to instructions.
- Page 4 Get to know the basic parts of your basketball system... ARENA SlAM SPRING WASHER BRACKET SPECIAl T-BOlT REINFORCEMENT BRACKET SElF-TAPPING SCREW COVER PARTS LIST - See Hardware Identifier Item Qty. Part No. Description Item Qty. Part No. Description 57980001 Warning label 900033 Bracket, Goal Mount 203309...
- Page 5 HARDWARE IDENTIFIER #2 (1) #4 (1) #5 (1) #6 (1) #3 (1) #11 (4) #7 (1) Item #8 (4) 201611 #8 (4) 203113 #10 (4) #8 (4) 203104 #13 (1) #8 (4) 205528 For Steel Framed #14 (2) Acrylics...
- Page 6 hARdWARe used IN thIs Note: Place Goal Mount bracket (2) sectIoN onto rim bracket. (not actual size) lip of goal mount bracket will hook over rim bracket. #2 (1) hARdWARe used IN thIs Insert tee-bolt (3) into goal mount bracket (2). sectIoN Secure tee-bolt with reinforcement bracket (4).
- Page 7 hARdWARe used IN thIs Attach special nut (7), washer (6) and spring (5) to tee-bolt (3). sectIoN (not actual size) #7 (1) #6 (1) Note: Tighten nut (7) until 1/8" of the bolt threads on end of T-bolt (3) are #5 (1) exposed.
- Page 8 hARdWARe used IN thIs sectIoN #8 (4) 201611 #8 (4) 205528 #10 (4) #8 (4) 203113 #8 (4) 203104 #11 (4) Connect rim to board using bolts (8) and passing though bracket (2) and board and fastening with, washers (10) and nuts (11). Note: bolts (8) will vary depending on what type of board the rim...
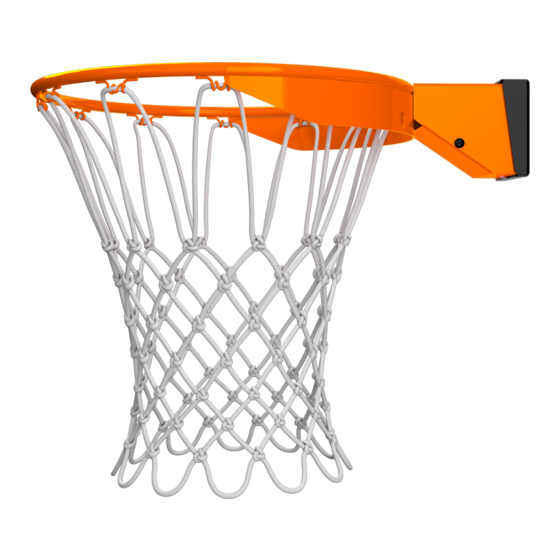
- Page 9 outsIde vIeW Install net (9). Attach spring cover (13) to rim (12) using self tapping screws (14) on both sides. Note: ReGulAtIoN RIm heIGht Is 10 feet (3.05m). 10 ft. (3.05m)
- Page 10 Numéro vert du service clientèle - États-unis: 1-800-558-5234, canada: 1-800-284-8339, europe: 00 800 555 85234 (suède: 009 555 85234), Australie: 1800 632 792 Adresse Internet: www.spalding.com www.spalding.com.au Gebührenfreie telefonnummer für die usA: 1-800-558-5234, für Kanada: 1-800-284-8339, für europa: 00 800 555 85234 (schweden: 009 555 85234), für Australien: 1800 632 792 Internet-Adresse: www.spalding.com www.spalding.com.au...
- Page 11 OUTILS ET MATÉRIEL BENÖTIGTE WERKZEUGE HERRAMIENTAS Y REQUIS: UND MATERIALIEN: MATERIALES REQUERIDOS: • Deux (2) adultes • Zwei (2) zur Ausführung dieser • Dos (2) adultos capables Arbeit fähige Erwachsene capaces • Mètre • Maßband • Cinta de medir • Lunettes de sécurité •...
- Page 13 AVERTISSEMENT Lisez les avertissements indiqués ci-dessous avant d'utiliser ce produit. sous peine d'encourir des blessures graves et/ou des dégâts matériels. Le propriétaire doit s'assurer que tous les joueurs connaissent et suivent ces règles d'utilisation sûre du système. Voir les procédures d'installation et d'entretien dans le ·...
- Page 14 ImpoRtANt! videz entièrement les boîtes. veillez à vérifier l'intérieur des sections de poteau. la quincaillerie et des pièces supplémentaires sont emballées à l'intérieur. WIchtIG! die Kartons vollständig auspacken. den hohlraum in den stangenteilen inspizieren. dort sind befestigungs- und andere Kleinteile verpackt. ¡ImpoRtANte! saque todo el contenido de las cajas.
- Page 15 Apprenez à connaître les composants de base de votre système de basket-ball... Machen Sie sich mit den wichtigsten Teilen Ihres Basketballsystems vertraut… Conozca las piezas básicas de su sistema de baloncesto… RONdEllE UNTERlEGSCHEIBE RESSORT ARANdElA FEdER RESORTE SUPPORT HAlTERUNG SOPORTE ÉCROU SPÉCIAl SPEZIEllE NUSS TUERCA ESPECIAl...
- Page 16 LISTE DES PIÈCES - Voir légende Légende Qté No. de réf. Description Légende Qté No. de réf. Description 57980001 Étiquette d’avertissement Filet 900033 Parenthèse, bâti de but 203309 Rondelle, 2,54 cm d.E. 206048 Boulon à T, 3/8-16 x 8,25 cm 203100 Écrou à...
- Page 17 LÉGENDE DE LA VISSERIE BEFESTIGUNGSTEILESCHLÜSSEL IDENTIFICADOR DE HERRAJE #7 (1) #2 (1) #4 (1) #10 (4) #5 (1) #6 (1) #13 (1) #3 (1) #14 (2) #11 (4) #8 (4) 201611 #8 (4) 203104 #8 (4) 205528 #8 (4) 203113 Pour panneaux en acrylique à...
- Page 18 QuINcAIlleRIe utIlIsÉe dANs cette sectIoN (pas à l’échelle) IN dIesem bAuAbschNItt beNutZte befestIGuNGsteIle (die Abbildungen entsprechen nicht der tatsächlichen Größe) heRRAje usAdo eN estA seccIÓN (no se muestra en su tamaño real) #2 (1) Placez le support Bâti de but (2) sur le support de cerceau. die Ziel-Einfassung Halterung (2) auf die Korbrandhalterung legen.
- Page 19 QuINcAIlleRIe utIlIsÉe dANs cette sectIoN (pas à l’échelle) IN dIesem bAuAbschNItt beNutZte befestIGuNGsteIle (die Abbildungen entsprechen nicht der tatsächlichen Größe) heRRAje usAdo eN estA seccIÓN (no se muestra en su tamaño real) #3 (1) #4 (1) Insérez le boulon à T (3) dans le support Bâti de but (2). die T-Nutenschraube (3) in die Ziel-Einfassung -Halterung (2) einsetzen.
- Page 20 QuINcAIlleRIe utIlIsÉe dANs cette sectIoN (pas à l’échelle) IN dIesem bAuAbschNItt beNutZte befestIGuNGsteIle (die Abbildungen entsprechen nicht der tatsächlichen Größe) heRRAje usAdo eN estA seccIÓN (no se muestra en su tamaño real) #7 (1) #5 (1) #6 (1) Attachez l’écrou spécial (7), la rondelle (6) et le ressort (5) au boulon à...
- Page 21 QuINcAIlleRIe utIlIsÉe dANs cette sectIoN IN dIesem bAuAbschNItt beNutZte befestIGuNGsteIle heRRAje usAdo eN estA seccIÓN #11 (1) #8 (4) 201611 #8 (4) 205528 #8 (4) 203113 #8 (4) 203104 #10 (4) Attachez le cerceau avec les boulons (8), les rondelles (10) et les écrous (11). den Korbrand mit Schrauben (8), Unterlegscheiben (10) und Muttern (11) verbinden.
- Page 22 vue eXtÉRIeuRe / AusseNANsIcht / vIstA eXteRNA Installez le filet (9). das Netz (9) anbringen Instale la red (9). Attachez le cache-ressort avec les vis autotaraudeuses (14). die Federabdeckung mit den Schneidschrauben (14) anbringen. Instale la cubierta del resorte con los tornillos autorroscantes (14).
Need help?
Do you have a question about the Arena Slam Rim and is the answer not in the manual?
Questions and answers