
Subscribe to Our Youtube Channel
Related Manuals for SPALDING Portable Basketball System


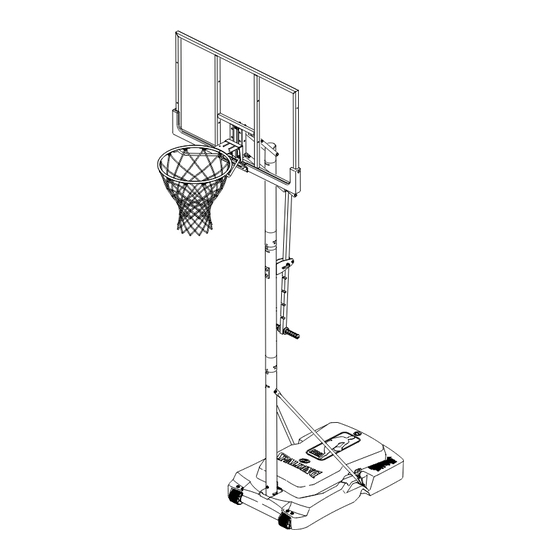
Summary of Contents for SPALDING Portable Basketball System
- Page 1 Portable Basketball System Owners Manual 1/19 M702042 © COPYRIGHT 2019 by Russell Brands, LLC...
- Page 2 Système portable - Manuel de l’utilisateur Gebrauchsanleitung für tragbare Systeme Manual del Propietario del Sistema Portátil...
- Page 3 (Schweden: 009 555 85234), für Australien: 1300 367 582 Internet-Adresse: www.spalding.com www.spalding.com.au Número telefónico sin costo del Departamento de Servicio al Cliente en EE.UU.: 1-800-558-5234, Para Canadá: 1-800-284-8339, Para Europa: 00 800 555 85234 (Suecia: 009 555 85234), Para Australia: 1300 367 582 Dirección en Internet: www.spalding.com www.spalding.com.au...
- Page 4 HERRAMIENTAS BENÖTIGTE OUTILS ET REQUIRED TOOLS Y MATERIALES WERKZEUGE MATÉRIEL REQUIS: AND MATERIALS: REQUERIDOS: UND MATERIALIEN: • Zwei (2) zur • Deux (2) • Dos (2) adultos Ausführung • 2 Capable adultes capaces dieser Arbeit Adults capables fähige • Cinta de medir Erwachsene •...
- Page 5 BEFORE YOU START! AVANT DE COMMENCER! VORBEREITENDE MASSNAHMEN ¡ANTES DE COMENZAR! Fragen oder fehlende Teile? ¿Tiene preguntas o le faltan piezas? STOP! ¡ALTO! HALT! Gehen Sie NICHT zum Laden zurück! ¡NO regrese a la tienda! Rufen Sie die GEBÜHRENFREIE Telefonnummer ¡Llame al número telefónico GRATUITO de Servicio (in den USA und Kanada) auf der Vorderseite an! al Cliente que se indica en la primera página!
- Page 6 WARNING AVERTISSEMENT Read and understand warnings listed below Lisez les avertissements indiqués ci-dessous avant d'utiliser ce produit. before using this product. Failure to follow these warnings may result in sous peine d'encourir des blessures graves et/ou des dégâts matériels. serious injury and/or property damage. Le propriétaire doit s'assurer que tous les joueurs connaissent et Owner must ensure that all players know and follow these rules suivent ces règles d'utilisation sûre du système.
- Page 7 ACHTUNG ADVERTENCIA Vor Gebrauch dieses Produkts die Lea y entienda las advertencias que se nachstehenden Warnhinweise lesen und encuentran a continuación antes de usar este beachten. producto. Ein Missachten dieser Warnung kann zu Si no se observan estas advertencias se schweren Verletzungen und/oder Sachschäden podrían causar lesiones graves y/o daños führe...
- Page 8 SAFETY INSTRUCTIONS FAILURE TO FOLLOW THESE SAFETY INSTRUCTIONS MAY RESULT IN SERIOUS INJURY OR PROPERTY DAMAGE AND WILL VOID WARRANTY. Owner must ensure that all players know and follow these rules for safe operation of the system. To ensure safety, do not attempt to assemble this system without following the instructions carefully.
- Page 9 SICHERHEITSHINWEISE EIN MISSACHTEN DIESER SICHERHEITSHINWEISE KANN ZU SCHWEREN VERLETZUNGEN ODER SACHSCHÄDEN FÜHREN UND MACHT DIE GARANTIE UNWIRKSAM. Der Eigentümer muss sicherstellen, dass alle Spieler diese Regeln für einen sicheren Betrieb des Systems kennen und befolgen. Aus Sicherheitsgründen darf dieses System nur unter sorgfältiger Beachtung der Anleitung zusammengebaut werden.
- Page 10 RÉGLAGE EN HAUTEUR POUR RÉGLER LA HAUTEUR DU PANNEAU : TO ADJUST BACKBOARD: 1. Basculez la poignée de verrouillage à came 1. Flip Cam Lock Handle to Open Position. en position ouverte. 2. Grasp Handle with Both Hands and Pull 2.
- Page 11 Sistema de baloncesto Garantía de dueños Para la última información de garantía del sistema de baloncesto Por favor visite el sitio web de Spalding Basketball en www.Spalding.com 1-800-558-5234 Póngase en contacto con servicio al cliente de Spalding en teléfono # 05/2013...
- Page 12 KÖNNEN ZU DEREN PLÖTZLICHEM BRUCH FÜHREN. WENN DIE KORBWAND VOR ODER NACH DEM ZUSAMMENBAU IN JEGLICHER WEISE BESCHÄDIGT WIRD, RUFEN SIE DIE FOLGENDE GEBÜHRENFREIE TELEFONNUMMER AN: Innerhalb der USA: 1-800-558-5234; innerhalb KANADAS: 1-800-284-8339; www.spalding.com ¡ADVERTENCIA! SI SU SISTEMA ESTÁ EQUIPADO CON UN RESPALDO DE ACRÍLICO, EXAMINE EL RESPALDO PARA VERIFICAR QUE NO HAYA SUFRIDO DA—OS DURANTE EL TRANSPORTE.
- Page 13 NOTICE TO ASSEMBLERS Adult Assembly Required. Dispose of ALL packaging materials promptly. As with all products, periodically inspect for loose small parts. Assembled unit MUST be filled with sand or water at ALL times. ALL basketball systems, including those used for DISPLAYS, MUST be assembled and installed according to instructions.
- Page 14 Get to know the basic parts of your basketball system... Apprenez à connaître les composants de base de votre système de basket-ball... Machen Sie sich mit den wichtigsten Teilen Ihres Basketballsystems vertraut… Conozca las piezas básicas de su sistema de baloncesto… BACKBOARD PANNEAU KORBWAND...
- Page 15 PARTS LIST - See Hardware Identifier Item Qty. Part No. Description Item Qty. Part No. Description 900033 Bracket, Slam Jam 600295 Base, (Black) 206048 T-Bolt, 3/8-16 x 3.25 Long 108867 Wheel Axle 206990 Reinforcement Bracket 600056 Wheel, 3.5” 203470 Washer, Flat, Slam Jam 901409 Top Pole Section - Black 203795...
- Page 16 LISTE DES PIÈCES - Voir légende Légende Qté No. de réf. Description Légende Qté No. de réf. Description 600295 Socle (noir) 108867 Axe des roues 203470 Rondelle, plate, Slam Jam 600056 Roue, 8,9 cm (noire) 203795 Écrou, spécial 901409 Partie supérieure du poteau - Noir 204872 Étiquette, indication de hauteur 901671...
- Page 17 TEILELISTE - Siehe Teileschlüssel Nr. Anz. Teilenummer Beschreibung Nr. Anz. Teilenummer Beschreibung 600295 Sockel (schwarz) 200318 Zuschlagsperre, Verstärkungshalterung 108867 Radachse 900033 Zuschlagsperre, Halterung 600056 Rad, 3.5” Zoll 206048 T-Nutenschraube, 3/8-16 x 3.25 Zoll 901409 Oberes Stangenteil - Schwarz Länge 901671 Mittleres Stangenteil - Schwarz 206990 Verstärkungshalterung...
- Page 18 LISTA DE PIEZAS - Vea el identificador de herraje Artículo Cant. Pieza N.º Descripción Artículo Cant. Pieza N.º Descripción 600295 Base (Negra) 108867 Eje de la rueda 900033 Soporte, Slam Jam 600056 Rueda, 3.5” (8,9 cm) 206048 Perno en T, 3/8-16 x 3.25” de longitud 901409 Sección superior del poste - Negra 206990...
- Page 19 HARDWARE IDENTIFIER (BOLTS AND SCREWS) IDENTIFICATION DES PIÈCES (BOULONS ET VIS) BEFESTIGUNGSTEILESCHLÜSSEL (BOLZEN UND SCHRAUBEN) IDENTIFICADOR DE HERRAJE (PERNOS Y TORNILLOS) #18 (1) #62 (1) #15 (2) #60 (4) #14 (4) #48 (2) #28 (2) #8 (2) #43 (4) #33 (1) #7 (2) #49 (1) #11 (1)
- Page 20 HARDWARE IDENTIFIER (PLASTIC SPACERS, CAPS, CLIPS AND OTHER) IDENTIFICATION DES PIÈCES (ENTRETOISES EN PLASTIQUE, CAPUCHONS, PINCES ET AUTRES) BEFESTIGUNGSTEILESCHLÜSSEL (ABSTANDSSTÜCKE, KAPPEN UND CLIPS AUS KUNSTSTOFF UND SONSTIGE TEILE) IDENTIFICADOR DEL HERRAJE (ESPACIADORES DE PLÁSTICO, TAPAS, SUJETADORES Y OTROS) #29 (2) #56 (1) #17 (4) #39 (2)
- Page 21 SECTION A: ASSEMBLE THE BASE SECTION A: ASSEMBLAGE DU SOCLE BAUABSCHNITT A: ZUSAMMENBAU DES SOCKELS SECCIÓN A: MONTAJE DE LA BASE ITEMS REQUIRED FOR THIS SECTION This is what your system will look like when OUTILS REQUIS POUR CETTE SECTION you’ve finished this section.
- Page 22 ENGAGEMENT WHICH ALLOWS THE HARDWARE TO BE ASSEMBLED CANNOT BE ACHIEVED DO NOT PROCEED TO THE NEXT STEP! - CALL SPALDING CUSTOMER SERVICE FOR ASSISTANCE. Tout en maintenant l’alignement, rebondissez la section moyenne de poteau (5) dans la section supérieure (4) utilisant une chute en bois comme montré...
- Page 23 ENGAGEMENT WHICH ALLOWS THE HARDWARE TO BE ASSEMBLED CANNOT BE ACHIEVED VORSICHT! !! STOP !! DO NOT PROCEED TO THE NEXT STEP! - CALL SPALDING CUSTOMER SERVICE ¡PRECAUCIÓN! FOR ASSISTANCE. Dessus de rebond et poteau moyen (4 et 5) sur poteau inférieur (6) utilisant une WHEN PROPERLY ASSEMBLED, THE POLE SECTIONS SHOULD HAVE A 3-1/2”...
- Page 24 Install wheel axle (2) through wheel brackets (19) and secure wheels (3) onto wheel axle (2) as shown. Insert pole assembly into tank assembly as shown. Secure pole (6) to tank and wheel carriage as shown. A deep socket is recommended.
- Page 25 Secure flat end of tank struts (10) to pole using bolt (11), and nut (13), as shown. Fixez l’extrémité plate des contrefiches du réservoir (10) à la perche en utilisant la vis (11), et l’écrou (13), comme illustré. Das flache Ende der Tankverstrebungen (10) Um die Pole mit der Schraube (11), Mutter (13), wie gezeigt.
- Page 26 Install bracket pre-assembly (27) and reinforcement bracket (34) with carriage bolts (28) in middle pole (5) mounting holes as shown. Tighten flange nuts (16) completely. Fixez l’ensemble étrier (27) et les 2 plaques de renfort (34) sur le mât (5) à l’aide des boulons (28), en regard des orifices de montage prévus à...
- Page 27 SECTION B: ATTACH THE BACKBOARD SECTION B: FIXATION DU PANNEAU BAUABSCHNITT B: ANBRINGEN DER KORBWAND SECCIÓN B: CONECTE EL RESPALDO ITEMS REQUIRED FOR THIS SECTION This is what your system will look like when you’ve OUTILS REQUIS POUR CETTE SECTION finished this section.
- Page 28 Identify elevator tubes (41 and 42). Identifiez les tubes du système élévateur (41 et 42). Die Verlängerungsrohre (41 und 42) zurechtlegen. Identifique los tubos elevadores (41 y 42). Toward Board Vers le poteau Zur Stange hin Hacia el poste Lower Elevator Tube Upper Elevator Tube Tube supérieur du dispositif élévateur Tube inférieur du dispositif élévateur...
- Page 29 Attach lower elevator tubes (41) and spring (44) to backboard using spacers (17) bolt (8) and nut (9) as shown. Insert T-bolt (33) through Slam Jam bracket (32) as shown. Secure Slam Jam bracket (32) to backboard using bolt (14) and nut (16) as shown.
- Page 30 Attach upper elevator tubes (42) to backboard using spacers (17), bolt (8), and nut (9) as shown. Attachez les tubes supérieurs du système élévateur (42) à l’aide des entretoises (17), du boulon (8) et de l’écrou (9), comme illustré. Die oberen Verlängerungsrohre (42) wie gezeigt mit Abstandsstücken (17), Schraube (8) und Mutter (9) befestigen. Conecte los tubos elevadores superiores (42) usando espaciadores (17), pernos (8) y tuercas (9) como se muestra.
- Page 31 Support pole on sawhorse. Attach upper and lower elevator tubes (41 and 42) to upper pole section (4) using bolts (43) and nuts (63) as shown. Attach pole cap (22) as shown. Appuyez le poteau sur le banc de sciage. Attachez les tubes supérieurs et inférieurs de l’élévateur (41 et 42) à la section de poteau supérieure (4) à...
- Page 32 Attach indexing tube (38) assembly to lower elevator tubes (41) using bolt (43) spacers (29) and nut (63) as shown. Engage slot in indexing tube (38) with bolt. Adjust thumbnut (53) to apply firm pressure to indexing tube when cam lock (49) is in closed position.
- Page 33 Install Slam Jam Rim to Backboard A. Fit rim (25) securely into bracket (32) as shown. Allow T-bolt (33) to slip through center hole in rim (25). B. Install reinforcement bracket (31) onto T bolt (33) as shown. C. Install spring (30) onto T bolt (33) as shown. D.
- Page 34 NOTE: / REMARQUE: HINWEIS: / NOTA: ORIENTATION OF BRACKET ORIENTATION DU SUPPORT AUSRICHTUNG DER HALTERUNG ORIENTACIÓN DEL SOPORTE...
- Page 35 Install cover (47) over spring return mechanism as shown. Installez le couvercle (47) sur le mécanisme de retour du ressort, comme illustré. Die Abdeckung (47) wie über dem Federrückholmechanismus anbringen. Instale la cubierta (47) sobre el mecanismo de retorno de resorte como se muestra.
- Page 36 Apply height indication sticker (37) to adjustment tube (38) as shown. Appliquez l’autocollant d’indication de hauteur (37) sur le tube de réglage (38) comme indiqué. Den Höhenanzeigeaufkleber (37) wie gezeigt auf das Einstellrohr (38) auftragen. Coloque la etiqueta adhesiva de altura (37) en el tubo de ajuste (38) como se muestra...
- Page 37 Support system on sawhorse. Extend system to highest position before assembly of spring. Stretch counterbalance spring (44) to upper elevator tubes and secure with with bolt (43) and nut (63) in location shown. Appuyez le système sur le banc de sciage. Tendez le système jusqu’à la position la plus haute avant d’assembler le ressort.
- Page 38 Instructions for filling with water: Roll completed assembly to desired position. Fill tank with water (approx. 11 gallons / 42 Liters).Tighten (24) securely into place. Instruction de remplissage avec de l’eau: Roulez l’ensemble jusqu’à la position souhaitée. Remplissez le réservoir d’eau (42 litres environ). Monter le bouchon (24) en toute sécurité.
- Page 39 Instructions for filling with sand: Place four 50 lb. (23 kg) sand or cement mix bags into base cavity as shown below. Instructions de remplissage avec du sable: Placez quatre sacs de 23 kg (50 lb) de sable ou de ciment dans la cavité...
- Page 40 Install cover retention bracket (61) to bottom pole (6) with bolt (62) and nut (16), positioning bracket above lip of cover (51). Fixez le support de fixation du couvercle de protection (61) au bas du poteau (6) avec le boulon (62) et l’écrou (16), en position- nant le support au-dessus du rebord du couvercle de protection (51).
- Page 41 Instructions for filling with water: Fill cover (51) with water (approx. 1.5 gallons / 5.67 Liters).Tighten (20) securely into place. Instruction de remplissage avec de l’eau: Remplir le couvercle (51) avec de l’eau (5.67 litres environ). Monter le bouchon (20) en toute sécurité. Anleitung zum Befüllen mit Wasser: Den Deckel mit Wasser füllen (ca.
- Page 42 10 ft. (3.05 m) WARNING! AVERTISSEMENT! NOTE: Peel protective film from surface of WARNUNG! acrylic backboard prior to use. REMARQUE: ¡ADVERTENCIA! HINWEIS: Décollez le film de protection de la NOTA: DO NOT ALLOW CHILDREN surface du panneau en acrylique TO ADJUST HEIGHT. avant usage.
- Page 43 Attach Pole Pad (55) to pole. Fixez le tapis de stade (55) au poteau. Befestigen Sie das Stadiumpad (55). Fijar el protector (55) al poste. NOTE: REMARQUE: HINWEIS: NOTA: Item 65 is not included in all models. Point 65 n’est pas inclus dans tous les modèles. Punkt 65 ist nicht im Lieferumfang aller Modelle.
- Page 44 SECTION C: BOARD PAD SECTION C: REMBOURRAGE DU PANNEAU BAUABSCHNITT C: KORBWANDPOLSTERUNG SECCIÓN C: ALMOHADILLA DEL TABLERO PARTS LIST / LISTE DES PIÈCES / TEILELISTE / LISTA DE PIEZAS (See Hardware Identifier) / (Voir la légende des illustrations) / (Siehe Befestigungsteileschlüssel) / (Vea el identificador de herraje) Item Qty.
- Page 45 Attach left and right pad sections to board using screws and washers as shown. Attachez les sections de rembourrage gauche et droite sur le panneau avec les vis et les rondelles, comme illustré. Den linken und rechten Polsterungsabschnitt wie gezeigt mit Schrauben und Unterlegscheiben an der Korbwand befestigen. Conecte las secciones izquierda y derecha de la almohadilla al tablero usando tornillos y arandelas como se muestra.
Need help?
Do you have a question about the Portable Basketball System and is the answer not in the manual?
Questions and answers