Advertisement
Advertisement
Table of Contents

Subscribe to Our Youtube Channel
Related Manuals for Deviser DS2002


Summary of Contents for Deviser DS2002
- Page 1 SIGNAL LEVEL METER OPERATION MANUAL Ver 1.11...
- Page 2 EXTRA NOTE If the meter hangs up or displays abnormally caused by wrong operation, please initialize it according to the following process: Press TILT button and at the mean time and hold, then press power key to power on the meter. Free the power button first, then free the TILT button and The memory will be cleared automatically, then the...
-
Page 3: Table Of Contents
INDEX Accessories Supplied………………………1 • Notice………………………………………2 • Front Panel and the Screen ………………3 • Keypad Introduction ………………………5 • Single channel test ………………………6 Single frequency test………………………8 III. Tilt Measurement ………………………11 IV. C/N measurement ………………………13 V. Voltage test ………………………………15 VI. Backlight of the LCD ……………………16 VII. -
Page 4: Accessories Supplied
● Accessories Supplied *Charger: DS10050 *RF connector: F type Imperial P. 1 2 1 0 5 8 J 8 J F t yp e M e t r i c P. 11 0 6 2 8 J 8 J *Strap: PK340080000 *User manual: DK212102002... -
Page 5: Notice
● Notice 1. The built-in Ni-MH battery must be charged more than 10 hours before the first time using. 2. USE ONLY THE ADAPTER SUPPLIED WITH THE UNIT. ANY OTHER ADAPTER COULD DAMAGE THE UNIT. 3. The accuracy will be affected when the unit is used in strong electromagnetic field. -
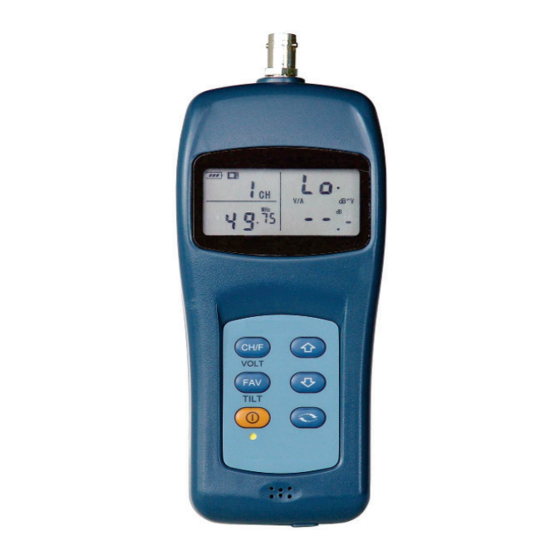
Page 6: Front Panel And The Screen
Front Panel and the Screen RF input Power on/off Charge LED Speaker... - Page 7 Hole of handle rope Battery case...
-
Page 8: Keypad Introduction
Battery status Video carrier Level Channel number Unit V/A, Tilt or C/N Frequency or secondary channel number Keypad Introduction... -
Page 9: Single Channel Test
CH /F SINGLE CHANNEL/FREQUENCY, TRUNK/BATTERY VOLTAGE measurement. TILT Toggles between DOUBLE CHANNEL SAME SCREEN DISPLAY /TILT mode / C/N mode. Power switch. Stepping option. Increasing the measured frequency or channel. Decreasing the measured frequency or channel. I. Single channel test Press CH/F to select LEVEL mode. - Page 10 carrier and the audio carrier ) Press to increase or decrease the channel number. In this function you can test the video carrier level and the V/A at the same time. Example 1: How to measure the video carrier and the V/A value of 6CH? 1.
-
Page 11: Single Frequency Test
II. Single frequency test In SINGLE CHANNEL test mode, press CH/F again to enter SINGLE FREQUENCY test mode and the screen will display as follows: It shows on the up left “F--“, the down left is the frequency of the audio carrier; the right is the level of audio carrier (or FM). - Page 12 It is used in testing the audio carrier level and the FM broadcast level. 1. When the signal level is above 35dB the audio monitor μ , function will automatically shut on. 2.This function is only available in this mode.
- Page 13 monitor function is active, you can listen to the sound of channel 8 through the speaker. Example 3: Test the RF level and the sound on 106.80MHz 1. Access the LEVEL mode by pressing CH/F key. 2. Press CH/F again to toggle in frequency test mode.
-
Page 14: Tilt Measurement
III. Tilt Measurement Press TILT key to enter double channel display mode. Then two channel numbers and the video carrier levels display at the same time. Press TILT key again to access the TILT measure mode. Two channel numbers show on the left, the up right is the video carrier level of the first channel, and the delta video carrier level(tilt level) difference of the two... - Page 15 using key you can switch between the first and the second channel, the “ CH ” symbol of the adjusted channel will blink. 1. You can measure or adjust the parameter of the trunk amplifier. 2. This function can be used in measuring the delta level difference between available...
-
Page 16: C/N Measurement
Example 4: Test Channel 2 and Channel 22. 1. Press TILT (“CH” symbol on the left will blink) 2. Tune the left channel to CH22 by pressing 3. Press key to switch to the down left channel. 4. Tune the down right channel to CH2 by pressing key. - Page 17 The up left is the channel number, the down left is the video carrier frequency, the up right is the video carrier level and the C/N value of this channel is shown on the down right. You can change the channel number by pressing ...
-
Page 18: Voltage Test
1.It will display when the carrier level “ ” is less than 85 dB μ 2.When C/N>=50dB it always displays , “50dB”. 3.When C/N<=20dB it displays “20dB”. , 4.If you want to test C/N again, you must press C/N for three times. 5.The carrier-off test mode is more exact. -
Page 19: Backlight Of The Lcd
The trunk voltage will show on the up right and the battery voltage will show on the down right. AC or DC of the trunk voltage is also indicated on the up left. VI. Backlight of the LCD In order to prolong the working time, the backlight is disabled from powering on until you press any key (excluding the power key), and it will last for 20 seconds then shut off automatically. -
Page 20: Power Supply
VII.Power Supply The meter can continuously work for above 6 hours with a built-in 3.6V/2.1AH Ni-MH battery. When the battery voltage drops below 3.2 V, to remind the customer that the battery should be charged, the battery indicator “ ” displays on the top of the screen. Please power off the meter and charge it with the attached charger for 10~12 hours. -
Page 21: Specifications
VIII. Specifications Frequency Range: 46MHz~864MHz Frequency step: 50kHz、100kHz、1MHz、 10MHz、100MHz Level Measurement: Range: 30dBμV~120dBμV Accuracy: ±2 dB (20℃±5℃) Resolution: 0.5dB C/N: (Option) Range: 20dB~50dB Input signal range: ≥85dBμV Measure accuracy: ±2.5dB (20℃±5℃) (shut off the carrier) Resolution: 0.5dB Voltage: Input range: 1V~100V(AC/DC)... - Page 22 SINGLE FREQUENCY mode) Battery: Built-in battery: 3.6V / 2.1AH Ni-MH Working time: more than 6 hours (shut off the audio and LCD backlight) Charging time: 10~12hours (power off the meter)
Need help?
Do you have a question about the DS2002 and is the answer not in the manual?
Questions and answers