EMS Piezon 150 Operation Instructions Manual
Hide thumbs
Also See for Piezon 150:
- Operation instructions manual (92 pages) ,
- Operation instructions manual (52 pages) ,
- Operation instructions manual (33 pages)

Related Manuals for EMS Piezon 150


Summary of Contents for EMS Piezon 150
- Page 1 OPERATION INSTRUCTIONS MODE D'EMPLOI Piezon ® BEDIENUNGSANLEITUNG INSTRUCCIONES DE EMPLEO Piezon ® ISTRUZIONI PER L’USO BRUKSANVISNING...
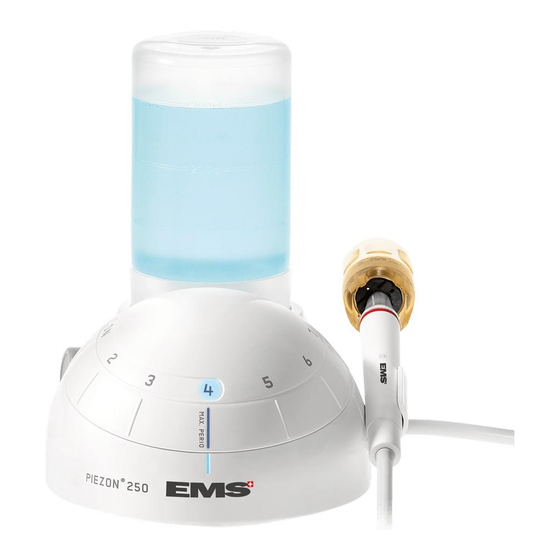
- Page 2 Piezon 150 Piezon 250...
- Page 3 Filtro esterno Externt filter EMS ofrece este aparato con diferentes variantes de EMS mette a disposizione unità con vari accessori. Nella EMS tillhandahåller olika tillbehör till enheterna. Förpack- equipamiento. Para información sobre el equipamiento distinta sono elencati esattamente gli accessori forniti ningslistan visar exakt vad som medföljer enheten.
- Page 4 DEAR CUSTOMERS, ChERS CLIENTS, SEhR GEEhRTE KUNDEN, Thank you for buying a new EMS product. This Wir gratulieren Ihnen zum Kauf Ihres neuen Nous vous félicitons de l'acquisition de ce nouveau EMS-Produkts. Es erfüllt höchste Ansprüche an produit EMS. Il répond aux plus hautes exigences device meets the highest quality and safety Qualität und Sicherheit.
- Page 5 ESTIMADOS CLIENTES, GENTILE CLIENTE, BäSTA KUNDER, Tack för ditt köp av en ny EMS-produkt. Denna Les agradecemos la adquisición de su nuevo Grazie per aver acquistato un nuovo prodotto produkt uppfyller de högsta kvalitets- och säker- producto EMS, el cual satisface las exigencias EMS.
- Page 6 Auf den Abbildungen in dieser Bedienungs- represent the Piezon 150 (unless otherwise sentent le Piezon 150 (sauf précisé contrai- anleitung ist der Piezon 150 zu sehen (sofern specified); however, these instructions also apply rement); ces instructions s'appliquent aussi au nichts anderes spezifiziert ist). Trotzdem gelten to the Piezon 250.
- Page 7 Las ilustraciones de este manual muestran In queste istruzioni, le figure si riferiscono Bilderna i dessa anvisningar visar Piezon el Piezon 150 (a menos que se especifique lo al Piezon 150 (se non altrimenti specificato); le 150 (om inte annat anges). Dessa anvisningar contrario).
- Page 8 Beachten Sie bitte die nachstehenden Anwei- sungen, um eine Verletzung des Patienten oder damage to the Piezon150 and 250, please note ou dommages au Piezon 150 et 250, merci de the corresponding directives: tenir compte des directives suivantes: Nutzers bzw. die Beschädigung des Piezon 150...
- Page 9 En caso de problemas le ofrecemos assistenza in caso di problemi tecnici. Si rivolga EMS-reparationscenter eller din återförsäljare naturalmente nuestro apoyo técnico. Diríjase al centro di assistenza EMS autorizzato o al riven- direkt. directamente a su centro de reparaciones o distri- ditore.
-
Page 10: Table Of Contents
Warranty ............62 Garantie ............62 Garantie ............62 Accessories............ 62 Zubehör ............62 Accessoires ............ 62 EMS Service ..........64 EMS-Service ..........64 Service EMS ..........64 Symbols ............66 Symbole ............66 Symboles ............66 Technical data ..........72 Technische Daten .......... - Page 11 Garantía ............63 Garanzia ............63 Garanti ............63 Accesorios ............. 63 Accessori ............63 Tillbehör ............63 Servicio técnico de EMS ........ 65 Assistenza EMS ..........65 EMS-service ..........65 Símbolos ............67 Simboli ............67 Symboler ............67 Especificaciones técnicas ......
-
Page 12: Treatment
Ce produit est destiné à être utilisé en dentisterie Dieses Produkt wurde für eine Verwendung in EMS ultrasound instruments for the following avec des instruments à ultrasons EMS Piezon der Zahnmedizin mit EMS Ultraschallgeräten für indications: pour les applications suivantes:... -
Page 13: Tratamiento
Este producto está diseñado para uso en odonto- Questo prodotto è stato progettato per l'uso Denna produkt är avsedd att användas inom logía con instrumentos de ultrasonidos EMS para odontoiatrico con strumenti a ultrasuoni EMS per tandläkarvården tillsammans med EMS ultraljuds-... -
Page 14: Installation And Connection
INSTALLATION AND INSTALLATION ET INSTALLATION UND CONNECTION CONNECTION ANSChLUSS Installing the pump (Piezon 250) Installation de la pompe (Piezon 250) Installieren der Pumpe (Piezon 250) Ensure that the pump head cover is S'assurer que le couvercle de tête de Vergewissern Sie sich, dass der Pumpen- correctly closed, before using the device. -
Page 15: Instalación Y Conexión
INSTALACIóN y CONExIóN INSTALLAZIONE E INSTALLATION OCh COLLEGAMENTI ANSLUTNING Instalación de la bomba (Piezon 250) Installazione della pompa (Piezon 250) Installera pumpen (Piezon 250) Antes de usar el dispositivo asegúrese de Prima di utilizzare il dispositivo, assicurarsi Säkerställ att pumphuvudets hölje är stängt que la cubierta de la cabeza de la bomba está... -
Page 16: Connecting The Unit
Schlauch an die Wasserversorgung anschliessen. tuyau à l'alimentation d'eau. Connect the unit to a water supply with the original EMS water hose supplied with your product. Schliessen Sie das Gerät über den Original-EMS- Brancher l'alimention d'eau de l'appareil avec le tuyau Wasserschlauch im Lieferumfang Ihres Produkts an original EMS, livré... -
Page 17: Conexión De La Unidad
Conecte la unidad al suministro de agua con la Anslut enheten till en vattentillförsel med den origi- Collegare l'apparecchio a un'erogatore d'acqua con manguera original EMS incluida con el producto. nalvattenslang från EMS som medföljer produkten. il tubo flessibile dell'acqua originale EMS fornito insieme al prodotto. - Page 18 To connect the foot pedal and the power supply Pour connecter la pédale et l'alimentation au Um den Fussschalter und das Netzkabel an den to the Piezon 250, turn over the unit as shown in Piezon 250, retourner l'appareil comme illustré Piezon 250 anzuschließen, drehen Sie das Gerät the pictures above.
- Page 19 30 VDC Para conectar el pedal y la fuente de alimentación Per collegare il pedale e l'alimentatore al Piezon Vänd på enheten enligt bilderna ovan när du ska al Piezon 250, dé la vuelta a la unidad como se 250, capovolgere l'apparecchio come mostrato ansluta pedalen och nätaggregatet till Piezon 250.
-
Page 20: Electrical Safety Precautions
Electrical safety precautions Remarques concernant la sécurité Elektrische Sicherheitsvorschriften électrique No modification of the unit and the acces- An diesem Gerät und dem mitgelieferten N’apportez aucune modification sur sories supplied with the unit are allowed. Zubehör dürfen keinerlei Modifikationen vorge- l'appareil et sur les accessoires livrés avec nommen werden. -
Page 21: Precauciones De Seguridad Eléctrica
Precauciones de seguridad eléctrica Precauzioni di sicurezza elettrica Elektriska säkerhetsanvisningar No se permite ninguna modificación de la Non è consentita alcuna modifica all'appa- Det är inte tillåtet att utföra några ändringar unidad y de los accesorios suministrados con la recchio e agli accessori forniti con l'apparecchio. av enheten och de tillbehör som medföljer unidad. -
Page 22: Preparing For Treatment
PREPARING fOR TREATMENT PRéPARATION POUR VORBEREITEN DER LE TRAITEMENT BEhANDLUNG Mode and instruments Mode et instruments Betriebsart und Instrumente Scaling Détartrage Scaling Avoid using the HVE (high volume evacu- Eviter l'utilisation du HVE (high volume Um eine ausreichende Kühlung des évacuation) afin d'assurer un refroidissement ation) to ensure sufficient cooling of the tooth Zahns und des Instruments zu gewährleisten,... -
Page 23: Preparación Para El Tratamiento
PREPARACIóN PARA PREPARAZIONE PER IL föRBEREDA föR EL TRATAMIENTO TRATTAMENTO BEhANDLING Modo e instrumentos Modalità e strumenti Läge och instrument Raspado Ablazione del tartaro Borttagning av plack och tandsten Evite el uso de la HVE (evacuación de Non utilizzare l'HVE (High Volume Undvik användning av HVE (high volume alto volumen) para asegurar una refrigeración Evacuation: evacuazione di grande volume) per... -
Page 24: Connecting The Handpiece
Anschliessen des Handstücks Connecting the handpiece Connexion de la pièce à main Clean, disinfect and sterilize the different Nettoyer, désinfecter et stériliser les diffé- Reinigen, desinfizieren und sterilisieren Sie pieces and accessories of this product before each rentes pièces et accessoires de ce produit avant die verschiedenen Bestandteile und das Zubehör use. -
Page 25: Conexión Del Mango
Connessione del manipolo Ansluta handstycket Conexión del mango Limpie, desinfecte y esterilice las diversas Pulire, disinfettare e sterilizzare i vari pezzi Rengör, desinfektera och sterilisera piezas y accesorios de este producto antes de e accessori di questo prodotto prima di ogni produktens olika delar och tillbehör före varje cada uso. -
Page 26: Attaching The Instruments
S i e d ü r f e n g r u n d s ä t z l i c h n u r d e n fixer l'instrument EMS sur la pièce à main au EMS instrument on the handpiece to the correct CombiTorque verwenden, um das EMS-Instrument couple approprié. -
Page 27: Conexión De Los Instrumentos
Utilice únicamente la CombiTorque para Servirsi esclusivamente del CombiTorque Använd endast CombiTorque för att dra åt apretar el instrumento EMS en el mango hasta el per serrare con la coppia corretta lo strumento EMS-instrumentet på handstycket till rätt åtdrag- par de torsión correcto. Después de atornillar el EMS sul manipolo. -
Page 28: Installing The Bottle (Piezon 250)
Installieren der Flasche (Piezon 250) Installing the bottle (Piezon 250) Installation de la bouteille (Piezon 250) Always check the condition of the bottle cap Toujours vérifier l'état du joint du couvercle Vor dem Installieren der Flasche müssen O-ring before installing the bottle. Please refer to de la bouteille avant de la mettre en place. -
Page 29: Instalación De La Botella (Piezon 250)
Installazione della bottiglia (Piezon 250) Installera flaskan (Piezon 250) Instalación de la botella (Piezon 250) Compruebe siempre el estado de la junta Prima di installare la bottiglia, controllare Kontrollera alltid skicket hos O-ringen i tórica del tapón de la botella antes de instalar la sempre le condizioni della guarnizione anulare flasklocket innan du installerar flaskan. -
Page 30: Solutions Compatible With The Circuit
® Cepacol /..® Solutions désinfectants pour laver le circuit Disinfecting solutions for washing the circuit Desinfektionslösungen zum Waschen des • EMS Ultra Clean (H Kreislaufs • EMS Ultra Clean (H • Peroxide d'hydrogène (H • Hydrogen peroxide (H •... -
Page 31: Soluciones Compatibles Con El Circuito
Soluciones desinfectantes para el lavado del Soluzioni disinfettanti per il lavaggio del Desinfektionslösningar för rengöring av circuito circuito kretsen • EMS Ultra Clean (H • EMS Ultra Clean (H • EMS Ultra Clean (H 6 %) • Peróxido de hidrógeno (H •... -
Page 32: Operating The Unit
OPERATING ThE UNIT UTILISATION DE L'APPAREIL VERWENDUNG DES GERäTS To switch on the unit turn the power knob Tourner l'interrupteur principal dans le sens Zum Einschalten des Geräts drehen Sie in a clockwise direction. des aiguilles d'une montre pour mettre l'appareil den Leistungsregler im Uhrzeigersinn. -
Page 33: Funcionamiento De La Unidad
fUNCIONAMIENTO fUNZIONAMENTO DELL'UNITà ANVäNDA ENhETEN DE LA UNIDAD Para encender la unidad gire el selector de Per accendere l'unità, ruotare la manopola När du vill slå på enheten vrider du effek- potencia en el sentido de las agujas del reloj. d'accensione e regolazione della potenza in senso tratten i medurs riktning. -
Page 34: Setting The Ultrasound Power
Setting the ultrasound power Réglage de la puissance des ultrasons Einstellen der Ultraschallleistung Use the rotating knob to increases or decreases Utiliser le pommeau rotatif pour augmenter ou Verwenden Sie den Drehknopf zum Erhöhen oder the power of the ultrasound. diminuer la puissance des ultrasons. -
Page 35: Ajuste De La Potencia De Los Ultrasonidos
Ajuste de la potencia de los Impostazione della potenza Ställa in ultraljudseffekten ultrasonidos ultrasonica Utilice el selector rotativo para aumentar o Utilizzare la manopola rotante per aumentare o Använd vridratten när du vill öka eller minska disminuir la potencia de los ultrasonidos. ridurre la potenza degli ultrasuoni. -
Page 36: Perio" Mode
"Perio" mode Die Perio-Betriebsart Le mode "Perio" When using an Perio tip, the maximum Le réglage maximum pour l'utilisation d'un Bei der Verwendung einer Perio-Spitze power setting is 4. instrument Perio est de 4. entspricht die maximal zulässige Leistungsein- stellung dem Wert 4. The setting range for the "Perio"... -
Page 37: Modo "Perio
Modo "Perio" Modalità "Perio" Läget Perio (Parodonti) PERIO La potencia máxima cuando se utilizan Nell'uso di una punta Perio, l'impostazione Vid användning av en Perio-spets (parodon- puntas Perio es 4. massima della potenza è 4. tispets) är den maximala effektinställningen 4. El rango de potencia para el modo "Perio"... -
Page 38: Scaling" Mode
"Scaling" mode Mode "Détartrage" Scaling-Betriebsart Die Scaling-Betriebsart nutzt den gesamten The "Scaling" mode uses the entire power Le mode détartrage utilise la plage entière Ultraschallleistungsbereich von „EIN“ bis „MAX“. range for the ultrasounds, from "ON" to "MAX". de puissances des ultrasons, de "ON" jusqu'à MAX". -
Page 39: Modo "Raspado
Modo "Raspado" Modalità "Ablazione del tartaro" Läget Scaling (Borttagning av plack och tandsten) SCALING El modo "Raspado" utiliza todo el rango La modalità "Ablazione del tartaro" utilizza Läget Scaling (Borttagning av plack och de potencia de los ultrasonidos, desde "ON" l'intero intervallo di potenze degli ultrasuoni, da tandsten) använder hela effektintervallet för hasta"MAX". -
Page 40: Setting The Liquid Flow Rate
Setting the liquid flow rate Réglage du débit du liquide Einstellen der Wasserdurchsatzmenge Optimal settings for the liquid flow rate for Le réglage optimal pour le débit du liquide Die optimalen Einstellungen für den each instrument are indicated in the operating pour chaque instrument est indiqué... -
Page 41: Ajuste Del Caudal Del Líquido
Ajuste del caudal del líquido Impostazione della velocità del flusso Ställa in vätskans flödeshastighet del liquido Los ajustes óptimos para el caudal de cada Le impostazioni ottimali della velocità del Optimala inställningar för vätskans flödes- instrumento se indican las instrucciones de funcio- flusso del liquido di ogni strumento sono riportate hastighet för varje instrument anges i bruksanvis- namiento de los "Sistemas Piezon". -
Page 42: Piezon Handpiece Led (Option)
Piezon handpiece LED (Option) Pièce à main Piezon LED (Option) Piezon-Handstück-LED (Option) The Piezon handpiece LED lights up La pièce à main Piezon LED s'éclaire Die Piezon-Handstück-LED leuchtet auf, when the foot pedal is activated. It remains lit for lorsque la pédale de commande est activée. Elle wenn der Fussschalter aktiviert wird. -
Page 43: Led Del Mango Piezon (Opcional)
LED del mango Piezon (opcional) LED del manipolo Piezon (Opzionale) Lysdioden på Piezon-handstycket (tillval) 20 seconds La luz LED del mango Piezon se ilumina al Il LED del manipolo Piezon si accende Lysdioden på Piezon-handstycket tänds activar el pedal. Permanece encendida durante all'attivazione del pedale. -
Page 44: Foot Pedal Functions
Foot pedal functions Fonction de la pédale de commande Funktionen des Fussschalters Ultrasounds with liquid Ultrasons avec liquide Ultraschall mit Flüssigkeit (2 STEPS) Liquid spray + Light Jet de liquide + Lumière Sprühnebel + Licht Pulverizador de líquido + Luz Spruzzo liquido + Luce Vätskesprej + ljus Liquid spray + Light + Ultrsounds... -
Page 45: Funciones Del Pedal
Funciones del pedal Funzioni del pedale Pedalfunktioner Ultrasuoni con liquido Ultraljud med vätska Ultrasonidos con líquidos Antes de la primera utilización, mantenga Al primo utilizzo, mantenere la pressione Vid den första användningen ska pedalen la presión en el pedal hasta que salga agua por sul pedale fino alla fuoriuscita dell'acqua dal hållas nedtryckt tills vattnet har kommit ut ur el mango. -
Page 46: End Of Treatment
END Of TREATMENT EN fIN DE TRAITEMENT ENDE DER BEhANDLUNG Clean the instrument and the CombiTorque Nettoyer l'instrument et le CombiTorque Reinigen Sie das Instrument und den with running water before disinfection. avec de l'eau courante avant la désinfection. CombiTorque vor dem Desinfizieren unter fliessendem Wasser. -
Page 47: Fin Del Tratamiento
fIN DEL TRATAMIENTO fINE DEL TRATTAMENTO VID SLUTET AV BEhANDLINGEN Limpie el instrumento y la CombiTorque con Prima della disinfezione, pulire lo strumento Rengör instrumentet och CombiTorque med agua corriente antes de desinfectarlos. e il CombiTorque con acqua corrente. rinnande vatten före desinfektion. Limpie la unidad y los accesorios (consulte Pulire l'unità... -
Page 48: Circuit Washing
Circuit washing Rinçage du circuit Waschen des Kreislaufs 20 s (distilled water) Once the treatment has been completed, Une fois le traitement terminé rincer le Nach Abschluss der Behandlung waschen wash the circuit during 20 sec. of distilled circuit pendant 20 sec. avec de l'eau distillée (ou Sie den Kreislauf 20 Sekunden lang mit destil- (or demineralized) water to avoid a possible déminéralisée) afin d'éviter une réaction possible... -
Page 49: Limpieza Del Circuito
Limpieza del circuito Lavaggio del circuito Tvätta kretsen Cuando haya terminado el tratamiento, Una volta terminato il trattamento, lavare il Tvätta kretsen i 20 sekunder med destillerat limpie el circuito durante 20 segundos con agua circuito per 20 sec. con acqua distillata (o demine- (eller demineraliserat) vatten efter att behand- destilada (o desmineralizada) para evitar una ralizzata) per evitare una possibile reazione... -
Page 50: Handpiece Disassembly
Handpiece disassembly Démontage de la pièce à main Demontieren des Handstücks Unscrew the cap and the light guide (when Dévisser l'embout et la lumière (si équipé) Lösen Sie den Deckel und den Lichtleiter equipped) under running water before cleaning. et le rincer à l'eau courante avant nettoyage. (sofern vorhanden) vor dem Reinigen unter fließendem Wasser. -
Page 51: Desmontaje Del Mango
Desmontaje del mango Smontaggio del manipolo Demontera handstycket Desatornille el tapón y la guía de la luz Svitare il tappo e la guida luminosa (se in Skruva loss höljet och ljusledaren (i (si está equipado con esta opción) bajo agua dotazione) e passarli sotto l'acqua corrente prima förekommande fall) under rinnande vatten före corriente antes de la limpieza. -
Page 52: Cleaning And Sterilizing
CLEANING AND STERILIZING NETTOyAGE ET STéRILISATION REINIGEN UND STERILISIEREN 135°C Recommended cleaning, packaging for steril- Les procédures de nettoyage, et emballage pour Im Folgenden sind die Empfehlungen im Hinblick ization, and sterilization procedures are provided la stérilisation sont décrites ci-dessous. auf Reinigungs-, Verpackungs- und Sterilisie- below. -
Page 53: Limpieza Y Esterilización
LIMPIEZA y ESTERILIZACIóN PULIZIA E STERILIZZAZIONE RENGöRING OCh STERILISERING A continuación se indican los procedimientos Le procedure raccomandate per la pulizia, l'imbal- Rekommenderade förfaranden för rengöring, recomendados de limpieza, embalaje para la laggio per la sterilizzazione e la sterilizzazione omslag för sterilisering och sterilisering ges esterilización y esterilización. -
Page 54: Packaging For Sterilization
EMS recommends sterilization in a fractional cycle EMS recommande une stérilisation en fraction at 132 °C for at least 4 min. EMS recommends use Sterilisation de cycle à 132 °C pendant au moins 4 min. EMS of biological indicators and chemical indicators recommande l'utilisation d'indicateurs biologiques that have been validated for use in a 132 °C steam... -
Page 55: Embalaje Para La Esterilización
Sterilizzazione EMS rekommenderar sterilisering i en fraktionerad EMS recomienda un ciclo fraccionado de esteri- cykel vid 132 °C under minst 4 min. EMS rekom- lización a 132 °C durante al menos 4 min. EMS menderar användning av biologiska indikatorer EMS raccomanda la sterilizzazione in ciclo recomienda el uso de indicadores biológicos y... -
Page 56: Cleaning The Bottle And The Unit
Cleaning the bottle and the unit Nettoyage de la bouteille et de Reinigen der Flasche und des Geräts l'appareil Bottles can be washed in a washer and Les bouteilles peuvent être lavées et désin- Die Flaschen können in einer Waschanlage disinfected at up to 95 °C in a washer disinfector. -
Page 57: Limpieza De La Botella Y La Unidad
Limpieza de la botella y la unidad Pulizia della bottiglia e dell'unità Rengöra flaskan och enheten Las botellas se pueden lavar en una Le bottiglie possono essere lavate in Flaskorna kan tvättas i en diskmaskin och lavadora y desinfectarse hasta 95 °C en una lavatrice e disinfettate in una lavatrice disinfet- desinfekteras vid upp till 95 °C i en diskdesinfektor. -
Page 58: Disinfecting The Circuit
Disinfecting the circuit Désinfection du circuit Desinfizieren des Kreislaufs 20 s 20 s disinfecting (distilled water) liquid It is recommended to disinfect the liquid Il est recommandé de désinfecter le circuit Wir empfehlen die tägliche Desinfizierung des Flüssigkeitskreislaufs. circuit daily. de liquide quotidiennement. -
Page 59: Desinfección Del Circuito
Desinfección del circuito Disinfezione del circuito Desinfektera kretsen 20 s (sterile water) 5 min Vi rekommenderar att vätskekretsen desin- Se recomienda desinfectar el circuito del Si raccomanda di disinfettare il circuito del fekteras dagligen. líquido a diario. liquido ogni giorno. Desinfektion är nödvändig för att minska La desinfección es necesaria para reducir La disinfezione è... -
Page 60: Maintenance
MAINTENANCE MAINTENANCE WARTUNG The EMS Piezon instruments must be checked Les instruments EMS Piezon doivent être vérifiés Die EMS Piezon-Instrumente müssen regelmäßig regularly using the EMS "Tip Card". Ultrasound régulièrement utilisant la EMS "Tip Card". Les mithilfe der EMS „Tip Card“ geprüft werden. -
Page 61: Mantenimiento
Los instrumentos Piezon de EMS deben revisarse Gli strumenti EMS Piezon devono essere EMS Piezon-instrumenten måste kontrol- regularmente con la "Tip Card" de EMS. Los controllati regolarmente utilizzando la "Scheda leras regelbundet med hjälp av EMS Tip Card instrumentos de ultrasonidos se desgastan por punte"... -
Page 62: Verification Of O-Rings
Bedienungsanleitung für das Wartungsset zum un joint torique. Austauschen eines O-Rings. Always use EMS original parts. Using non- original instruments may damage the unit, and Toujours utiliser des pièces d'origines EMS. Verwenden Sie grundsätzlich EMS Origi- practitioner or patient may be injured. -
Page 63: Verificación De Las Juntas Tóricas
Använd alltid originaldelar från EMS. junta tórica. manutenzione. Användning av icke-originalinstrument kan orsaka Utilice siempre piezas originales de EMS. El Usare sempre ricambi originali EMS. L'uti- skada på enheten, tandläkaren eller patienten. uso de instrumentos no originales puede causar lizzo di strumenti non originali potrebbe danneg- daños en la unidad y lesiones en el médico o el... -
Page 64: Replacing The Pump (Piezon 250)
Replacing the pump (Piezon 250) Replacement de la pompe (Piezon 250) Austauschen der Pumpe (Piezon 250) The pump of the unit is a wear part, it is recom- La pompe de l'appareil est un élément qui s'use, il Die Pumpe des Geräts ist ein Verschleissteil, mended to change it every 12 months. -
Page 65: Sustitución De La Bomba (Piezon 250)
Sustitución de la bomba (Piezon 250) Sostituzione della pompa (Piezon 250) Byta ut pumpen (Piezon 250) La bomba de la unidad es una pieza que se La pompa dell'unità è una parte soggetta ad usura Enhetens pump är en slitdel och vi rekommen- desgasta y se recomienda cambiarla cada e si raccomanda di cambiarla ogni 12 mesi. -
Page 66: Safety Precautions
SAfETy PRECAUTIONS REMARqUES CONCERNANT LA SIChERhEITSVORSChRIfTEN SéCURITé EMS and the dealer of this product accept no EMS et le distributeur de ce produit ne peuvent EMS und der Händler des Produkts haften nicht liability for direct or consequential injury or damage être tenus responsables d’éventuels préjudices... -
Page 67: Precauciones De Seguridad
PRECAUCIONES DE PRECAUZIONI DI SICUREZZA SäKERhETSANVISNINGAR SEGURIDAD EMS y el distribuidor de este producto no se hacen EMS e il rivenditore di questo prodotto non si EMS och återförsäljaren av denna produkt tar responsables de los daños directos e indirectos assumono alcuna responsabilità... - Page 68 Un acces- oder ein beschädigte Geräte dürfen nicht must be replaced. Use original EMS spare parts soire ou un appareil endommagé ne doit plus mehr verwendet werden und sind zu ersetzen.
- Page 69 Använd endast den pedal (ref. EK-128) som unidad EMS. Utilizzare esclusivamente l'alimentatore medföljer vid leveransen av EMS-enheten. esterno (rif. EK-357) fornito con l'unità EMS. Utilice únicamente el pedal (ref EK-128) Vissa typer av mobil telekommunikations- entregado con la unidad EMS.
-
Page 70: Storing The Product
STORING ThE PRODUCT RANGEMENT DU PRODUIT LAGERN DES PRODUKTS Keep the original packaging until the Nous vous conseillons de conserver Bewahren Sie die Originalverpackung bis product is to be disposed of permanently. It can l’emballage d’origine jusqu’à la mise au rebut de zur endgültigen Entsorgung Ihres Produkts auf. -
Page 71: Almacenamiento Del Producto
ALMACENAMIENTO DEL IMMAGAZZINAMENTO DEL föRVARING AV PRODUKTEN PRODUCTO PRODOTTO Le aconsejamos que conserve el embalaje Conservare l'imballo originale fino allo Behåll originalförpackningen tills produkten original hasta el momento de deshacerse de su smaltimento definitivo del prodotto, È possibile ska kasseras slutgiltigt. Den kan när som helst producto. -
Page 72: Disposal
European l'Union Européenne peuvent être envoyés à EMS schen Union kann gemäß der WEEE-Richtlinie Union may be shipped to EMS for recycling in pour être recyclés en accord avec la directive für die Wiederverwertung an EMS zurückgegeben accordance to the WEEE regulations. -
Page 73: Eliminación Del Producto
Unión Europea pueden enviarse Europea possono essere inviati a EMS per (om avfall som utgörs av eller innehåller elektriska a EMS para su reciclaje de conformidad con la riciclarli in conformità con la normativa RAEE. Il eller elektroniska produkter). EMS står för kostna- normativa sobre RAEE. -
Page 74: Ems Service
Reparaturen ohne Erlaubnis sowie Schäden non-respect du mode d’emploi dégagent EMS tions, EMS accepts no liability whatsoever. This bei Nichtbeachtung der Bedienungsanleitung de toute responsabilité et annulent la garantie. will also void the warranty. -
Page 75: Servicio Técnico De Ems
EMS declina qualsiasi responsabilità in icke-efterlevnad av bruksanvisningen. Detta ciones de empleo liberan a EMS de cualquier merito e ne renderà nulla la garanzia. ogiltiggör även garantin. responsabilidad en cuanto a la garantía se refiere. -
Page 76: Symbols
SyMBOLS SyMBOLE SyMBOLES Manufacturer’s logo Logo du fabricant Herstellerlogo Power setting maximum of the mode "PERIO" MAX.PERIO Réglage de la puissance maximum du mode "PERIO" Maximale Leistungseinstellung in der Perio-Betriebsart CE marking: refers to directive 93/42 EEC, including EN 60601-1 and EN 60601-1-2 Marquage de conformité... -
Page 77: Símbolos
SÍMBOLOS SIMBOLI SyMBOLER Logotipo del fabricante Logo del produttore Tillverkarens logotyp Ajuste de potencia máxima del modo "PERIO" MAX.PERIO Impostazione potenza massima della modalità "PERIO" Maximal effektinställning för läget PERIO (Parodonti) Marcación de conformidad CE: hace referencia a la norma 93/42 CEE, inclusive EN 60601-1 y EN 60601-1-2 Marchio CE: si riferisce alla direttiva 93/42 CEE, inclusa la EN 60601-1 e EN 60601-1-2 CE-märkning: hänvisar till direktiv 93/42 EEG, inklusive EN 60601-1 och EN 60601-1-2 ¡Precaución! - Page 78 Refer to instruction manual Lire le manuel d'instructions Siehe Bedienungsanleitung Reference number Numero de la référence Referenznummer Serial number Numéro de série Seriennummer Manufacturer Fabricant Hersteller Manufacture date Date de fabrication Herstellungsdatum Sterilizable at up to 135 °C 135°C Stérilisable jusqu'à 135 °C Sterilisierbar bei bis zu 135 °C Liquid flow rate Débit de liquide...
- Page 79 Consulte el manual de instrucciones Consultare il manuale delle istruzioni Se användarhandboken Número de referencia Numero di riferimento Referensnummer Número de serie Numero di serie Serienummer Fabricante Produttore Tillverkare Fecha de fabricación Data di fabbricazione Tillverkningsdatum Esterilizable hasta 135 °C Sterilizzabile fino a 135°C 135°C Steriliserbar upp till 135 °C...
- Page 80 Applied part, type BF Pièce appliquée de type BF Zur Anwendung am Patienten, Typ BF Thermal disinfection Désinfection thermique Thermische Desinfektion...
- Page 81 Pieza de aplicación tipo BF Parte applicata, tipo BF Patientansluten del, BF-typ Desinfección térmica Disinfezione termica Värmedesinfektion...
-
Page 82: Technical Data
Dimensions in mm (H x W x D) Piezon150: 96 x 170 x 135 Dimensions en mm (HxLxP) Piezon 150: 96 x 170 x 135 Piezon250: 96 x 153 x 215 Piezon 250: 96 x 153 x 215 Operating conditions +10 °C to +40 °C... -
Page 83: Technische Daten
Dimensiones in mm (Al x An x Pr) Piezon150: 96 x 170 x 135 Abmessungen in mm (H x B x T) Piezon 150: 96 x 170 x 135 Piezon250: 96 x 153 x 215 Piezon 250: 96 x 153 x 215 Betriebsbedingungen +10 °C bis +40 °C... -
Page 84: Dati Tecnici
EMS ELECTRO MEDICAL SYSTEMS SA, Tillverkare EMS ELECTRO MEDICAL SYSTEMS SA, CH-1260 Nyon, Svizzera CH-1260 Nyon, Schweiz Modelli Piezon 150 e Piezon 250 Modeller Piezon 150 och Piezon 250 Classificazione EN 60601-1 - Classe II Klassificering enligt EN 60601-1 – Klass II - Parte applicata, Tipo BF –... -
Page 86: Troubleshooting
Use compressed air (max. 3 bar) and check that air comes out of the handpiece • If the air does not come out of the handpiece send to an approved EMS repair center • Replace the external filter for the Piezon 150 •... -
Page 87: Dépannage
Pas d’irrigation lorsque la pédale de • Régler le débit d'irrigation au maximum • Contrôler les connexions des tuyaux d'eau pour le Piezon 150 commande est actionnée • Contrôler la bonne installation de la bouteille pour le Piezon 250 •... -
Page 88: Fehlerbehebung
Drehen Sie den Regler für die Wasserdurchsatzmenge auf das Maximum. Fussschalter aktiviert wird. • Vergewissern Sie sich, dass das externe Gerät für den Piezon 150 mit Wasser versorgt wird. • Vergewissern Sie sich, dass die Flasche für den Piezon 250 ordnungsgemäß installiert wurde. -
Page 89: Solución De Problemas
Gire el mando de caudal de líquido para abrirlo al máximo el pedal • Asegúrese de que el agua entra en el dispositivo externo para el Piezon 150 • Asegúrese de que la botella está instalada correctamente para el Piezon 250 •... -
Page 90: Ricerca E Risoluzione Dei Problemi
Scollegare il manipolo a ultrasuoni e verificare che il liquido fuoriesca dal cavo • Utilizzare aria compressa (max. 3 bar) per verificare che l'aria fuoriesca dal manipolo • Se l'aria non fuoriesce dal manipolo, inviarlo a un centro di assistenza EMS autorizzato • Per il Piezon 150, sostituire il filtro esterno •... -
Page 91: Felsökning
• Använd tryckluft (högst 3 bar) och kontrollera att luften kommer ut från handstycket • Om luften inte kommer ut från handstycket ska du skicka produkten till ett godkänt EMS-reparationscenter • Byt ut det externa filtret för Piezon 150 •... - Page 92 Tel. +39 02 3453 8111 Fax +49 89 42 71 61 60 Fax +39 02 3453 2778 e-mail: info@ems-ch.de e-mail: dental@ems-italia.it SPAIN EMS Electro Medical Systems España SL EMS Corporation Bernardino Obregón 14 bis 11886 Greenville Avenue #120 E-28012 Madrid Dallas, TX 75243, USA Tlf.
Need help?
Do you have a question about the Piezon 150 and is the answer not in the manual?
Questions and answers