EMS PIEZON 250 Operation Instructions Manual
Hide thumbs
Also See for PIEZON 250:
- Operation instructions manual (92 pages) ,
- Operation instructions manual (52 pages) ,
- Operation instructions manual (33 pages)
Table of Contents
Advertisement
Advertisement
Table of Contents

Related Manuals for EMS PIEZON 250


Summary of Contents for EMS PIEZON 250
- Page 1 PIEZON 150 / PIEZON ® ® OPERATION INSTRUCTIONS MODE D'EMPLOI...
- Page 2 Piezon 150 Piezon 250...
- Page 3 CombiTorque CombiTorque External fi lter Filtre externe Hu-Friedy & EMS supply units with various accessories. Hu-Friedy & EMS fournissent cet appareil avec différents The "Packing list" shows exactly what is included with accessoires. Le bordereau d’expédition détaille exactement your unit.
- Page 4 DEAR CUSTOMERS, Thank you for buying a new Hu-Friedy & EMS product. This device meets the highest quality and safety standards. In order to get the best out of this high-end dental product and ensure the longest working life possible, please read this manual carefully before using or maintaining the product.
- Page 5 CHERS CLIENTS, Nous vous félicitons de l'acquisition de ce nouveau produit Hu-Friedy & EMS. Il répond aux plus hautes exigences en matière de qualité et de sécurité. Afi n d’utiliser au mieux votre appareil dentaire haut de gamme et pour lui assurer une durée de vie la plus longue possible, veuillez lire attentivement ce manuel avant d’utiliser l’appareil ou avant toute...
- Page 6 Read the instruction manuals originally delivered with each of the components before using this product. Do not hesitate to contact your local Hu-Friedy & EMS dealer for further information. This product needs special precautions regarding electromagnetic compatibility and needs to be...
- Page 7 Les instructions concernant les composants du système sont fournies séparément dans les manuels d’instructions correspondants. Veuillez lire les manuels d’instructions livrés avec chacun des composants avant d’utiliser ce produit. N’hésitez pas à contacter votre distributeur Hu-Friedy & EMS pour plus d’informations.
- Page 8 We would be pleased to answer your questions or listen to your suggestions. We do, of course, provide support in case of technical problems. Please call your approved Hu-Friedy & EMS repair center or your dealer directly. We wish you lots of success!
- Page 9 Nous sommes à votre entière disposition pour répondre à vos questions et nous sommes à l’écoute de vos éventuelles suggestions. Naturellement, nous vous proposons un soutien technique en cas de problèmes. Veuillez contacter votre centre de réparation agré Hu-Friedy & EMS ou votre distributeur. Avec nos meilleurs vœux de succès!
-
Page 10: Table Of Contents
Treatment ............2 Indications ............ 2 Contraindication ........... 2 Installation and connection ......4 Installing the pump (Piezon 250) ....4 Connecting the unit ........6 Electrical safety precautions ...... 10 Preparing for treatment ........12 Mode and instruments ....... 12 Connecting the handpiece ...... - Page 11 Traitement ............3 Dépannage ............. 75 Indications ............ 3 Contre-indication .......... 3 Installation et connection ......... 5 Installation de la pompe (Piezon 250) ..5 Brancher l'appareil ........7 Remarques concernant la sécurité électrique ............ 11 Préparation pour le traitement ....... 13 Mode et instruments........
-
Page 12: Treatment
TREATMENT Indications This product is designed for use in dentistry with Hu-Friedy & EMS ultrasound instruments for the following indications: • Periodontal Pocket Lavage with simultaneous ultrasonic movement • Scaling and Root Planning • Removal of Supra and Subgingival Calculus and Stains from Teeth Contraindication Ultrasonic oscillations may prevent cardiac pacemakers and defi... -
Page 13: Traitement
TRAITEMENT Indications Ce produit est conçu pour une utilisation en dentisterie avec des instruments à ultrasons Hu-Friedy & EMS pour les indications suivantes: • Nettoyage de poches parodontales par mouvement à ultrasons simultané • Détartrage et surfaçage de la racine •... -
Page 14: Installation And Connection
INSTALLATION AND CONNECTION Installing the pump (Piezon 250) Ensure that the pump head cover is correctly closed, before using the device. -
Page 15: Installation Et Connection
INSTALLATION ET CONNECTION Installation de la pompe (Piezon 250) S'assurer que le couvercle de tête de pompe est correctement fermé, avant d'utiliser l'appareil. -
Page 16: Connecting The Unit
Install the external fi lter of water before connecting the hose to the water supply. Connect the unit to a water supply with the original Hu-Friedy & EMS water hose supplied with your product. It is recommended to use an independent water supply. -
Page 17: Brancher L'appareil
Pour les USA ou le Canada: brancher uniquement à une prise secteur "Hospital Grade". Installer le fi ltre à eau externe avant de brancher le tuyau à l'alimentation d'eau. Brancher l'alimention d'eau de l'appareil avec le tuyau original Hu-Friedy & EMS, livré avec votre appareil. Il est recommandé d'utiliser un circuit d'eau indépendant. - Page 18 To connect the foot pedal and the power supply to the Piezon 250, turn over the unit as shown in the pictures above.
- Page 19 30 VDC Pour connecter la pédale et l'alimentation au Piezon 250, retourner l'appareil comme illustré ci-dessus.
-
Page 20: Electrical Safety Precautions
Electrical safety precautions No modifi cation of the unit and the accessories supplied with the unit are allowed. Do not touch the connector of the handpiece cord and the patient simultaneously. The power supply must not be fi xed tightly by screw. The power supply can be placed on a table or hung on the wall. -
Page 21: Remarques Concernant La Sécurité Électrique
Remarques concernant la sécurité électrique N’apportez aucune modifi cation sur l'appareil et sur les accessoires livrés avec l'appareil. L'utilisateur ne doit pas toucher simultanément la prise du câble et le patient Le boîtier d'alimentation ne doit pas être fi xé par vis. Le boîtier d'alimentation peut être placé... -
Page 22: Preparing For Treatment
PREPARING FOR TREATMENT Mode and instruments Scaling Avoid using the HVE (high volume evacuation) to ensure sufficient cooling of the tooth and the instrument. The instrument heats up quickly if the irrigation flow rate is not sufficient. Instruments: please refer to the "Piezon Systems" manual. -
Page 23: Préparation Pour Le Traitement
PRÉPARATION POUR LE TRAITEMENT Mode et instruments Détartrage Éviter l'utilisation du HVE (high volume évacuation) afi n d'assurer un refroidissement suffi sant de la dent et de l'instrument. L'instrument chauffe rapidement si le fl ux d'irrigation est insuffi sant. Instrument: Merci de se référer au mode d'emploi "Piezon Systems". -
Page 24: Connecting The Handpiece
Connecting the handpiece Clean and sterilize the different pieces and accessories of this product before each use. Please refer to the "Reprocessing" chapter. Non-sterile pieces and accessories may cause bacterial or viral infections. Blow dry the connections to remove the possible presence of liquid to ensure a proper electrical contact. -
Page 25: Connexion De La Pièce À Main
Connexion de la pièce à main Nettoyer, désinfecter et stériliser les différentes pièces et accessoires de ce produit avant chaque usage. Veuillez-vous référer au chapitre "Nettoyage désinfection et stérilisation". Des pièces et acces- soires non-stériles peuvent causer des infections bactériennes ou virales. Souffl... -
Page 26: Attaching The Instruments
Attaching the instruments Use only the CombiTorque to tighten the Hu-Friedy & EMS instrument on the handpiece to the correct torque. Once the instrument is screwed all the way in, give an extra quarter of a turn to obtain the required torque. -
Page 27: Fixation Des Instruments
Fixation des instruments Utiliser uniquement le CombiTorque pour fi xer l'instrument Hu-Friedy & EMS sur la pièce à main au couple approprié. Une fois l'instrument vissé, serrer encore d’un quart de tour afi n d'obtenir le couple de serrage requis. -
Page 28: Installing The Bottle (Piezon 250)
Installing the bottle (Piezon 250) Always check the condition of the bottle cap O-ring before installing the bottle. Please refer to the "Maintenance" chapter. Use the graduations on the bottle to adjust the quantity of solution necessary for the treatment. -
Page 29: Installation De La Bouteille (Piezon 250)
Installation de la bouteille (Piezon 250) Toujours vérifi er l'état du joint du couvercle de la bouteille avant de la mettre en place. Veuillez- vous référer au chapitre "Maintenance". Utiliser les graduations sur la bouteille pour ajuster la quantité de solution nécessaire au traitement. -
Page 30: Solutions Compatible With The Circuit
/ CloSYS™ / Scope ® / Cepacol ® /..Solutions for washing the circuit • EMS Ultra Clean (H • Hydrogen peroxide (H • Sterilox (hypochlorous acid) Incompatible mixing Different solutions can be used during treatment. Chemical reactions might occur between these solutions and damage the unit. -
Page 31: Solutions Compatibles Avec Le Circuit
® ® ® ® ® Solutions désinfectants pour laver le circuit • EMS Ultra Clean (H • Peroxide d'hydrogène (H • Sterilox (acide hypochlorique) Mélanges incompatibles Différents solutions désinfectantes peuvent être utilisées durant le traitement. Des réactions chimiques pourraient se produire entre ces liquides et endommager l’appareil. Laver le circuit de liquide pendant 20 secondes avec de l'eau distillée (ou déminéralisée) avant d'utiliser une solution désinfectante... -
Page 32: Operating The Unit
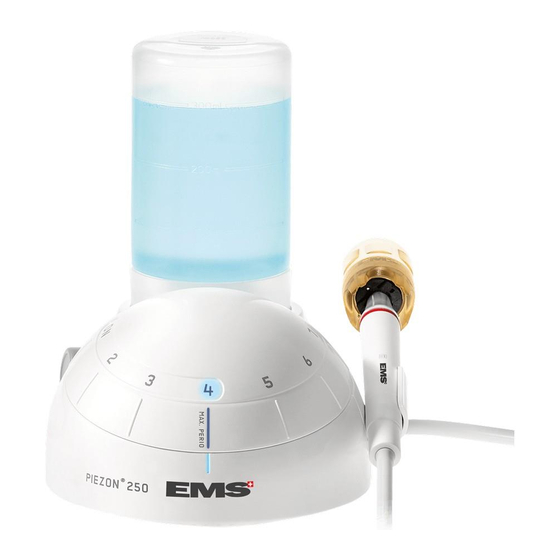
OPERATING THE UNIT To switch on the unit turn the power knob in a clockwise direction. Two control lamps light up. One lights the setting index to indicate that the unit is switched on. The other lights the Perio power range. -
Page 33: Utilisation De L'appareil
UTILISATION DE L'APPAREIL Tourner l'interrupteur principal dans le sens des aiguilles d'une montre pour mettre l'appareil sous tension. Deux voyants de control s'allument. Un voyant de réglage indique que l'appareil est sous tension. L'autre voyant indique le niveau de puissance Perio. -
Page 34: Setting The Ultrasound Power
Setting the ultrasound power Use the rotating knob to increases or decreases the power of the ultrasound. The unit has a setting range from "ON" to "MAX" to optimize the power of the ultrasound according to the treatment. For information on optimal setting of the ultrasound power for each instrument, please refer to the "Piezon Systems"... -
Page 35: Réglage De La Puissance Des Ultrasons
Réglage de la puissance des ultrasons Utiliser le pommeau rotatif pour augmenter ou diminuer la puissance des ultrasons. L'appareil dispose d'une plage de niveau partant de "ON" jusqu'à "MAX" pour optimiser le réglage da la puissance des ultrasons en accord avec le traitement. Des informations sur le réglage optimal de la puissance des ultrasons sont disponibles sur le manuel "Piezon Systems". -
Page 36: Perio" Mode
"Perio" mode When using an Perio tip, the maximum power setting is 4. The setting range for the "Perio" mode is from "ON" to "4" maximum. When the "Perio" mode switch ON, an LED indicates the setting of the power for ultrasounds. The maximum limit of the range is indicated by the mark "MAX. -
Page 37: Le Mode "Perio
Le mode "Perio" PERIO Le réglage maximum pour l'utilisation d'un instrument Perio est de 4. La plage de réglage pour un instrument "Perio" est de "ON" à "4" maximum. Lorsque le mode "Perio" est sur ON, un voyant indique le réglage de la puissance des ultrasons. La limite maximum de l'utilisation est indiquée par le repère "MAX. -
Page 38: Scaling" Mode
"Scaling" mode The "Scaling" mode uses the entire power range for the ultrasounds, from "ON" to "MAX". -
Page 39: Mode "Détartrage
Mode "Détartrage" SCALING Le mode détartrage utilise la plage entière de puissances des ultrasons, de "ON" jusqu'à MAX". -
Page 40: Setting The Liquid Flow Rate
Setting the liquid fl ow rate Optimal settings for the liquid fl ow rate for each instrument are indicated in the operating instruc- tions of the "Piezon Systems". Never work dry to avoid heat damage on the tooth, unless the instrument is intended specifi cally for this purpose. -
Page 41: Réglage Du Débit Du Liquide
Réglage du débit du liquide Le réglage optimal pour le débit du liquide pour chaque instrument est indiqué dans le manuel d'utilisation "Piezon Systems". Ne jamais travailler à sec afi n d'éviter des dommages dus à la chaleur sur le dents, à moins que l'instrument ne soit conçu pour ce mode d'utilisation. -
Page 42: Piezon Handpiece Led (Option)
Piezon handpiece LED (Option) The Piezon handpiece LED lights up when the foot pedal is activated. It remains lit for a duration of 20 seconds after the foot pedal is released. -
Page 43: Pièce À Main Piezon Led (Option)
Pièce à main Piezon LED (Option) 20 seconds La pièce à main Piezon LED s'éclaire lorsque la pédale de commande est activée. Elle reste allumée pour une durée de 20 secondes après que la pédale soit relâchée. -
Page 44: Foot Pedal Functions
Foot pedal functions Ultrasounds with liquid (2 STEPS) Liquid spray + Light Jet de liquide + Lumière Liquid spray + Light + Ultrasounds Jet de liquide + Lumière + Ultrasons Upon fi rst use, keep pressure on the pedal until the water comes out of the handpiece. -
Page 45: Fonction De La Pédale De Commande
Fonction de la pédale de commande Ultrasons avec liquide Avant la première utilisation maintenir la pression sur la pédale jusqu'à ce que la pièce à main expulse du liquide. -
Page 46: End Of Treatment
END OF TREATMENT Rinse the instrument with running water before cleaning. Please conform to the recommendations of the Reprocessing chapter of this manual regarding the procedures of cleaning and sterilizing of the reusable components... -
Page 47: En Fi N De Traitement
EN FIN DE TRAITEMENT Nettoyer l'instrument et le CombiTorque avec de l'eau courante avant la désinfection. Nettoyer l'appareil et les accessoires (veuillez lire le chapitre "Nettoyage, désinfection et stérili- sation"). -
Page 48: Circuit Washing
Circuit washing 20 s (distilled water) Once the treatment has been completed, wash the circuit with distilled (or demineralized) water for 20 seconds to avoid a possible reaction caused by ageing of the solution or by an inadvertent mixture of liquids. Clean the unit and the accessories (please refer to the "Reprocessing"... -
Page 49: Rinçage Du Circuit
Rinçage du circuit Une fois le traitement terminé rincer le circuit pendant 20 sec. avec de l'eau distillée (ou déminé- ralisée) afi n d'éviter une réaction possible causée par une solution ou par un mélange involontaire avec le liquide. Nettoyer l'appareil et les accessoires (veuillez lire le chapitre "Nettoyage, désinfection et stérili- sation". -
Page 50: Handpiece Disassembly
Handpiece disassembly Unscrew the cap and the light guide (when equipped) under running water before cleaning. -
Page 51: Démontage De La Pièce À Main
Démontage de la pièce à main Dévisser l'embout et la lumière (si équipé) et le rincer à l'eau courante avant nettoyage. -
Page 52: Reprocessing
The instruments, CombiTorque, handpidece holder, and handpiece supplied with the Piezon 150 and Piezon 250 must be cleaned and sterilized before the fi rst use. Reusable accessories must be cleaned and sterilized following each use. A listing of the reusable accessories is provided in the table below. -
Page 53: Retraitement
Les instruments, le CombiTorque, le support de Pièce à Main et la Pièce à Main fournis avec le Piezon 150 et Piezon 250 doivent être nettoyés et stérilisés avant la première utilisation. Les accessoires réutilisables doivent être nettoyés et stérilisés après chaque utilisation. Une liste des accessoires réuti- lisables est fourni dans le tableau ci-dessous. -
Page 54: Cleaning
Recommended cleaning, packaging for sterilization, and sterilization procedures are provided Reusable Instruments and Accessories for the Piezon below. 150 and Piezon 250 Cleaning Description Description Instrument RE2 INSTRUMENTS Instruments, Handpiece Connector, Combitorque Intrument A Instrument PI • Remove any externally attached soiling by brushing carefully with a soft surface brush or... -
Page 55: Nettoyage
Procédures de nettoyage, et emballage pour la stérilisation: Instruments et accessoires réutilisables pour le Piezon 150 et le Piezon 250 Nettoyage: Description Description Instrument RE2 Instruments, Connecteur de Pièce à Main, Combitorque INSTRUMENTS • Enlever délicatement à l'aide d'une brosse ou d'un chiffon doux les saletés sur les... -
Page 56: Packaging For Sterilization
The reusable Hu-Friedy & EMS Piezon 150 and 250 handpieces, instruments, and accessories must be steam-sterilized prior to the fi rst use and following each patient use. Hu-Friedy & EMS recommend sterilization in a fractional prevacuum cycle at 132°C for 4 minutes with a drying time of 20 minutes. -
Page 57: Emballage Pour La Stérilisation
La fermeture de cette poche doit être effectuée conformement aux instructions du fabricant. Stérilisation Les Pièces à Main réutilisables Hu-Friedy & EMS des Piezon 150 et 250 ainsi que les instruments et les accessoires doivent être stérilisés à la vapeur avant la première utilisation et après chaque utilisation sur un patient. -
Page 58: Cleaning The Bottle And The Unit (Piezon 250)
Cleaning the bottle and the unit (Piezon 250) The bottles can be washed in a dishwasher at temperatures of up to 95°C. The bottles cannot be sterilized. -
Page 59: Nettoyage De La Bouteille Et De L'appareil (Piezon 250)
Nettoyage de la bouteille et de l'appareil (Piezon 250) Les bouteilles peuvent être lavées en machine jusqu'à une température de 95 °C. Les bouteilles ne peuvent pas être stérilisées. -
Page 60: Cleaning The Circuit
Cleaning the circuit 20 s 20 s disinfecting (distilled water) liquid It is recommended to clean the liquid circuit daily. Cleaning is necessary to reduce crystalline deposits and the number of bacteria in the liquid circuit of the unit; the following procedure achieves a 5 log reduction of target pathogens (using washing solutions for cleaning the circuit as listed at the beginning of this manual): Remove the instrument, Pre-Cleaning the circuit during 20 seconds with distilled (or demineralized) water,... -
Page 61: Désinfection Du Circuit
Désinfection du circuit 20 s (sterile water) 5 min Il est recommandé de désinfecter le circuit de liquide quotidiennement. La désinfection est nécessaire à la réduction du dépôt cristallin et au nombre de bactéries dans le circuit du liquide de l'appareil; la procédure suivante décrit en 5 pas la réduction de pathogènes (utilisant des solutions de nettoyage du circuit, comme listées en début de ce manuel): Démonter l'instrument, Rincer le circuit pendant 20 secondes avec de l'eau distillée (ou déminéralisée),... -
Page 62: Maintenance
MAINTENANCE The Hu-Friedy & EMS Piezon instruments must be checked regularly using the Hu-Friedy & EMS "Tip Card". Ultrasound instruments wear during use and become shorter. Worn instruments are ineffective and are a cause of discomfort to the patient. Instruments showing wear on the diamond coating must be replaced. -
Page 63: Maintenance
MAINTENANCE Les instruments Hu-Friedy & EMS Piezon doivent être vérifi és régulièrement utilisant la Hu-Friedy & EMS "Tip Card". Les instruments ultrasons s'usent pendant l'usage et deviennent plus court. Les instruments usés sont ineffi caces et provoquent un inconfort du patient. -
Page 64: Verification Of O-Rings
Check that both connectors of the cord are dry before connecting it to the unit. Please refer to the instructions provided with the maintenance set to replace an O-ring. Always use Hu-Friedy & EMS original parts. Using non- original instruments may damage the unit, and practitioner or patient may be injured. -
Page 65: Vérification Du Joint Torique
Vérifi er que les connecteurs du câble sont bien secs avant de les brancher sur l'appareil. Veuillez-vous référer aux instructions fournis avec le set de maintenance pour remplacer un joint torique. Toujours utiliser des pièces d'origines Hu-Friedy & EMS. L'utilisation de composants d'une autre origine peuvent endommager l'équipement, blesser l'utilisateur et le patient. -
Page 66: Replacing The Pump (Piezon 250)
Replacing the pump (Piezon 250) The pump of the unit is a wear part, it is recommended to change it every 12 months. To change the pump, please refer to the chapter installing the pump in this manual. -
Page 67: Replacement De La Pompe (Piezon 250)
Replacement de la pompe (Piezon 250) La pompe de l'appareil est un élément qui s'use, il est recommandé de la remplacer tous les 12 mois. Pour changer la pompe, veuillez vous référer au chapitre installation de la pompe dans ce manuel. -
Page 68: Safety Precautions
ETL (Electrical Testing Laboratories) has not investigated the physiological effects. Always examine the product for damage before commencing treatment. Damaged accessories or a damaged unit must not be used and must be replaced. Use original Hu-Friedy & EMS spare parts and accessories only. -
Page 69: Remarques Concernant La Sécurité
REMARQUES CONCERNANT LA SÉCURITÉ Hu-Friedy & EMS et le distributeur de ce produit ne peuvent être tenus responsables d’éventuels préju- dices directs et indirects résultant d’un emploi inadéquat ou d’un maniement incorrect, en particulier lorsque le mode d’emploi n’a pas été respecté ou lorsque la préparation et l’entretien n’ont pas été... -
Page 70: Storing The Product
STORING THE PRODUCT Keep the original packaging until the product is to be disposed of permanently. It can be used for shipping or storing at any time. Should you wish to put your product out of use for an extended period of time: •... -
Page 71: Rangement Du Produit
RANGEMENT DU PRODUIT Nous vous conseillons de conserver l’emballage d’origine jusqu’à la mise au rebut de votre produit. Vous pouvez ainsi l’utiliser à tout moment pour le rangement ou le transport. Si vous envisagez de ne pas utiliser votre produit durant une période prolongée: •... -
Page 72: Disposal
Waste Electrical and Electronic Equipment belonging to customers located in the European Union may be shipped to Hu-Friedy & EMS for recycling in accordance to the WEEE regulations. The costs of recycling, exclusive of shipping fees, are covered by Hu-Friedy & EMS. -
Page 73: Recyclage
Les équipements électriques et électroniques en fi n de vie appartenant aux clients localisés dans l'Union Européenne peuvent être envoyés à Hu-Friedy & EMS pour être recyclés en accord avec la directive WEEE. Les coûts du recyclage, à l'exclusion des frais de transports, sont couverts par Hu-Friedy & EMS. GARANTIE Des dégâts liés au non-respect du mode d’emploi ou l’usure des pièces sont exclus de la garantie. -
Page 74: Hu-Friedy & Ems Service
Repair can be refused for product or accessories received in a contaminated condition. When sending your product directly to the approved Hu-Friedy & EMS repair center, please include the name of your dealer. This simplifi es processing. -
Page 75: Service Hu-Friedy & Ems
Si l’appareil ou les accessoires comportent des risques de contamination, les réparations peuvent être refusées. En cas d’expédition directe de votre produit vers votre centre de réparation agréé Hu-Friedy & EMS, indiquer le nom du distributeur. Cela nous permettra de simplifi er le traitement. -
Page 76: Symbols
SYMBOLS Manufacturer’s logo Distributor’s logo MAX.PERIO Power setting maximum of the mode "PERIO" CE marking: refers to directive 93/42 EEC, including EN 60601-1 and EN 60601-1-2 Caution! Plug 30 VDC Output Foot pedal connection Water supply connection... -
Page 77: Symboles
SYMBOLES Logo du fabricant Logo du distributeur MAX.PERIO Réglage de la puissance maximum du mode "PERIO" Marquage de conformité CE. Se rapporter à la directive 93/42 CEE, y compris EN 60601-1 et EN 60601-1-2 Attention! Prise 30 VDC Sortie Connexion pour la pédale de commande Connexion pour l'alimentation en eau... - Page 78 Refer to instruction manual Reference number Serial number Manufacturer Manufacture date Sterilizable at up to 135 °C 135°C Liquid fl ow rate Disposal of waste electrical & electronic equipment (applicâble in the European Union and other European countries with separate collection systems) Degree of protection against water permeability...
- Page 79 Lire le manuel d'instructions Numéro de la référence Numéro de série Fabricant Date de fabrication Stérilisable jusqu'à 135 °C 135°C Débit de liquide Traitements des appareils électriques et électroniques en fi n de vie (Applicable dans les pays de l’Union Européenne et aux autres pays européens disposant de systèmes de collecte sélective) Degré...
- Page 80 Applied part, type BF Expiry date Thermal disinfection DEKRA INMETRO identifi cation for products in conformance with Brazilian electrical standards CSA marking with "C" identifi cation for products in conformance with Canadian standards and "US" for products in confor- mance with US standards GOST R marking for products in conformance with Russian standards...
- Page 81 Pièce appliquée de type BF Date de péremption Désinfection thermique Identifi cation DEKRA INMETRO pour les produits en conformité avec les normes électriques brésiliennes Marquage CSA avec identification "C" pour produit conforme aux normes canadiennes et "US" pour produit conforme US GOST R marquage pour les produits conformes aux exigences russes...
-
Page 82: Technical Data
TECHNICAL DATA Description Manufacturer EMS ELECTRO MEDICAL SYSTEMS SA, CH-1260 Nyon, Switzerland Models Piezon 150 & Piezon 250 Classifi cation EN 60601-1 - Class II - Applied part, Type BF - IP 20, unit - IP X1, foot pedal Classifi cation 93 / 42 EEC... -
Page 83: Caractéristiques Techniques
Piezon 150: Approx. 0.6 kg Piezon 250: Approx. 1 kg Dimensions en mm (HxLxP) Piezon 150: 96 x 170 x 135 Piezon 250: 96 x 153 x 215 Conditions de fonctionnement de +10 °C à +40 °C de 30% à 75% d’humidité relative Altitude max. -
Page 84: Troubleshooting
Use compressed air (max. 3 bar) and check that air comes out of the handpiece • If the air does not come out of the handpiece send to an approved Hu-Friedy & EMS repair center • Replace the external fi lter for the Piezon 150 •... -
Page 85: Dépannage
Tourner le pommeau sur ON et contrôler si la LED est allumée l'appareil est sur "ON" • Remplacer le transformateur • Expédier l'appareil et les accessoires à un réparateur agréé Hu-Friedy & EMS Pas d’irrigation lorsque la pédale de • Régler le débit d'irrigation au maximum •... - Page 88 Distributed by Hu-Friedy Mfg. Co., LLC 3232 N. Rockwell St. Chicago, IL 60618-5935, USA Tel. 1-800-Hu-Friedy (1-773-975-6100) HU-FRIEDY.COM HU-FRIEDY.COM Manufactured by EMS Electro Medical Systems S.A. Ch. de la Vuarpillière 31 1260 Nyon, SWITZERLAND EMS-SWISSQUALITY.COM EMS-SWISSQUALITY.COM...
Need help?
Do you have a question about the PIEZON 250 and is the answer not in the manual?
Questions and answers