Table of Contents
Advertisement
Quick Links
Advertisement
Table of Contents

Subscribe to Our Youtube Channel
Related Manuals for Brain Corp ICE Robotics RS26


Summary of Contents for Brain Corp ICE Robotics RS26
- Page 1 PERATIONAL ANUAL...
- Page 2 Only use the robotic scrubber with accessories approved by Brain Corp or ICE. The robotic scrubber should only be used by operators trained by Brain Corp or Brain Corp-approved trainers in a controlled, restricted environment approved by Brain Corp.
- Page 3 NTRODUCTION Read completely and understand this manual before operating or servicing the machine. This robotic scrubber offers superior service and delivers best results when: • Operated with reasonable care. • Appropriately and regularly maintained, as per maintenance instructions provided. • Recommended accessories are used, such as squeegee blades, scrub brushes/pads, etc.
-
Page 4: Table Of Contents
ONTENTS MPORTANT AFETY NSTRUCTIONS ENERAL AFETY NVIRONMENTAL AFETY PERATIONAL AFETY AINTENANCE AND ERVICE AFETY OBOTIC CRUBBER OMPONENTS ACHINE ETUP NCRATING ACHINE PERATION OF ONTROLS IRECTIONAL WITCH ACUUM UTTON OUCH UTTON OLUTION ONTROL ATER ONTROL RUSH RESSURE ONTROL TART AUSE UTTON MERGENCY UTTON UI (U... - Page 5 ONTENTS UN A OBOTIC OUTE LERTS URING PERATION MERGENCY ELETE A OUTE FTER RAIN AND LEAN ANKS LEAN QUEEGEES LEAN ENSORS ARKING AND TORAGE HARGE ATTERIES ROUBLESHOOTING AINTENANCE AINTENANCE HART ERIMETER KIRTS EALS ECOVERY LEAN ATER QUEEGEES OTATE OR EPLACE QUEEGEE LADES OTATE OR...
-
Page 6: Important Safety Instructions
MPORTANT AFETY NSTRUCTIONS EEP THESE INSTRUCTIONS The following safety labels are attached to the machine. Replace any damaged or missing labels. Located directly in front of the operator seat. Located underneath the operator seat. ENERAL AFETY • Operators must be appropriately trained on the use of the robotic scrubber. •... -
Page 7: Environmental Safety
MPORTANT AFETY NSTRUCTIONS NVIRONMENTAL AFETY • The robotic scrubber is not designed or intended for use in environments requiring fail-safe performance including, but not limited to any application in which failure of the robotic scrubber could lead directly to death, personal injury, or severe physical or property damage. •... -
Page 8: Operational Safety
In case of accidental contact or spillage of cleaning chemicals or detergents, follow guidelines provided by the manufacturer. • Only use brushes/pads provided with the robotic scrubber or those specifi ed by Brain Corp or ICE. Use of unauthorized brushes/pads may impair safety and potentially damage the robotic scrubber. •... -
Page 9: Maintenance And Service Safety
MPORTANT AFETY NSTRUCTIONS AINTENANCE AND ERVICE AFETY • Repairs and specifi ed maintenance tasks must be performed by authorized personnel only. • Only use approved replacement parts. Use of unapproved parts may impair safety and potentially damage the machine. • Read all instructions before performing any service or maintenance function. -
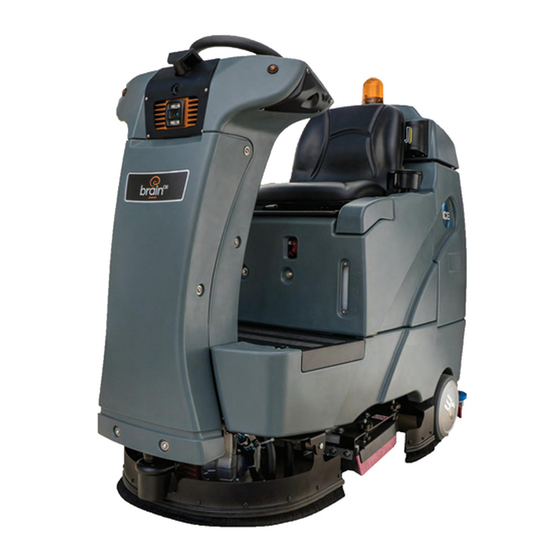
Page 10: R S C
OBOTIC CRUBBER OMPONENTS COMPONENT DESCRIPTION Hose Fill Clean Water Port Input for clean water Clean Water Tank Holds clean water received via Hose Fill Clean Water Port Scrub Deck Deck that raises/lowers scrub brush during cleaning Rear Squeegee Removes debris and liquid from fl oor during cleaning Side Perimeter Skirt Protects the machine from oversized debris Side Squeegee... - Page 11 OBOTIC CRUBBER OMPONENTS COMPONENT DESCRIPTION Emergency Stop Button Press to immediately stop the machine in emergency situations Side 3D Camera Constantly surveys the machine’s surroundings for obstacles Side 2D Camera Constantly surveys the machine’s surroundings for obstacles Battery Charger Receptacle Input for battery charger’s DC cord Front Drive Wheel Drives the machine when the accelerator pedal is pressed...
- Page 12 OBOTIC CRUBBER OMPONENTS COMPONENT DESCRIPTION Warning Light Signals machine operation Rear Signal Lights Signals turns during robotic operation Start/Pause Button Press to begin or pause a robotic route Recovery Tank Drain Hose Use to empty the Recovery Tank Clean Water Tank Drain Hose Use to empty the Clean Water Tank Vacuum Hose Hose where vacuumed debris fl...
- Page 13 OBOTIC CRUBBER OMPONENTS COMPONENT DESCRIPTION Ignition Key Switch Turns machine on and off Directional Switch Controls whether the machine drives forward or backward Vacuum Button Turns the vacuum on and off One-Touch Button Engages all cleaning components (scrub brush, vacuum, & squeegee) Horn Button Press to sound the machine’s horn Brush Pressure Control...
-
Page 14: Machine Setup
ACHINE ETUP NCRATING ACHINE Perform the following steps to uncrate the machine: 1. Check the packing crate and immediately report 7. Remove the tape from the two red battery any damage to the carrier. connectors and attach together. 2. Remove the top and side walls from the pallet. 3. -
Page 15: Operation Of Controls
PERATION PERATION OF ONTROLS IRECTIONAL WITCH The directional switch controls whether the robotic scrubber drives forward or backward when the accelerator pedal is pressed. The up arrow instructs the machine to drive forward. The down arrow instructs it to drive backward. When a direction is selected, the corresponding arrow light will illuminate. -
Page 16: Solution Flow Control
PERATION OLUTION ONTROL The solution fl ow control regulates the amount of cleaning detergent or solution that is discharged during cleaning. Solution is not dispensed by the machine unless the One-Touch button is selected. The solution fl ow control defaults to the lowest setting every time the machine is turned on, as cleaning needs may change from day-to-day. -
Page 17: Tart Ause Utton
PERATION TART AUSE UTTON The machine is equipped with a Start/Pause button on the back that is used to start a robotic route or pause an in-process robotic route. When an existing navigation route is selected on the UI touchscreen, the Start/Pause button fl... -
Page 18: How The Machine Works
The robotic scrubber is capable of both manual and robotic operation, thanks to BrainOS technology. A subscription to Brain Corp’s Autonomy Services is required to use the machine’s robotic functions. The machine consists of a solution bottle, clean water tank, scrub brushes or pads, squeegees, vacuum fan, and recovery tank that all work together to provide effi... -
Page 19: Pre -Operation Checks
PERATION PERATION HECKS Before using the ICE RS26 Robotic Scrubber, always perform the following checks to ensure proper operation: □ Clear all obstacles from the areas to be cleaned to ensure maximum fl oor coverage. □ Be sure you understand the functions of all components of the machine. □... -
Page 20: Manual Mode Operation
PERATION ANUAL PERATION Before turning on the robotic scrubber, make sure it is fully charged and free of damage. Perform the following steps to manually operate the machine: 1. Disconnect the AC power supply from the outlet 8. Select the desired cleaning settings using the and then from the external battery charger. -
Page 21: Double Scrubbing (Manual Mode Only )
PERATION Drive in a straight path as much as possible. Drive slowly on inclines, declines, and slippery surfaces. Avoid inclines or declines greater than 2% when operating manually. Maintain a safe distance of approximately 18 in (46 cm) from the edge of ramps, platforms, cliffs, and glass. -
Page 22: Robotic Mode Operation
PERATION OBOTIC PERATION The ICE RS26 Robotic Scrubber is equipped with BrainOS technology that offers a robotic mode feature. Robotic mode provides the ability for the machine to perform fl oor cleaning by following one of the saved navigation routes without direct, real-time operator control. The machine can only operate in robotic mode in areas where cleaning routes have been taught and saved. -
Page 23: Region
PERATION EGION The UI (User Interface) touchscreen can be set to display in a variety of languages. English is the default language. Perform the following steps to set the UI touchscreen to display in a different language: 1. Insert the ignition key and turn to the right 5. -
Page 24: Roc: Robot Operations Center
PERATIONS ENTER BrainOS software provides access to Brain Corp’s Robot Operations Center, also known as the ROC. The ROC is a cloud-based robot operations center, managed by Brain Corp technicians, that enhances the machine’s abilities by providing monitoring and analytics. The ROC is connected via a 4G LTE modem and does not require user interaction to connect. -
Page 25: Learning Center
PERATION EARNING ENTER The robotic scrubber’s UI contains a Learning Center, which provides brief tutorial videos on how to perform certain tasks, such as how to teach a new route or run an existing route. Select LEARNING CENTER from the Main Menu to access these tutorials. -
Page 26: Teach A Robotic Route
PERATION EACH A OBOTIC OUTE The robotic scrubber must be taught one or more cleaning navigation routes before it can run robotically. Perform the following steps to teach a new route: NOTE: 1. Sit in the operator seat, insert the ignition key IF THE MACHINE IS UNABLE TO and turn to the right (clockwise) to turn on the SCAN THE HOME LOCATION CODE, THE UI... - Page 27 PERATION 6. Select one of the available routes. The UI 8. Press the accelerator pedal and drive the touchscreen states Ready. I will learn as you machine through the entire cleaning route to drive. be saved. As soon as driving begins, the UI touchscreen states Learning...
- Page 28 PERATION 9. Once driving stops, the UI touchscreen states 11. The UI touchscreen displays Saving... When the Learning Paused. Drive to resume. with options route is successfully saved, the UI touchscreen to SAVE or CANCEL. Select SAVE to save the new briefl...
- Page 29 PERATION UN A OBOTIC OUTE Once one or more cleaning routes have been taught and saved, the machine can be operated in robotic mode. When running a route in robotic mode, pairing a cell phone can be a valuable tool. (See Pair a Phone to the ROC for details.) 1.
- Page 30 PERATION 10. As the machine begins robotic operation, the 14. Press the Start/Pause button to resume the UI touchscreen states Cleaning in Progress, route in robotic mode. along with the machine’s current location on NOTE IF AN ALERT IS TRIGGERED DURING the cleaning route, amount of time spent on the THE ROBOTIC ROUTE, THE MACHINE route, and the total amount of time the route is...
- Page 31 PERATION RACTICES UNNING A OUTE Remove any rugs, fallen items, or large debris from the fl oor. Sweep the fl oor. Pair your phone to the ROC to receive text messages whenever the robotic scrubber encounters an alert and/or when the robotic route is complete. Run routes when the area is most free of people and other obstructions.
- Page 32 PERATION ALERT CAUSE RESOLUTION 1. Follow the blue arrow and drive to the red path. Machine is off robotic ROBOT IS OFF PATH 2. When correct, the path will turn white. route path 3. Press rear BLUE button to start. 1.
- Page 33 PERATION MERGENCY The robotic scrubber is equipped with two Emergency Stop (aka E-Stop) buttons, one to the right of the steering wheel and one on the rear of the machine. If there is an emergency and the robotic scrubber must be immediately stopped, press one of these red Emergency Stop buttons.
- Page 34 PERATION ELETE A OUTE Perform the following steps to delete an existing route: 1. Insert the ignition key and turn to the right 5. Select the desired Home Location Code to view (clockwise) to turn on the machine. existing routes available for deletion. 2.
- Page 35 PERATION 7. Select DELETE ROUTE to permanently delete the 9. All existing routes for the Home Location Code selected route from the machine. are displayed. The deleted route no longer appears on the screen. NOTE SELECT BACK TO RETURN TO THE LIST 10.
- Page 36 PERATION FTER Perform all of the following tasks after every use. These actions will keep the robotic scrubber operating at peak performance. RAIN AND LEAN ANKS 1. Drive the machine to an appropriate disposal 8. Lower the recovery tank drain hose to the liquid drain.
- Page 37 PERATION 11. Rinse out the inside of the recovery tank and the 17. Make sure the recovery tank is empty and tilt it internal fl oat sensor (located underneath the back to access the clean water tank. vacuum fan fi lter) with the recovery tank drain hose still in the liquid disposal drain.
- Page 38 PERATION LEAN QUEEGEES Remove the rear and side squeegee blades and wipe down with a damp towel. (See for details.) QUEEGEES LEAN ENSORS The robotic scrubber is equipped with LIDARs, 2D cameras, and 3D cameras, all of which work together to provide a 270°...
- Page 39 PERATION ARKING AND TORAGE When not in use, the robotic scrubber should be stored in a designated parking station. When parking and storing the machine: • Make sure the designated parking station is secure from public access. • Park the machine with the front facing a wall or barrier. This will help protect the lower LIDAR sensor from getting damaged from passersby, shopping carts, etc.
- Page 40 PERATION HARGE ATTERIES The robotic scrubber’s battery is designed to last approximately 4 hours and 20 minutes on the lowest settings. Charge the batteries when not in operation. The following charging instructions are intended only for recommended batteries and external chargers. Use of alternate batteries and/or battery chargers is prohibited.
- Page 41 PERATION ROUBLESHOOTING PROBLEM CAUSE RESOLUTION Squeegee Out of Adjustment Adjust Squeegee Debris Caught in Squeegee Remove Debris Worn Squeegee Blades Rotate or Replace Squeegee Blades Vacuum Hose Clogged Clear Obstruction from Hose Vacuum Hose Disconnected from Reconnect Vacuum Hose POOR OR NO WATER Squeegee or Recovery Tank PICK-UP Vacuum Hose Damaged...
- Page 42 PERATION PROBLEM CAUSE RESOLUTION Battery Disconnected Check All Battery Cable Connections Emergency Shut-Off Activated Reset NO POWER TO MACHINE Battery Terminals Corroded Clean Connections Faulty Main Contactor Replace Contactor Faulty Key Switch Replace Switch Low Battery Charge Charge Batteries Wheels Spin Decrease Brush Pressure LITTLE OR NO Allow Cool Down Period...
- Page 43 AINTENANCE AINTENANCE HART FREQUENCY RESPONSIBLE PERSON DESCRIPTION Drain and clean recovery tank, filter, float sensor, and yellow strainer Operator basket. Operator Drain and rinse clean water tank and float sensor. Check rear and side squeegees for deflection, leveling, and wear. Operator Rotate or replace as needed.
- Page 44 AINTENANCE ERIMETER KIRTS There are three perimeter skirts that protect the scrub deck from oversized debris; one in the front and one on each side near the rear tires. Check the skirt bristles for debris, damage, and wear at least once a week.
- Page 45 AINTENANCE QUEEGEES There are three squeegees that wipe and control the fl ow of fl uid during cleaning; one on the rear of the machine and one on each side. Clean all of the squeegee blades after each use by removing any debris and wiping with a damp towel.
- Page 46 AINTENANCE OTATE OR EPLACE QUEEGEE LADES Perform the following steps to rotate or replace the rear squeegee blade: 1. Park the machine on a level, fl at surface and turn 7. Remove the inner and outer squeegee blades. off. 8. Rotate or replace the inner and outer squeegee 2.
- Page 47 AINTENANCE DJUST QUEEGEE EIGHT When the scrub deck is lowered, the side squeegees operate best when adjusted to optimal defl ection height. The side squeegee blades should slightly fl are outward when the scrub deck is lowered. Check the squeegee blade defl...
- Page 48 AINTENANCE DJUST QUEEGEE EIGHT When the scrub deck is lowered, the rear squeegee operates best when adjusted to optimal defl ection height. The rear squeegee blade should slightly fl are outward when the scrub deck is lowered. Check the squeegee blade defl...
- Page 49 AINTENANCE CRUB RUSHES AND Check the scrub brush/pad for debris, damage, and wear on a daily basis. Remove any excess debris, such as wire. Scrub brushes or pads should be replaced when they begin to appear thin, are covered with debris, or are no longer effectively cleaning.
- Page 50 AINTENANCE RAKE ELEASE ROCEDURE If the machine is inoperable and/or immobile, it can be manually moved by releasing the brake with the brake release wedge. Perform the following steps to release the brake: 1. Turn the ignition key to the left (counter- 4.
- Page 51 PECIFICATIONS MODEL BE-MK2-RS26 DIMENSIONS 66.57 IN X 33 IN X 54.45 IN (1961 MM X 846 MM X 1383 MM) WEIGHT 617 LBS (280 KG) WEIGHT WITH BATTERIES 881 LBS (400 KG) RECOVERY TANK CAPACITY 29 GAL (110 L) CLEAN WATER TANK CAPACITY 29 GAL (110 L) SQUEEGEE WIDTH 33.8 IN (860 MM)
- Page 52 101 E. Roosevelt Street, Zeeland, MI 49464 833-ICE-ROBO info-us@icerobo.com www.icerobo.com · ) ·...
Need help?
Do you have a question about the ICE Robotics RS26 and is the answer not in the manual?
Questions and answers