Table of Contents
Advertisement
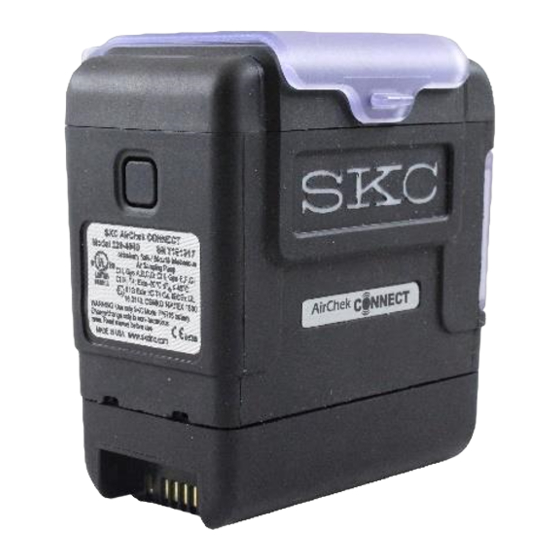
AirChek Connect Sample Pump
Cat. No. 220-4000
Operating Instructions
On/off button
Belt clip in back
)
(not shown
Charging
contacts
Table of Contents
Introduction ................................................................................................................................................ 3
Checking Pump Kit/Contents .................................................................................................................... 3
Getting Started ........................................................................................................................................... 4
Charging the Battery Pack......................................................................................................................... 4
Notes and Cautions ................................................................................................................................... 5
Turning Pump Power On/Off ..................................................................................................................... 5
Interpreting the Display .............................................................................................................................. 6
Determining Battery Charge Status ........................................................................................................... 6
Using the Touch Screen ............................................................................................................................ 7
Navigating Menus and Screens ................................................................................................................ 7
Determining Pump Status.......................................................................................................................... 9
Modifying Device Settings ......................................................................................................................... 9
Operation ................................................................................................................................................. 16
skcinc.com
Protective screen cover
Battery pack
Front and side view
Figure 1. AirChek
Form 37171 Rev 200630
Touch screen/display
LED Indicator
Top view
®
Connect Overview
Inlet
housing/filter
LED Indicator
Page 1
Advertisement
Table of Contents

Related Manuals for SKC AirChek Connect


Summary of Contents for SKC AirChek Connect
-
Page 1: Table Of Contents
AirChek Connect Sample Pump Cat. No. 220-4000 Operating Instructions Protective screen cover Touch screen/display On/off button Inlet housing/filter Belt clip in back (not shown Charging LED Indicator LED Indicator contacts Battery pack Top view Front and side view ® Figure 1. AirChek... - Page 2 Setting Pump Flow Rate .......................... 16 Setting/Calibrating Flow Rate from 1 to 5 L/Min ..................16 Setting/Calibrating Flow Rate from 5 to 500 Ml/Min — Constant Flow Mode ......... 18 Setting/Calibrating Flow Rate from 100 to 1000 Ml/Min — Constant Pressure Mode (No All-In-One or CPC Required) ......................
-
Page 3: Introduction
Checking Pump Kit/Contents Use the following table to verify that you received all items associated with the Cat. No. ordered. If you are missing items, contact SKC at 800-752-8472 (U.S. only) or 724-971-9701. If you ordered Cat. No. Your package should contain... -
Page 4: Getting Started
GETTING STARTED Charging the Battery Pack Set up the charging train (Figure 2) and completely charge the battery pack(s) before operating the pump. 1. Prepare charging cradle(s). a. Single cradle: Insert connector on Single Cradle Power Supply Cat. No. 220-600 into power port on side of Standard Charging Cradle Cat. -
Page 5: Notes And Cautions
CAUTION: The battery used in this device may present a risk of fire or explosion when heated above 212 F (100 C) or incinerated. Replace battery with SKC Battery Pack model P75718 only. Use of another battery may present a risk of fire or explosion. -
Page 6: Interpreting The Display
Interpreting the Display Date Time Battery status Constant display at top of every screen: Time (12 or 24-hr display), Date (3 format options), and Battery Status icon (charge remaining) Calibration Flow rate (L/min constant flow correction applied or inH O constant pressure) Scrolling display of accumulated sample Locked... -
Page 7: Using The Touch Screen
Down Navigating Menus and Screens AirChek Connect operates through a series of menus and screens. When the pump is powered on, the Flow screen displays (see right), allowing you to calibrate and sample immediately. For more details, start at Setting Pump Flow Rate. - Page 8 Menu/Screen Overview Device Info Sample • History Menu Flow Menu Firmware version • • Set Flow List of sample number • • Calibrate (constant flow runs/summaries Lifetime run time and Clock Menu volume mode) • • • Set Duration (timer) Set Time Pump serial number •...
-
Page 9: Determining Pump Status
Modifying Device Settings Note about default settings: AirChek Connect is shipped with the default settings listed below that may be changed by the user from the Device submenus: •... - Page 10 Clock Menu To change time on pump From Main Menu: >Touch time displayed Touch Device >Touch Clock Hour digits will flash. Touch up/down arrow buttons to increment/decrement hours. Touch right arrow to advance to minutes (will flash) and up/down arrow buttons to toggle AM/PM.
- Page 11 To change date and date display From Main Menu: Touch Device >Touch Clock > Touch Date Month digits will flash. Touch up/down arrow buttons to increment/decrement month. Touch right arrow to advance to day (will flash) and up/down arrow buttons to increment/decrement day.
- Page 12 Units Menu To change temperature units From Main Menu: >Touch Temp Touch Device >Touch Units ºF and ºC buttons display. Touch desired button to select and return to Units Menu. To change atmospheric display units From Main Menu: >Touch Touch Device >Touch Units mbar, inHG, and mmHg buttons display.
- Page 13 Screen Menu To set Dim to on or off From Main Menu: Touch Device >Touch Screen >Touch Touch desired button to select and return to Screen Menu. If Dim is set to On, the user can dim and lock the screen of a running pump by pressing the On/Off button.
- Page 14 To set Auto Lock to on or off From Main Menu: Touch Device >Touch Screen >Touch Auto Lock Touch desired button to select and return to Screen Menu. If Auto Lock is set to On, the screen will lock (become inactive) as soon as the pump starts running a sample.
- Page 15 To set Secure Lock to on or off and set passcode From Main Menu: >Touch Screen >Touch Secure Lock Touch Device Secure Lock helps to prevent tampering during a sample run. Touch desired button. If Secure Lock was set previously to On and you select Off, you will be prompted to enter the previously set passcode. Once the passcode is entered, you will be returned to the Screen Menu.
-
Page 16: Operation
OPERATION Setting flow rate, calibrating flow rate, and sampling are done through the Sample Menu. Viewing run history is done through the Device Menu. Setting Pump Flow Rate From Main Menu: Touch Sample >Touch Flow >Touch flow display Touch left/right arrow buttons to set gross flow setting; flow changes by 0.5 L/min. - Page 17 4. Set flow rate on pump. See Setting Pump Flow Rate. 5. Calibrate flow rate as follows: From Main Menu: Touch Sample >Touch Flow >Touch calibration icon Pump will start running when you touch the calibration icon. It is good practice to allow the pump to run for 10 to 15 minutes before calibrating the flow rate.
-
Page 18: Setting/Calibrating Flow Rate From 5 To 500 Ml/Min - Constant Flow Mode
Setting/Calibrating Flow Rate from 5 to 500 ml/min — Constant Flow Mode • Allow pump to equilibrate after moving it from one temperature extreme to another. • Charge pump battery completely before calibration and sampling. • Single-tube sampling requires All-in-One adjustable tube holder; see All-in-One operating instructions for details on operation. - Page 19 Set Up Calibration Train — Constant Flow Mode Connect the calibrator to the single sorbent tube or the first of multiple sorbent tubes as shown in Figures 4 and 5, respectively. All-in-One Sorbent tube Tubing Tubing Flow adjust screw Suction port Pump inlet Pump chek-mate...
- Page 20 Calibrate Flow Rate with All-in-One (single tube) — Constant Flow Mode 1. In the Flow menu, touch the Run button to run the pump. Note: It is good practice to allow the pump to run for 10 to 15 minutes before calibrating flow rate. 2.
-
Page 21: Setting/Calibrating Flow Rate From 100 To 1000 Ml/Min - Constant Pressure Mode (No All-In-One Or Cpc Required)
Setting/Calibrating Flow Rate from 100 to 1000 ml/min — Constant Pressure Mode (No All-in-One or CPC required) About Constant Pressure Mode In Constant Flow mode, the pump adjusts to the set flow and maintains it by directly measuring the flow. In Constant Pressure mode, the pump will adjust to the set inlet pressure and maintain it for the duration of the sampling run. - Page 22 Set Up Calibration Train — Constant Pressure Mode 1. Prepare pump and sorbent tubes per Setting/Calibrating Flow Rate from 5 to 500 ml/min — Constant Flow Mode. 2. Set up the calibration train (Figures 6 and 7). The All-in-One and CPC are not needed in Constant Pressure mode.
- Page 23 Calibrate Flow Rate with Single Tube — Constant Pressure Mode 1. In Set Pressure screen: Using left/right and up/down arrow buttons, adjust inlet pressure and flow to achieve required flow. Increasing pressure will increase the flow and vice versa. If required flow cannot be achieved while inlet pressure is changed from 1 to 20 inches H O, use a single low flow tube holder and follow instructions below for calibrating flow rate with single or multiple...
-
Page 24: Sampling
Sampling • Allow pump to equilibrate after moving it from one temperature extreme to another. • Charge pump battery completely before sampling. • Use of an unapproved battery and/or charging cable could damage the pump and will void any warranty. •... - Page 25 Set Up and Run a Manual Sample 1. Set up the sampling train. See Sampling, Step 2. 2. Run the sample as follows: From Main Menu: >Touch Run button in Flow Menu to run pump in constant flow. >Touch Flow or Advanced Touch Sample >Touch Run button in Advanced Menu to...
- Page 26 Options on pump screen during sample run: Touch the Stop button to stop sampling, reset accumulated data display, and view Sample Summary. Touch the Pause button to pause sampling and retain accumulated data display. When touched, pause changes to Run button.
- Page 27 Set Up and Run a Timed Sample 1. Set sample duration as follows: From Main Menu: >Touch Time button in Flow Menu to set sample duration. >Touch Flow or Advanced Touch Sample >Touch Time button in Advanced Menu to set sample duration.
- Page 28 From Main Menu: >Touch Run button in Flow Menu to run Touch Sample >Touch Flow or Advanced pump in constant flow. See Options on pump screen during a sample run on page 26. 4. When the Timed sampling period is complete, the pump will stop sampling automatically.
-
Page 29: Flow Fault Mode And Display
To run a preset sample with a delayed start, touch check mark to activate the preset. Note: The day of a preset with delayed start can be changed from the pump screen. Touch the delayed start date, touch the up and down arrow buttons to change the desired start day, and touch check mark. This can be changed to a future day only. -
Page 30: Viewing History (History Menu)
PC. Using Pump with DataTrac Pro for Bluetooth-connected Pumps Software AirChek Connect communicates with a laptop/PC via USB Bluetooth adapter Cat. No. 877-94 and DataTrac Pro for Bluetooth-connected Pumps Software, which is available as a download (requires Internet connection). Access Data for Bluetooth-connected Pumps Software as follows: 1. -
Page 31: Maintenance
MAINTENANCE Replacing the Battery Pack Ensure that pump is turned off before removing the battery pack and that no tubing or media are attached to the pump. 1. Turn the pump off by pressing the on/off button. 2. Remove the existing battery pack. a. -
Page 32: Replacing The Inlet Housing And/Or Inlet Filter
(see Replacing the Battery Pack). If these problems persist, contact SKC. Pump Service Pumps under warranty should be sent to SKC Inc. for servicing. See Limited Warranty and Return Policy. User may replace external components such as the inlet filter, battery, screen protector, and/or belt clip. -
Page 33: Accessories/Replacement Parts
*Li-Ion Battery Testing and Shipment Rechargeable lithium-ion (Li-Ion) batteries for use with SKC sample pumps have been tested in accordance with the UN Manual and are proven to meet requirements of each test in the UN Manual of Tests and Criteria, Part III, subsection 38.3. The batteries are rated below 100 watt-hours (Wh). -
Page 34: Appendix: Performance Profile
4.1 x 3.7 x 2.8 in (10.4 x 9.4 x 7.1 cm) Weight 19.4 oz • Intrinsic safety (SKC Cat. No. 220-4000 operated with SKC Battery Pack P75718) Certifications Class I, Groups A, B, C, D; Class II, Groups E, F, G; Class III, T4; Class I, Zone 0, AExia IIC T4 Ga;...
Need help?
Do you have a question about the AirChek Connect and is the answer not in the manual?
Questions and answers