Table of Contents
Advertisement
Quick Links
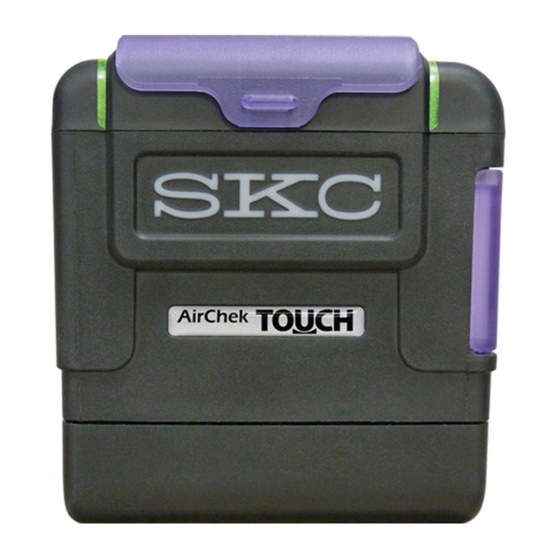
Color resistive touch
Protective
screen/display
screen cover
Top view
Introduction
Checking Pump/Kit Contents
Use the table below to verify that you received all items associated with the Cat. No. ordered. If you are missing items, contact SKC
at 800-752-8472 (U.S. only) or 724-941-9701.
If you ordered Cat. No.
Your Package Should Contain
220-5000TC
Pump with battery pack and screwdriver set
220-5000TC-S
Pump with battery pack, screwdriver set, Standard Charging Cradle, power supply with cord, 3 feet (0.9 meter) Tygon
tubing, and collar clip with cable tie
220-5000TC-K
Pump with battery pack, screwdriver set, Standard Charging Cradle, power supply with cord, fi lter cassette holder, and
soft-side nylon carry case
220-5000TC-KD
Pump with battery pack, screwdriver set, Standard Charging Cradle, power supply with cord, fi lter cassette holder, adjustable
low fl ow holder, constant pressure controller, Type A protective tube cover, and soft-side nylon carry case
220-5000TC-DFK
Pump with battery pack, screwdriver set, Charging e-Cradle, power supply with cord, fi lter cassette holder, CalChek
communication cable, USB cable, Defender calibrator with charger, and Pelican case
220-5000TC-K5
5 pumps with battery packs, screwdriver set, 4 Standard Charging Cradles, 1 Charging e-Cradle, power supply with cord,
5 fi lter cassette holders, and Pelican case
220-5000TC-K5D
5 pumps with battery packs, screwdriver set, 4 Standard Charging Cradles, 1 Charging e-Cradle, power supply with cord,
5 each: fi lter cassette holders, adjustable low fl ow holders, constant pressure controllers, Type A protective tube covers,
and Pelican case
220-5000TC-DFK5
5 pumps with battery packs, screwdriver set, 4 Standard Charging Cradles, 1 Charging e-Cradle, power supply with cord,
5 fi lter cassette holders, CalChek communication cable, USB cable, Defender calibrator with charger, and Pelican case
863 Valley View Road, Eighty Four, PA 15330 USA • Tel: 724-941-9701 • e-mail: skctech@skcinc.com • www.skcinc.com
Pump inlet
Side view
Figure 1. AirChek TOUCH Parts Overview
www.skcinc.com
AirChek
Inlet fi lter
Belt clip
(back of pump)
Pump status
LED indicators
Charging cradle
Battery pack
®
TOUCH Sample Pump
Cat. No. 220-Series
Operating Instructions
Screws securing
Charging
battery (2)
contacts
Form 38054 Issue 1506
Page 1 of 30
On/Off
button
Side view
Advertisement
Table of Contents

Related Manuals for SKC AirChek TOUCH 220 Series


Summary of Contents for SKC AirChek TOUCH 220 Series
- Page 1 Figure 1. AirChek TOUCH Parts Overview Introduction Checking Pump/Kit Contents Use the table below to verify that you received all items associated with the Cat. No. ordered. If you are missing items, contact SKC at 800-752-8472 (U.S. only) or 724-941-9701. If you ordered Cat. No.
-
Page 2: Getting Started
Getting Started Charging the Battery Pack Set up charging train (Figure 2) and completely charge bat ery pack(s) before operating the pump. Prepare charging cradle(s). a. Single cradle: Insert connector on Single Cradle Power Pump Supply (Cat. No. 220-600) into power port on side of Standard Charging Cradle (Cat. -
Page 3: Notes And Cautions
• Power off pump before removing battery to avoid loss of time, date, and other settings. • Use only the SKC-approved battery pack (Cat. No. P75718) and charging cradle (Cat. No. 220-800 or 220-900) for pump. Use of an unapproved battery and/or charging cradle could damage the pump and will void any warranty. - Page 4 Using the Touch Screen (Figure 1, B) Access the touch screen by unlatching and lifting the protective screen cover (Figure 1, A). Use a fi ngertip or fi ngernail tip to gently tap soft keys on screen to set up and operate the pump Learning the Home Screen Home screen displays when the pump is powered on.
- Page 5 Navigating Screens and Menus Soft keys on the touch screen allow the user to move between screens/menus and to view, select, edit, and enter values (see Figures 3 and 4). Navigational Soft Keys Up/down arrows increase/decrease values or Checkmark accepts selections/settings and scroll through data moves to next menu/screen or Home screen Back moves to previous menu/screen...
- Page 6 Modifying Device Settings (Date and Time, Security, and Units) Changing Date/Time and Display Touch Set ings soft key. Touch Device. Touch Date and Time to access Date and Time screen. Touch Date Fmt. to toggle M/D/Y, Touch 24-Hour Time to toggle Touch date and time display to D/M/Y, and Y/M/D (displayed set ing ON and OFF (displayed set ing in...
-
Page 7: Select Option
Changing Security (Lock Out) and Auto-Dim Touch Set ings soft key. Touch Device. Touch Security to access security screen. Auto-Lock Auto-Lock prevents accidental changes to pump status during sampling by requiring a simple 1 2 3 4 unlock code to be entered to unlock the touch screen and power but on. - Page 8 Secure Lock Secure Lock prevents tampering during sampling by requiring a user-set passcode to be entered to unlock the touch screen and power but on. Changing Secure Lock from OFF to ON: Secure Lock displays OFF. Enter your own four-digit passcode. Re-enter the same four-digit Touch Secure Lock to turn ON passcode to confi...
- Page 9 Changing Display Units Touch Device. Touch Set ings soft key. Touch Units to access Units screen. Select option: Back moves to Device screen; changes accepted. H o m e m o v e s t o H o m e screen, changes accepted.
-
Page 10: Operation
Operation Setting Flow Rate Select option: Checkmark accepts set fl ow and returns to Home screen. Back moves to Home screen without accepting set fl ow. Manual Cal (flow rate display/Manual Cal soft key) accesses Manual Cal screen (see Calibrating Flow Rate from 1 to 5 L/min, Manual Calibration to set up Touch flow rate display (Set... - Page 11 Tubing Tubing Pump inlet Representative sample medium Defender calibrator Figure 7. Calibration Train (1 to 5 L/min) 3. Set up a calibration train. See Figure 7. Alternative Manual Calibration Access Touch up and down arrow keys to adjust calibration based on fl ow displayed on Home Settings Calibrate...
- Page 12 CalChek Single Calibration CalChek Single Calibration requires a Defender calibrator (Cat. No. 717-M Series), Standard Charging Cradle (Cat. No. 220-800) or Charging e-Cradle (Cat. No. 220-900), and CalChek Communication Cable (Cat. No. 210-502). CalChek Single calibration is performed with representative sampling medium inline. 100-240 V Tubing Tubing...
- Page 13 Press the right arrow to highlight Preferences; press Enter. c. Press the down arrow to navigate to Data Port. d. Press the left or right arrow to toggle to SKC. e. Press the down arrow to highlight Confi rm; press Enter.
- Page 14 Initiating CalChek Single Automatic Flow Calibration See pages xx-xx for CalChek Multiple Calibration to be used following pump maintenance or repair. Touch Set ings soft key. Touch Calibrate. Touch CalChek Single. Ensure calibration train is in place Enter desired flow rate. Touch (see Figure 8).
- Page 15 Calibrating Flow Rate from 5 to 500 ml/min • Allow pump to equilibrate after moving it from one temperature extreme to another. • Charge pump battery completely before calibration and sampling. • Use Manual calibration only. • Requires Constant Pressure Controller (CPC) and Adjustable Low Flow Holder accessories. •...
- Page 16 Set ing Up the Calibration Train Dual Adjustable Low Flow Holder Tubing Flow Adjust screw Labeled “To Sample” Sorbent tube Tubing Flow Adjust screw Tubing Pump inlet Defender calibrator Sorbent tube Suction port Figure 9. Calibration Train (5 to 500 ml/min) Set up a calibration train, connecting the calibrator to the fi...
- Page 17 Sampling Set ing Up a Sampling Train • Allow pump to equilibrate after moving it from one temperature extreme to another. • Charge pump battery completely before calibration and sampling. • Use of any device (including charging cradle) or battery pack other than P75718 to power the pump voids intrinsic safety certifi cations and any warranty.
-
Page 18: Fault Mode
Options/Modes During Sampling Pause/Resume Information To pause sample: To resume sample: Touch i soft key to access current run time data. Touch Flow Rate Touch Flow Rate display/Pause soft key. display/Resume soft Pump stops; run time key. Pump runs; run data freezes. - Page 19 Touch Stop soft key to stop sample. Accumulated time and volume will reset. Record sample stop time, remove sample medium, and cap. Re-install representative sample medium and perform post-sampling calibration (see Calibrating Pump Flow Rate). Setting Up and Running a Timed Sample Calibrate pump fl...
- Page 20 Setting Up Timed Sample Presets (Includes Continuous and Intermit ent Sampling) An alternative to programming a quick timed sample before each run is to save sample runs that are performed on a regular basis as timed sample presets (P1, P2, P3, or P4). Presets that are already programmed will display with a white background and can be edited.
- Page 21 Timed Sample Preset Options Continuous Sample Enter the total duration of the sample run and specify a start date, if desired. Touch Continuous soft key. Enter total sample time in minutes. Touch checkmark to accept. P1 Start Time screen displays. Select option: Date touch to edit start date.
- Page 22 Intermittent Sample Enter the total duration of the sample run, and then specify number of minutes the pump is to run and number of minutes the pump is to pause during a single cycle. The AirChek TOUCH will calculate the number of run/pause cycles and the estimated volume.
- Page 23 Accessing History Touch Menu soft key. Touch History. A short history of Touch up/down arrows to scroll the latest sample run displays. through a maximum of 1042 history records. Note: Once the maximum number of records is reached, old records will be overwrit en without warning. To avoid loss of data, upload sampling history to PC using DataTrac Pro Software on a weekly basis.
- Page 24 Using Pump with PC and DataTrac Pro Software The AirChek TOUCH Sample Pump communicates with a PC via Charging e-Cradle (Cat. No. 220-900) and DataTrac Pro Software (Cat. No. 877-93). 100-240 V PC/Laptop Pump wall outlet Single cradle power supply e-Cradle (grey) Power port USB connector...
-
Page 25: Maintenance
Maintenance Changing the Battery Pack Remove the existing bat ery pack. a. Press and hold briefl y the recessed power but on on the side of the pump to turn pump power off (screen turns off ). b. Use a 2.5-mm hex driver (Allen wrench) to loosen two screws on bot om of bat ery pack housing. c. - Page 26 Press the right arrow to highlight Preferences; press Enter. c. Press the down arrow to navigate to Data Port. d. Press the left or right arrow to toggle to SKC. e. Press the down arrow to highlight Confi rm; press Enter.
- Page 27 Initiating CalChek Full Calibration Touch Set ings soft key. Touch Calibrate. Touch CalChek Full. Data light on cradle fl ashes alternately green and amber. Top box on screen displays a progress bar, bot om box displays fl ow rate reading from Defender.
-
Page 28: Troubleshooting Guide
Caution: Do not use a sharp object on contacts. Do not damage contacts. Re-install bat ery pack. See Changing the Bat ery Pack. Note: An SKC logo screen with fi rmware version number displays when pump is powered on initially after a manual reset or fi rmware upgrade. - Page 29 SKC Limited Warranty and Return Policy SKC products are subject to the SKC Limited Warranty and Return Policy, which provides SKC’s sole liability and the buyer’s exclusive remedy. To view the complete SKC Limited Warranty and Return Policy, go to ht p://www.skcinc.com/warranty.asp.
- Page 30 • Intrinsic safety: UL Class I, Div. 1, Groups A,B,C, and D; Class II, Div. 1, Groups E,F, and G; Class III, Div. 1 hazardous locations when used with SKC battery pack model P75718; T-Code T3C. Exia; Class I, Zone 0, Gp IIC (SKC Cat. No. 220-5000TC) •...
Need help?
Do you have a question about the AirChek TOUCH 220 Series and is the answer not in the manual?
Questions and answers