Table of Contents
Advertisement
Quick Links
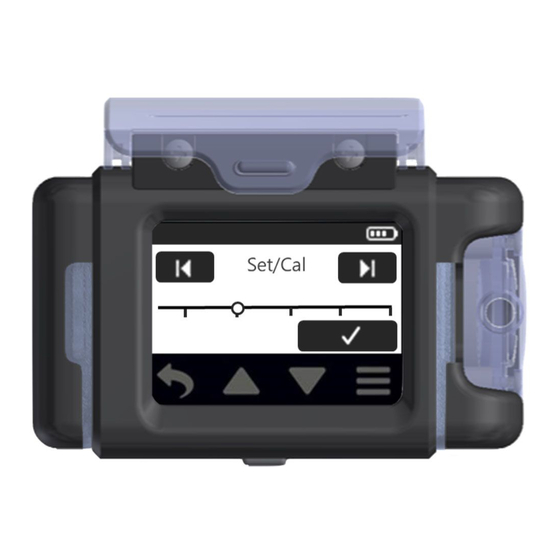
AirChek Essential+ Sample Pump
Cat. No. 220-3100
Operating Instructions
On/off button
Belt clip in back
)
(not shown
Charging
contacts
Front and side view
Table of Contents
Introduction .............................................................................................................................................. 3
Checking Pump Kit/Contents .................................................................................................................... 3
Getting Started ......................................................................................................................................... 4
Charging the Battery Pack......................................................................................................................... 4
Notes and Cautions ................................................................................................................................... 5
Turning Pump Power On/Off ..................................................................................................................... 6
Interpreting the Display .............................................................................................................................. 6
Determining Battery Charge Status ........................................................................................................... 7
Using the Touch Screen ............................................................................................................................ 7
Navigating Menus and Screens ................................................................................................................ 7
Determining Pump Status.......................................................................................................................... 8
Main Menu Overview ................................................................................................................................. 9
Operation ................................................................................................................................................ 10
Setting/Calibrating Pump Flow Rate ....................................................................................................... 10
Setting/Calibrating Flow Rate from 1 to 5 L/min ...................................................................................... 11
skcinc.com
Protective screen cover
Battery pack
®
Figure 1. AirChek
Essential+ Overview
PDP0008 Rev 0
Touch screen/display
LED Indicator
Top view
Inlet
housing/filter
LED Indicator
Page 1
Advertisement
Table of Contents

Subscribe to Our Youtube Channel
Related Manuals for SKC AirChek 220-3100


Summary of Contents for SKC AirChek 220-3100
-
Page 1: Table Of Contents
AirChek Essential+ Sample Pump Cat. No. 220-3100 Operating Instructions Protective screen cover Touch screen/display On/off button Inlet housing/filter Belt clip in back (not shown Charging contacts LED Indicator LED Indicator Battery pack Top view Front and side view ® Figure 1. AirChek Essential+ Overview Table of Contents Introduction .............................. - Page 2 Setting/Calibrating Flow Rate from 5 to 500 ml/min ................12 Sampling ..............................15 Fault Mode and Display ........................... 18 Maintenance ............................19 Replacing the Battery Pack ........................19 Replacing the Screen Cover ........................19 Replacing the Belt Clip ..........................20 Replacing the Inlet Housing and/or Inlet Filter ..................
-
Page 3: Introduction
Checking Pump Kit/Contents Use the following table to verify that you received all items associated with the Cat. No. ordered. If you are missing items, contact SKC at 800-752-8472 (U.S. only) or 724-971-9701. If you ordered Cat. No. Your package should contain... -
Page 4: Getting Started
GETTING STARTED Charging the Battery Pack Set up the charging train (Figure 2) and completely charge the battery pack(s) before operating the pump. 1. Prepare charging cradle(s). a. Single cradle: Insert connector on Single Cradle Power Supply Cat. No. 220-600 into power port on side of Standard Charging Cradle Cat. -
Page 5: Notes And Cautions
CAUTION: The battery used in this device may present a risk of fire or explosion when heated above 212 F (100 C) or incinerated. Replace battery with SKC Battery Pack model P75718 only. Use of another battery may present a risk of fire or explosion. -
Page 6: Turning Pump Power On/Off
Turning Pump Power On/Off Turn on: Press the recessed power on/off button on the side of the pump (Figure 1). The screen will light up and the Sample menu will be displayed (see below). Turn off: Press the recessed power on/off button on the side of the pump. Note: To conserve battery power, a non-sampling pump will power off automatically after 5 minutes of inactivity. -
Page 7: Determining Battery Charge Status
Determining Battery Charge Status The battery status icon at the top right of the pump display screen has four bars that decrease in number as battery charge is depleted. Use the table below to interpret the battery status. Icon Displayed Battery Charge Remaining Full battery charge, approximately 75 to 100% Four bars... -
Page 8: Determining Pump Status
Navigation Buttons Back Up Arrow Down Arrow Main menu Returns to previous Increases value in Decreases value in Opens Main menu with screen 0.01-L/min increments 0.01-L/min increments in Auto Lock, Info, and in Set/Cal Set/Cal Sample options. Touch to adjust flow Touch to adjust flow setting;... -
Page 9: Main Menu Overview
Main Menu Overview Main menu options Info, Auto Lock, and Sample are described below. Info displays pump firmware version and name. Auto Lock prevents accidental tap errors during sample runs. When activated, Auto Lock locks the pump display as soon as the pump starts sampling. To unlock and reactivate the screen, press the power on/off button on the side of the pump during sampling. -
Page 10: Operation
OPERATION Setting/Calibrating Pump Flow Rate Flow rate is set and calibrated through the Sample menu as described below. Also see the procedures for setting/calibrating flow at 1 to 5 L/min and 5 to 500 ml/min, respectively. 1. In Sample menu, touch Set/Cal. 2. -
Page 11: Setting/Calibrating Flow Rate From 1 To 5 L/Min
Setting/Calibrating Flow Rate from 1 to 5 L/min • Allow pump to equilibrate after moving it from one temperature extreme to another. • Charge pump battery completely before calibration and sampling. • To achieve the best results, run the pump for 10 to 15 minutes before calibration. 1. -
Page 12: Setting/Calibrating Flow Rate From 5 To 500 Ml/Min
c. Touch check mark in Set/Cal screen to save desired flow rate and return to Sample menu. 5. Disconnect the pump from the representative sample medium and calibrator. Go to Sampling. Setting/Calibrating Flow Rate from 5 to 500 ml/min • Allow pump to equilibrate after moving it from one temperature extreme to another. - Page 13 Prepare Dual, Tri, or Quad Adjustable Low Flow Tube Holder (multiple-tube sampling) 1. On the tube holder, insert an opened representative sorbent tube (arrow on tube pointing toward the pump) into the rubber sleeve on the port. Repeat for the desired number of tube samples. See Figure 5.
- Page 14 Sorbent tube Dual adjustable low flow holder Tubing Tubing Flow adjust screw Suction port Pump inlet chek-mate Calibrator Pump Figure 5. Calibration Train (5 to 500 ml/min) for Multiple Tubes Calibrate Flow Rate with All-in-One (single tube, see Figure 4) 1.
-
Page 15: Sampling
6. Disconnect the pump from the representative sample tube and calibrator. Replace representative sorbent tubes with newly opened unexposed method-specified sorbent tubes to complete the sampling train. Proceed to Sampling. Sampling • Allow pump to equilibrate after moving it from one temperature extreme to another. •... - Page 16 2. In Sample menu, touch the Start button. 3. When the required sampling period is complete, touch the Stop button to stop sampling. Note: To pause sampling, touch the Pause button (see Options on Pump Screen During Sampling). 4. Total sample run time will be displayed. Touch the check mark to reset accumulated run time. skcinc.com PDP0008 Rev 0 Page 16...
- Page 17 Options on Pump Screen During Sampling Stop sampling. Touch the Stop button to stop sampling. Touch check mark to reset accumulated run time display. Pause sampling. Touch the Pause button to pause sampling and retain accumulated run time display. Touch the Start button to resume sampling and run time accumulation.
-
Page 18: Fault Mode And Display
Fault Mode and Display During a sample run, overloaded sampled media or kinked tubing can restrict airflow and cause back pressure to build to a point at which the pump can no longer compensate flow within ± 5%. This also may happen when battery voltage is too low to maintain set flow. -
Page 19: Maintenance
MAINTENANCE Replacing the Battery Pack Ensure that pump is turned off before removing the battery pack and that no tubing or media are attached to the pump. 1. Turn the pump off by pressing the on/off button. 2. Remove the existing battery pack. a. -
Page 20: Replacing The Belt Clip
SKC. Pump Service Pumps under warranty should be sent to SKC Inc. for servicing. See Limited Warranty and Return Policy. User may replace external components such as the inlet filter, battery, screen protector, and/or belt clip. Service must be performed by SKC to maintain performance and intrinsic safety rating. -
Page 21: Accessories/Replacement Parts
*Li-Ion Battery Testing and Shipment Rechargeable lithium-ion (Li-Ion) batteries for use with SKC sample pumps have been tested in accordance with the UN Manual and are proven to meet requirements of each test in the UN Manual of Tests and Criteria, Part III, subsection 38.3. The batteries are rated below 100 watt-hours (Wh). -
Page 22: Appendix: Performance Profile
4.1 x 3.7 x 2.8 in (10.4 x 9.4 x 7.1 cm) Weight 19.4 oz • Intrinsic safety (SKC Cat. No. 220-3100 operated with SKC Battery Pack P75718) Certifications/Markings Class I, Groups A, B, C, D; Class II, Groups E, F, G; Class III, T4;...
Need help?
Do you have a question about the AirChek 220-3100 and is the answer not in the manual?
Questions and answers