
Subscribe to Our Youtube Channel
Related Manuals for Thermo Scientific Shake n Stack 6240


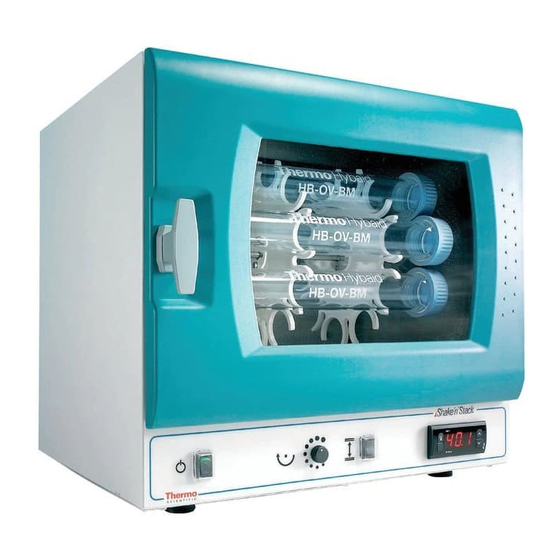
Summary of Contents for Thermo Scientific Shake n Stack 6240
- Page 1 Shake ‘n Stack Hybridisation Oven Operating and Maintenance Manual 7026240 Rev. 1 Visit us online to register your warranty www.thermoscientific.com/labwarranty...
- Page 2 Shaking platform, drip tray, rotisserie 6242 Drip tray, rotisserie 6243 Drip tray, rotisserie Manual Number 7026240 ECNM-000224 02/06/2020 Removed model numbers 6244 & 6245 from the manual. 25036/OV-368 8/16/11 New controller - Release 3 ECR/ECN DATE DESCRIPTION Thermo Scientific Shake ‘n Stack...
- Page 3 Thermo Fisher Scientific makes no representations or warranties with respect to this manual. In no event shall Thermo be held liable for any damages, direct or incidental, arising out of or related to the use of this manual. © 2020 Thermo Fisher Scientific. All rights reserved. Shake ‘n Stack Thermo Scientific...
- Page 4 European Country, and this product should be disposed of or recycled through them. Further information on Thermo’s compliance with this directive, the recyclers in your country and information on Thermo Scientific products will be available at www.thermofisher.com. Always use the proper protective equipment (clothing, gloves, goggles, etc.) Always dissipate extreme cold or heat and wear protective clothing.
- Page 5 We can also provide you with a quotation on our Extended Warranty for your Thermo Scientific products. Whatever Thermo Scientific products you need or use, we will be happy to discuss your applications. If you are experiencing technical problems, working together, we will help you locate the problem and, chances are, correct it yourself...over the telephone without a service...
-
Page 6: Table Of Contents
Variable Axis Rotisseries ........5-1 50ml & 15ml Tube Rotisseries ......5-2 Thermo Scientific Shake ‘n Stack... - Page 7 Bottle Care ......... . .AII-1 Shake ‘n Stack Thermo Scientific...
-
Page 8: Introduction
Refer to “Setting the Required Temperature” for recommendations on temperature setting when using shaking platforms. Thermo Scientific Shake ‘n Stack... -
Page 9: Safety Precautions
Caution During operation, caution should be taken with moving parts that are accessible when the Oven door is open. Thermo offers full service and technical support for all its products. Alternatively, contact your local authorised distributor. Shake ‘n Stack Thermo Scientific... -
Page 10: Unpacking And Installation
The mains lead should be fitted with a 10 A fuse for both 110/120 V and 220/240 V regions. The oven is grounded via the mains lead and should only be connected to an grounded supply. (See “Technical Specifications”). Thermo Scientific Shake ‘n Stack... -
Page 11: Operation
The warm up time for the oven varies according to the load and the ambient temperature. When first switching on the oven (no bottles installed), allow approximately one hour for the temperature to stabilise. Solutions should be pre-warmed to the required temperature to minimise sample stabilisation time. Shake ‘n Stack Thermo Scientific... - Page 12 Full details of Technical Specifications are given in Section 8. Note If the Shake ‘n Stack Oven is not used as specified in this manual, the protection provided by the equipment may be impaired. Thermo Scientific Shake ‘n Stack...
- Page 13 Section 2 Unpacking and Installation Shake ‘n Stack Thermo Scientific...
-
Page 14: Set Up The Shaking Platform
2. Fit the rear right hand peg of tray into vertical slot at right of bracket, allowing tray to temporarily rest on oven base. Refer to Figure 3. Figure 3. Insert Tray Peg into Slot Thermo Scientific Shake ‘n Stack... - Page 15 5. Slide the rear left peg into the horizontal slot on the left-hand side of bracket at the back of oven. Assembly is now complete and ready to operate. Figure 6. Rear Peg into Slot Shake ‘n Stack Thermo Scientific...
-
Page 16: Place Membranes In A Bottle
Then roll the bottle to unwind the mesh and membrane. 7. Continue until the membrane and mesh are fully unwound. The mesh ensures the probe will have access to all parts of the hybridisation membrane including those parts of the membrane which overlap. Thermo Scientific Shake ‘n Stack... -
Page 17: Insert Membranes In A Bottle
4. Pour out SSPE (SSC) and replace with pre-warmed pre-hybridisation buffer. 5. Place the bottle in the oven so that it rotates in the oven in the same direction, as it was unrolled in Step 3. Shake ‘n Stack Thermo Scientific... -
Page 18: Pre-Hybridisation
4. Replace the cap and gently agitate the bottle to ensure an even distribution of the probe in the hybridisation solution. 5. Place the bottle back in the Hybridisation Oven, switch on the rotisserie and leave it to hybridise for the required time period. Thermo Scientific Shake ‘n Stack... -
Page 19: Washing
Replace the lid and shake on the shaking platform in the Shake ‘n Stack Oven at the required temperature for the specified time period. Note Initial room temperature washes are not recommended and may result in subsequent background problems. Shake ‘n Stack Thermo Scientific... -
Page 20: Washing In A Sandwich Box
An example of probe stripping procedure is as follows: - a) Wash the filter at 65°C in 5mM Tris CI pH8.0, 0.2mM EDTA, 0.1 x Denhardt’s reagent for 1-2 hours. b) Check for residual activity by autoradiography, then re-probe. Thermo Scientific Shake ‘n Stack... - Page 21 Section 4 Methodology of Hybridisation Shake ‘n Stack Thermo Scientific...
-
Page 22: Rotisseries
1. Release the two securing screws visible on the front rotisserie wheel using a Phillips screwdriver. 2. Put the rotisserie into the oven and place a bottle in the rotisserie. 3. Rotate the free wheel to the desired angle. Figure 5-1. Variable Axis Rotation Thermo Scientific Shake ‘n Stack... -
Page 23: 50Ml & 15Ml Tube Rotisseries
(50 ml) disposable tubes. Details are given in Section 8. Tubes should be inserted into the rotisseries by sliding the tube sideways into the rotisserie. Care should be taken not to push the tubes too firmly into the rotisseries, otherwise the tube will crack. Shake ‘n Stack Thermo Scientific... -
Page 24: Cleaning And Decontamination
4. If the mesh has been decontaminated, no further action is necessary. If, however, the mesh is still contaminated, it will be necessary to leave it to decontaminate in Decon 90 for a longer time period. 5. Meshes should be allowed to dry flat between uses. Thermo Scientific Shake ‘n Stack... -
Page 25: Bottles & Caps
Caution Before using any cleaning or decontamination method except those recommended by the manufacturer, users should check with the manufacturer that the proposed method will not damage the equipment. Shake ‘n Stack Thermo Scientific... -
Page 26: Use Of Radioactive Probes
Thermo cannot accept responsibility for damages arising from such use. If in any doubt, contact a Thermo product specialist prior to use. Thermo Scientific Shake ‘n Stack... - Page 27 Section 7 Use of Radioactive Probes Shake ‘n Stack Thermo Scientific...
-
Page 28: Technical Specifications
..(345 mmW x 245 mmH x 240 mmD) Shipping Weight ....53 lb. (24 kg) Thermo Scientific Shake ‘n Stack... - Page 29 Accessory Pack ....P/N 222060 Includes 2 medium bottles and Bottle Gripper. Temp Controller Replacement Kit ..P/N 192048 Includes temperature controller, PTC probe, gasket, and installation/ calibration procedures. Shake ‘n Stack Thermo Scientific...
-
Page 30: Additional Accessories
Nylon Mesh Five large mesh sheets, 9 x 9 in. (23 x 23 cm) ..P/N 222053 Five small mesh sheets, 4 x 6 in. (10 x 15 cm) . . .P/N 222052 Thermo Scientific Shake ‘n Stack... - Page 31 Section 8 Technical Specifications Shake ‘n Stack Thermo Scientific...
- Page 32 Section 8 Technical Specifications Thermo Scientific Shake ‘n Stack...
- Page 33 Section 8 Technical Specifications Shake ‘n Stack Thermo Scientific...
- Page 34 Section 8 Technical Specifications Thermo Scientific Shake ‘n Stack...
- Page 35 Section 8 Technical Specifications Shake ‘n Stack Thermo Scientific...
- Page 36 Section 8 Technical Specifications Thermo Scientific Shake ‘n Stack...
- Page 37 Section 8 Technical Specifications 8-10 Shake ‘n Stack Thermo Scientific...
-
Page 38: Electrical Schematics
Section 9 Electrical Schematics Thermo Scientific Shake ‘n Stack... - Page 39 Section 9 Electrical Schematics Shake ‘n Stack Thermo Scientific...
- Page 40 Section 9 Electrical Schematics Thermo Scientific Shake ‘n Stack...
- Page 41 Section 9 Electrical Schematics Shake ‘n Stack Thermo Scientific...
-
Page 43: Appendix I Troubleshooting Guide For Nucleic Acid Hybridisations
Failure to carry out adequate pre-hybridisation results in high backgrounds. If dextran sulphate is used in the hybridisation solution, then it must also be included in the pre-hybridisation solution. Thermo Scientific Shake ‘n Stack... - Page 44 Probe solutions should be pre-warmed to the hybridisation temperature and care should be taken to ensure the membrane is not exposed to the concentrated probe solutions if adding it directly to the bottles. Shake ‘n Stack Thermo Scientific...
-
Page 45: Factors Resulting In High Backgrounds
(especially following vacuum blotting). 8. Multiple filters not separated by mesh in bottles. 9. Autoradiography problems. Random black spots and “lightening flash” markings on autoradiographs may be due to static electricity. Thermo Scientific Shake ‘n Stack... -
Page 46: Factorsresultinginsignal Lowerthanexpected
8. Hybridisation and/or washing conditions were too stringent: i) Increase salt concentration. ii) Decrease temperature. iii) Reduce concentration of SDS. iv) Reduce wash times. 9. The hybridisation time was too short. Shake ‘n Stack Thermo Scientific... -
Page 47: Appendix Ii
If the bottle cap is difficult to unscrew, NEVER ATTEMPT to force the bottle cap open. Allow the bottle to cool and retry. If the cap remains stuck, discard the bottle. • The bottles should not be used at temperatures above 70°C. Thermo Scientific Shake ‘n Stack... - Page 48 Shake ‘n Stack Thermo Scientific...
- Page 49 Thermo Scientific Shake ‘n Stack...
- Page 50 Shake ‘n Stack Thermo Scientific...
- Page 51 YBRIDISATION UIDE USER INSTRUCTION MANUAL Manual 7222060 Rev. 0...
- Page 52 Synthetic Oligonucleotides .............. 19 CHAPTER 5: NON-RADIOACTIVE SYSTEM………………………………………..20 The DIG System in Thermo Hybridisation Ovens......20 Electrophoresis & Transfer .............. 21 DNA Hybridisation ................21 CHAPTER 6: HYBRIDISATION USING OLIGONUCLEOTIDE PROBES .... 23 _________________________________________________________________________________________________________ __________ © Thermo Scientific, May 2003. Issue 7...
- Page 53 Use of the Bottle Gripper..............35 Bottle Care ..................35 APPENDIX IV: REFERENCES................36 HYBRIDISATION BOTTLE SAFETY: It is important to follow correct safety procedures when using Hybridisation Bottles. Please see Appendix II for details © Thermo Scientific, May 2003. Issue 7...
-
Page 54: Chapter 1: Introduction
Hybridisation and washing. The procedures outlined in this booklet are intended as general guidelines for the use of Thermo Hybridisation Ovens and may not be ideally suited for every research application. _________________________________________________________________________________________________________ __________ © Thermo Scientific, May 2003. Issue 7... - Page 55 Fritsch, J. & Maniatis, T. (1989) Molecular Cloning: A Laboratory Manual 2nd Edition Sambrook, Cold Spring Harbour Laboratory Press Edited by: Hames, B.D. & Higgins, S.J. (1985) Nucleic Acid Hybridisation: A Practical Approach IRL Press, Oxford © Thermo Scientific, May 2003. Issue 7...
-
Page 56: Chapter 2: Nucleic Acid Transfer Procedures
10. After fixing the DNA the membrane is ready for Hybridisation. Membranes not used immediately may be stored between sheets of Whatman 3MM in sealed plastic bags at 4°C. © Thermo Scientific, May 2003. Issue 7... -
Page 57: Colony/Plaque Blotting
After fixing the DNA, membranes may be stored between sheets of Whatman 3MM paper in sealed plastic bags at 4°C. Prior to Hybridisation, it may be advantageous to carry out a pre-washing step to remove colony debris and hence reduce background noise. © Thermo Scientific, May 2003. Issue 7... -
Page 58: Plaque Blotting
Southern Blotting Size fractionation of the DNA is carried out by agarose gel electrophoresis (a suitable range of horizontal gel apparatus is available from Thermo Scientific). Before transfer to Hybridisation membranes, the DNA in the agarose must be treated to ensure efficient transfer and to generate single-stranded DNA suitable for Hybridisation. -
Page 59: Capillary Blotting
Invert the gel and place centrally on the filter paper. Any filter paper exposed at the edge of the gel should be covered in Saran Wrap, used X-ray film or similar, to prevent flow of buffer around the edge of the gel. © Thermo Scientific, May 2003. Issue 7... - Page 60 After fixing the DNA, the membrane is ready for Hybridisation. Membranes not hybridised immediately may be stored between sheets of Whatman 3MM paper in sealed plastic bags at 4°C. Figure 2.1: Capillary Blot Assembly © Thermo Scientific, May 2003. Issue 7...
-
Page 61: Northern Blotting
RNA is carried out by baking at 80°C for 2 hours, or by UV cross-linking. After fixing the RNA, the membrane is ready for Hybridisation. Membranes not used immediately may be stored between sheets of Whatman 3MM paper in sealed plastic bags at 4°C. © Thermo Scientific, May 2003. Issue 7... -
Page 62: Chapter 3: Hybridisation Procedures
In general terms, the minimum volume of buffer should be used such that the membrane is covered by the fluid at all times (approximately 0.1ml/cm ), or if in Hybridisation bottles, 10ml for a large bottle and 5ml for a small bottle. © Thermo Scientific, May 2003. Issue 7... - Page 63 Removal of the probe on the membrane may be carried out by boiling the membrane in 0.1 x SSPE (SSC), 0.1% SDS for 5 minutes. Check for residual probe activity by autoradiography before hybridising again. © Thermo Scientific, May 2003. Issue 7...
-
Page 64: Northern Blot Rna Hybridisation
2 x SSPE 0.1% SDS at minutes 42°C 1 x 30 with 1 x SSPE 0.1% SDS at minutes 42°C 1 x 15 with 0.1 x 0.1% SDS at minutes SSPE 42°C © Thermo Scientific, May 2003. Issue 7... -
Page 65: Notes For Nucleic Acid Hybridisations Using The Thermo Range Of Equipment
It is important that each membrane is separated from any other by a piece of mesh. Up to five 20 x 20mm membranes can be hybridised in a single Hybridisation bottle. © Thermo Scientific, May 2003. Issue 7... - Page 66 Continue until the membrane and mesh is fully unwound. The mesh ensures the probe will have access to all parts of the Hybridisation membrane including those parts of the membrane, which overlap. © Thermo Scientific, May 2003. Issue 7...
- Page 67 Pour out SSPE (SSC) and replace with pre-warmed prehybridisation buffer. Place the bottle in the Oven so that it rotates in the Oven in the same direction, as it was unrolled in step 3. © Thermo Scientific, May 2003. Issue 7...
-
Page 68: Prehybridisation
Replace the cap and gently agitate the bottle to ensure an even distribution of the probe in the Hybridisation solution. Place the bottle back in the Hybridisation Oven, switch on the rotisserie and leave it to hybridise for the required time period. © Thermo Scientific, May 2003. Issue 7... -
Page 69: Washing
Remove the Hybridisation Bottle from the Oven. Pour off the Hybridisation buffer. Using a pair of forceps, carefully remove the membranes and place them in a suitable container with a lid (e.g. sandwich box or similar). Using the forceps gently unroll the membranes. © Thermo Scientific, May 2003. Issue 7... - Page 70 Step 5 should be repeated for any subsequent wash. The washing protocol using the shaking platform will be identical to that used in the bottles. Please refer to Chapter 7 for additional information on Washing. © Thermo Scientific, May 2003. Issue 7...
-
Page 71: Chapter 4: Nucleic Acid Probes
(the fragment may then be extracted from the gel using Thermo Recovery kits). This technique eliminates the possibility of re-association of complementary strands, which can occur with double-stranded DNA probes. © Thermo Scientific, May 2003. Issue 7... -
Page 72: Rna Probes
(e.g. Maniatis et al). In addition, there are several commercially available kits containing all the components required for the different types of labelling experiments. High quality HPLC purified oligonucleotides are available online from Thermo Scientific, visit our web site at www.thermo.com/molecularbiology. © Thermo Scientific, May 2003. Issue 7... -
Page 73: Chapter 5: Non-Radioactive System
This protocol has been optimised for DNA RFLP analysis. It may require minor alteration to be used for other applications. The following protocol applies to a 20cm x 20cm membrane: - © Thermo Scientific, May 2003. Issue 7... -
Page 74: Electrophoresis & Transfer
Pre-warm Hybridisation bottle containing 50ml 2 x SSC to 68°C. Layer the following into a plastic box containing 50ml 2 x SSC: One piece of nylon mesh (23cm x 23cm - Thermo Scientific). The membrane, DNA side-up. Two layers of nylon mesh. - Page 75 Alternatively, remove membrane from roll and wash in plastic box: - 2 x 5 minutes in 500ml 2 x SSC 0.1% SDS at room temp. 2 x 15 minutes in 500ml 0.2 x SSC 0.1% SDS at 68°C © Thermo Scientific, May 2003. Issue 7...
-
Page 76: Chapter 6: Hybridisation Using Oligonucleotide Probes
Hybridisation vessel. Some researchers may prefer to use fresh Hybridisation buffer. Hybridise with agitation, or by rotating in bottles, for approximately 12 hours at the Hybridisation temperature. © Thermo Scientific, May 2003. Issue 7... - Page 77 Background Hybridisation problems are much more common when using oligonucleotide probes. For this reason procedures to reduce background such as pre-washing of colony filters (Chapter 2, Colony/Plaque Blotting) and purification of the oligonucleotide to remove unincorporated nucleotides are particularly advantageous. © Thermo Scientific, May 2003. Issue 7...
-
Page 78: Chapter 7: Troubleshooting Guide For Nucleic Acid
Failure to carry out adequate preHybridisation results in high backgrounds. If dextran sulphate is used in the Hybridisation solution, then it must also be included in the prehybridisation solution. © Thermo Scientific, May 2003. Issue 7... -
Page 79: Washing Procedure
Probe solutions should be pre-warmed to the Hybridisation temperature and care should be taken to ensure the membrane is not exposed to the concentrated probe solutions if adding it directly to the bottles. © Thermo Scientific, May 2003. Issue 7... -
Page 80: Summary Of Factors Resulting In High Backgrounds
(especially following vacuum blotting). Multiple filters not separated by mesh in bottles. Autoradiography problems. Random black spots and “lightening flash” markings on autoradiographs may be due to static electricity. © Thermo Scientific, May 2003. Issue 7... -
Page 81: Summary Of Factors Resulting In A Signal Lower Than Expected
Hybridisation and/or washing conditions were too stringent: - Increase salt concentration. (ii) Decrease temperature. (iii) Reduce concentration of SDS. (iv) Reduce wash times. The Hybridisation time was too short. © Thermo Scientific, May 2003. Issue 7... -
Page 82: Appendix I: Solutions For Nucleic Acid Blotting
Dissolve the DNA at a concentration of 1mg/ml in sterile H O, sonicate to a length of 200-500bp, and then stand in a boiling water bath for 10 minutes. Aliquot and store at -20°C. Denaturing Solution NaCl 1.5M NaOH 0.5M Sterilise by autoclaving. © Thermo Scientific, May 2003. Issue 7... - Page 83 Volume Final Concentration 20 x SSPE (or SSC) 6 x SSPE (SSC) 100 x Denhardt’s 0.5ml 5 x Denhardt’s reagent 10% SDS 0.5ml 0.5% SDS 4.5ml Add denatured salmon sperm DNA to 50µg/ml. © Thermo Scientific, May 2003. Issue 7...
- Page 84 : In addition, Hybridisation membranes should always be handled wearing gloves or using forceps. Where it is necessary to sterilise the membranes, place between sheets of filter paper and autoclave for 15 minutes. © Thermo Scientific, May 2003. Issue 7...
-
Page 85: Appendix Ii: Factors Affecting Stringency Of Hybridisation Reactions
In general, hybridise at low stringency; then during washing, increase the stringency by keeping the temperature constant but decreasing the salt concentration with each wash step. © Thermo Scientific, May 2003. Issue 7... -
Page 86: Effect Of Temperature & Salt Concentration
Increasing the monovalent cation concentration enables the DNA strands to come together more readily, thus reducing the stringency of Hybridisation. EDTA is sometimes added to chelate magnesium ions, which can have an unpredictable effect on Hybridisation reactions. © Thermo Scientific, May 2003. Issue 7... - Page 87 3M, shifts the melting temperature of A-T base pairs to that of G-C base pairs. Thus it may be used in oligonucleotide Hybridisation so that the stringency of Hybridisation becomes a function of the probe length alone, rather than probe length and G-C content. © Thermo Scientific, May 2003. Issue 7...
-
Page 88: Appendix Iii: Hybridisation Bottle Safety
Helping you to safely tighten and unscrew caps. • Making handling of hot bottles easier. For more details and ordering information, contact Thermo Scientific or your local Distributor. Bottle Care Hybridisation Bottles are made of thick walled borosilicate glass, which protects users from radiation and has excellent long-term reliability. -
Page 89: Appendix Iv: References
Ultraviolet Fixation. Anal. Biochem. 184:90 Rigby, P.W.J., Dieckman, Ml, Rhodes, C. and Berg, P. (1977) Labelling Deoxyribonucleic Acid to high specific activity in vitro by nick translation with DNA polymerase. I.J. Mol. Biol. 113:237 © Thermo Scientific, May 2003. Issue 7... - Page 90 17. Wood, W.I., Gitschier, J., Lasky, L.A. and Lawn, R.M. (1985) Base composition independent hybridisation in tetramethylammonium chloride. A method for oligonucleotide screening of highly complex gene libraries. Proc. Natl. Acad. Sci. 82:1585 © Thermo Scientific, May 2003. Issue 7...
- Page 92 thermoscientific.com © 2020 Thermo Fisher Scientific Inc. All rights reserved. All trademarks are the property of Thermo Fisher Scientific and its subsidiaries. Specifications, terms and pricing are subject to change. Not all products are available in all countries. Please consult your local sales representative for details. Thermo Fisher Scientific (Asheville) LLC 401 Millcreek Road Marietta, Ohio 45750...
Need help?
Do you have a question about the Shake n Stack 6240 and is the answer not in the manual?
Questions and answers