Table of Contents
Advertisement
Available languages
Available languages
Quick Links
Installation and Assembly:
®
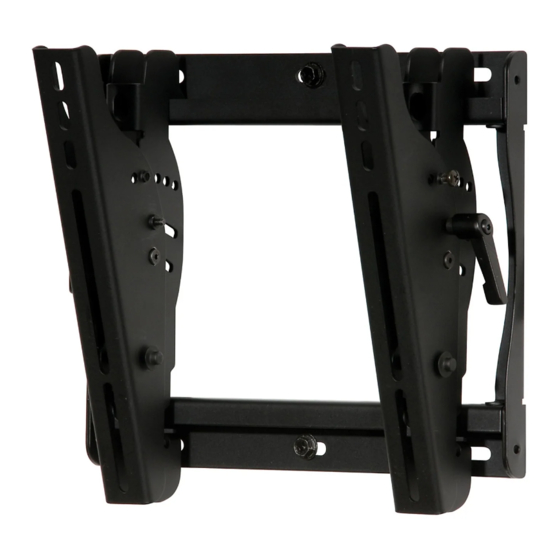
SmartMount
Universal Tilt Wall Mount for 13" - 37"
(33 - 94 cm) Flat Panel Displays
Models: ST635, ST635-S, ST635P, ST635P-S
U L
C
US
©
Max UL Load Capacity:
125 lb (57 kg)
Features:
• For virtually all 13" - 37" (33 - 94 cm) fl at panel displays
• Universal mount fi ts displays with mounting hole patterns up to 245 x 240mm (9.65" W x 9.48" H)
• Display held only 2.65" (67mm) from wall for a discreet installation
• Open wall plate design allows for greater wall and an array of cable management options
• Universal tilt brackets easily hook onto the wall plate for fast installation
• Adjustable up to 15° of forward tilt and up to -5° backward tilt for optimal viewing angle
• Easy locking handle locks the display position into place without the use of tools
• Optional IncreLok™ feature offers fi xed tilts at -5°, 0°, 5°, 10° and 15° increments
• Includes Sorted-For-You™ fastener packs for installation to wood studs, concrete and cinder block
• Optional horizontal adjustment of up to 8" (203mm) (depending on display model) for perfect display
placement
• Available in Black or Silver
2300 White Oak Circle • Aurora, Il 60502 • (800) 865-2112 • Fax: (800) 359-6500 • www.peerlessmounts.com
ISSUED: 02-18-08 SHEET #: 202-9249-6 04-05-11
Advertisement
Chapters
Table of Contents

Subscribe to Our Youtube Channel
Related Manuals for PEERLESS Mounts SmartMount ST635


Summary of Contents for PEERLESS Mounts SmartMount ST635
- Page 1 Installation and Assembly: ® SmartMount Universal Tilt Wall Mount for 13" - 37" (33 - 94 cm) Flat Panel Displays Models: ST635, ST635-S, ST635P, ST635P-S © Max UL Load Capacity: 125 lb (57 kg) Features: • For virtually all 13" - 37" (33 - 94 cm) fl at panel displays •...
-
Page 2: Table Of Contents
NOTE: Read entire instruction sheet before you start installation and assembly. WARNING • Do not begin to install your Peerless product until you have read and understood the instructions and warnings contained in this Installation Sheet. If you have any questions regarding any of the instructions or warnings, for US customers please call Peerless customer care at 1-800-865-2112, for all international customers, please contact your local distributor. -
Page 3: Parts List
Before you begin, make sure all parts shown are included with your product. Parts List Non-Security Security ST635P ST635P-S ST635 ST635-S Description Qty. Black Silver Black Silver 201-1506 201-4506 201-1506 201-4506 AA wall plate 201-1461 201-4461 201-1462 201-4464 left adapter bracket 201-1463 201-4463 201-1464... -
Page 4: Installation To Wood Stud Wall
Installation to Wood Stud Wall WARNING • Installer must verify that the supporting surface will safely support the combined load of the equipment and all attached hardware and components. • Tighten wood screws so that wall plate is fi rmly attached, but do not overtighten. Overtightening can damage the screws, greatly reducing their holding power. -
Page 5: Installation To Solid Concrete Or Cinder Block
Installation to Solid Concrete or Cinder Block WARNING • When installing Peerless wall mounts on cinder block, verify that you have a minimum of 1-3/8" (35mm) of actual concrete thickness in the hole to be used for the concrete anchors. Do not drill into mortar joints! Be sure to mount in a solid part of the block, generally 1"... -
Page 6: Installing Adapter Brackets
Installing Adapter Brackets WARNING • If screws don't get three complete turns in the display inserts or if screws bottom out and adapter brackets are still not tightly secured, damage may occur to display or product may fail. Contact customer care for correct hardware to use. -
Page 7: Installing Flat Panel Display To Wall Plate
Mounting and Removing Flat Panel Display WARNING • Always use an assistant or mechanical lifting equip- ment to safely lift and position the fl at panel display. & • Do not tighten screws with excessive force. Overtightening can cause damage to mount. Tighten screws to 40 in. - Page 8 Instalación y ensamblaje: ® Soporte universal de pared inclinación SmartMount para pantallas planas de 13" a 37" Modelos: ST635, ST635-S, ST635P, ST635P-S © Máxima capacidad de UL carga: 125 lb (57 kg) Características: • Para prácticamente todas las pantallas planas de 13" a 37" •...
- Page 9 Español NOTA: Lea la hoja de instrucciones completa antes de comenzar la instalación y el ensamblaje. ADVERTENCIA • No comience a instalar su producto de Peerless hasta haber leído y entendido las instrucciones y las advertencias contenidas en la Hoja de Instalación. Si tiene alguna pregunta acerca de cualquiera de las instrucciones o las ad- vertencias, por favor, llame a Servicio al Cliente de Peerless al 1-800-865-2112 si está...
-
Page 10: Lista De Piezas
Español Antes de comenzar, asegúrese de que su producto contiene todas las piezas que se muestran. Lista de piezas No Aseguradora Aseguradora ST635P ST635P-S ST635 ST635-S Descripción Cantidad Negro(a) Plateado(a) Negro(a) Plateado(a) 201-1506 placa de pared 201-4506 201-1506 201-4506 soporte adaptador izquierdo 201-1461 201-4461 201-1462... -
Page 11: Instalación En Una Pared Con Montantes De Madera Dobles
Español Instalación en una pared con montantes de madera ADVERTENCIA • El instalador tiene que asegurarse de que la superfi cie de apoyo sostendrá, con seguridad, la carga combinada del equipo y todos los fi jadores y componentes. • Apriete los tornillos de madera de manera que la placa de pared se fi je fi rmemente, pero no en exceso. Apretarlos en exceso puede dañar los tornillos y puede disminuir signifi... -
Page 12: Instalación En Una Pared De Concreto Macizo O De Bloques De Hormigón De Escorias
Instalación en una pared de concreto macizo o de bloques de Español hormigón de escorias ADVERTENCIA • Cuando instale soportes de pared Peerless en bloques de hormigón de escorias, verifi que que tengan un mínimo de 1-3/8" (35mm) de superfi cie efectiva de concreto en el agujero que va a utilizar para los anclajes de concreto. ¡No perfore en las juntas de mortero! Asegúrese de instalar el soporte en una parte sólida del bloque, generalmente a un mínimo de 1"... -
Page 13: Instalación De Los Soportes Adaptador
Español Instalación de los soportes adaptadores ADVERTENCIA • Si no se les da tres vueltas completas a los tornillos en los insertos de la pantalla o si los tornillos topan fondo y el soporte todavía no está fi rme, se podría dañar la pantalla o el producto podría no funcionar bien. Para no rayar la pantalla, coloque un trapo sobre una superfi... -
Page 14: Instalación Y Desinstalación De La Pantalla Plana
Español Instalación y desinstalación de la pantalla plana ADVERTENCIA • Siempre cuente con un asistente o con un equipo mecánico de izar para levantar y colocar los televisores de pantalla plana con más seguridad. • No apriete los tornillos con fuerza excesiva. Apretarlos en exceso puede dañar el soporte. - Page 15 Installation et montage : ® Support mural inclinable universel Smartmount pour écrans plats de 13 à 37 po Modèles: ST635, ST635-S, ST635P, ST635P-S © Capacité de charge UL maximale: 125 lb (57 kg) Caractéristiques : • Pour pratiquement tous les écrans plats de 13 à 37 po •...
- Page 16 Français REMARQUE: lisez entièrement la fi che d’instructions avant de commencer l’installation et l’assemblage. AVERTISSEMENT • Ne commencez pas à installer votre produit Peerless avant d’avoir lu et assimilé les instructions et les avertisse- ments contenus dans cette fi che d’installation. Pour toute question concernant les instructions ou les avertissements, veuillez appeler le service à...
-
Page 17: Liste Des Pièces
Français Avant de commencer, veillez à ce que toutes les pièces énumérées soient incluses. Liste des pièces Sans sécurité Sécurité ST635P ST635P-S ST635 ST635-S Noir Argent Noir Argent Description Qté 201-1506 201-4506 201-1506 201-4506 AA plaque murale support adaptateur gauche 201-1461 201-4461 201-1462... -
Page 18: Installation Sur Un Mur À Doubles Montants En Bois
Français Installation sur des murs à montants en bois AVERTISSEMENT • L’installateur doit s’assurer que la surface de support pourra soutenir sans danger la charge combinée de l’équipement, de toute sa visserie et de tous ses composants. • Serrez les vis à bois de manière que la plaque murale soit fermement fi xée, mais sans excès. Un serrage excessif peut endommager les vis et en réduire considérablement le pouvoir de maintien. -
Page 19: Installation Sur Du Béton Plein Ou Un Bloc De Béton De Mâchefer
Français Installation sur du béton plein ou un bloc de béton de mâchefer AVERTISSEMENT • Si vous installez des montures murales Peerless sur un bloc de béton de mâchefer, vérifi ez que vous disposez d’une épaisseur de béton d’au moins 3,4 cm (1 3/8 po) dans le trou destiné aux ancrages de béton. Ne percez pas dans les joints de mortier ! Veillez à... -
Page 20: Installation De Support Inclinables
Français Fixation des supports inclinables à l’écran AVERTISSEMENT • Si les vis ne sont pas enfoncées de trois tours complets dans les inserts ou si elles sont serrées au maximum sans parvenir à fi xer solidement le support, l’écran peut être abîmé ou le produit détérioré. Afi... -
Page 21: Installation De L'écran Plat Sur La Plaque Murale
Français Installation de l’écran plat sur la plaque murale AVERTISSEMENT • Pour lever et positionner l’écran plat en toute sécurité, & faites-vous toujours aider par une autre personne ou utilisez un dispositif de levage mécanique. • N’exercez pas une force excessive sur les vis. Un serrage excessif peut endommager le support. - Page 22 Anbringung und Zusammenbau: SmartMount®-Universal-Wandkipphalter für Flachbildschirme von 13 - 37 Zoll (33 - 94 cm) Modelle: ST635, ST635-S, ST635P, ST635P-S © Maximale UL Tragfähigkeit: 125 lb (57 kg) Merkmale: • Für nahezu alle Flachbildschirme von 13 bis 37 Zoll (33 - 94 cm) •...
- Page 23 HINWEIS: Lesen Sie bitte das gesamte Anleitungsblatt durch, bevor Sie mit Anbringung und Zusammenbau beginnen. ACHTUNG • Beginnen Sie mit der Anbringung Ihres Peerless-Produkts erst, nachdem Sie die in dieser Montageanleitung enthaltenen Anleitungen und Achtungshinweise gelesen und sich gründlich mit ihnen vertraut gemacht haben. Falls Sie Fragen hinsichtlich irgendeiner der Anleitungen oder Achtungshinweise haben, wenden Sie sich in den USA bitte an den Peerless-Kundendienst unter der Rufnummer 1-800-865-2112.
-
Page 24: Teileliste
Vergewissern Sie sich vor Beginn der Arbeiten, dass alle dargestellten Teile mit Ihrem Produkt mitgeliefert wurden. Teileliste KEINE SICHERHEITSAUSF. SICHERHEITSAUSF. ST635P ST635P-S ST635 ST635-S SCHWARZ SILBER SCHWARZ SILBER Beschreibung Anz. 201-1506 201-4506 201-1506 201-4506 WANDPLATTE 201-1461 201-4461 201-1462 201-4462 LINKE KIPPHALTERUNG 201-1463 201-4463 201-1464... -
Page 25: Anbringung An Holzständerwand
Anbringung an Wänden mit einer Holzständerreihe ACHTUNG • Bei der Anbringung muss darauf geachtet werden, dass die Wand die kombinierte Last von Bildschirm und allen Befestigungsteilen und -komponenten tragen kann. • Ziehen Sie die Schrauben fest genug an, dass die Wandplatte sicher befestigt ist, doch ohne sie zu überdrehen. Durch Überdrehen können die Schrauben beschädigt werden, wodurch ihr Haltevermögen stark reduziert wird. -
Page 26: Anbringung An Massivbeton Oder Porenbetonstein
Anbringung an Massivbeton oder Porenbetonstein ACHTUNG • Bei der Anbringung von Peerless-Wandhaltern an Porenbetonstein muss sichergestellt werden, dass die tatsächliche Stärke des Betons, in den das Loch für die Betondübel gebohrt wird, mindestens 35mm (1 3/8 Zoll) beträgt. Bohren Sie nicht in Mörtelfugen! Achten Sie darauf, dass die Anbringung an einem massiven Teil des Blocks erfolgt, im Allgemeinen mindestens 25mm (1 Zoll) von der Blockseite entfernt. -
Page 27: Anbringung Von Adapterhalterungen
Anbringung Vertikalen Halterungen ACHTUNG • Sind die Schrauben nicht um drei volle Umdrehungen in die Löcher des Bildschirms eingeschraubt oder stoßen sie unten an und die Adapterhalterungen sind noch immer nicht sicher befestigt, kann der Bildschirm beschädigt werden oder das Produkt kann versagen. Bitte erfragen Sie die korrekten Befestigungsteile beim Kundendienst. -
Page 28: Anbringung Des Flachbildschirms An Der Wandplatte
Anbringung und Abnahme des Flachbildschirms ACHTUNG • Ziehen Sie immer eine zusätzliche Person heran oder verwenden Sie mechanische Hebegeräte, um den Flachbildschirm sicher zu heben und zu positionieren. & • Ziehen Sie die Schrauben so an, dass die Adapterhalterungen sicher befestigt sind. - Page 29 LIMITED FIVE-YEAR WARRANTY Peerless Industries, Inc. (“Peerless”) warrants to original end-users of Peerless® products will be free from defects in material and workmanship, under normal use, for a period of fi ve years from the date of purchase by the original end-user (but in no case longer than six years after the date of the product’s manufacture). At its option, Peerless will repair or replace, or refund the purchase price of, any product which fails to conform with this warranty.
- Page 30 Français GARANTIE DE CINQ ANS Peerless Industries, Inc. (« Peerless ») garantit aux utilisateurs fi naux d’origine des produits Peerless que lesdits produits ne présenteront aucun défaut de matériau ou de main-d’œuvre, dans la mesure où ils sont utilisés normalement, pendant une période de cinq ans à compter de la date d’achat par l’utilisateur fi nal d’origine (mais en aucun cas plus de six ans après la date de fabrication du produit).
Need help?
Do you have a question about the SmartMount ST635 and is the answer not in the manual?
Questions and answers