Advertisement
Quick Links
SMA-2 • Installation Guide
Overview
The Extron SMA-2 swivel mount adapter kit is used for mounting
select tabletop TouchLink Pro touchpanels. The assembly can be
rotated up to 360°, providing easy access for multiple users sitting
around a table. The provided set screws fix the exact angle of rotation
in each direction to prevent cable strain and tangling.
ATTENTION:
•
If the SMA-2 will be installed into fine furniture, it is best
to hire a licensed, bonded craftsperson to cut the access
hole and perform the physical installation so the surface
will not be damaged.
•
S'il est prévu d'installer le SMA-2 dans du beau mobilier,
il est préférable de faire appel à un artisan autorisé et
qualifié pour couper le trou d'accès et réaliser l'installation
de telle façon que la surface ne soit pas endommagée.
Step One — Prepare the Site
Choose a location for the SMA-2. The mounting site must be free of
obstructions above and below the table so that the touchpanel can
rotate without the cables getting tangled.
Step Two — Secure the Base Plate to the Table
Before securing the base plate to the bottom of the table, use
1.
the provided hex key to insert the set screws into the base plate.
Figure 1 shows how to position the set screws to limit clockwise and
counter-clockwise rotation. You must have at least one set screw to
prevent the cables from becoming tangled and strained.
Placing Set Screws (shown in red)
Figure 1.
Mark the position where the barrel of the mounting plate passes
2.
through the table and drill a hole through the table that is 1-1/8"
(29 mm) in diameter (see figure 2,
as a template to mark the position of the hole.
Place base plate against the bottom surface of the table so that the
3.
central hole of the base plate aligns with the hole in the table. Use
the threaded barrel of the mounting plate to help with the alignment.
NOTES:
•
Ensure the base plate is in the correct orientation with
the concave surface facing away from the table (see
figure 2).
•
Ensure the base plate is aligned so that the set screws
stop the rotation of the assembly as required.
Mark the position of the holes for the two mounting screws and drill
4.
two pilot holes, diameter 7/64" (
Secure the base plate to the bottom of the table with the two
5.
provided #6 round head wood mounting screws (
Secure the set screw(s).
1
). If needed, use the base plate
2
).
3
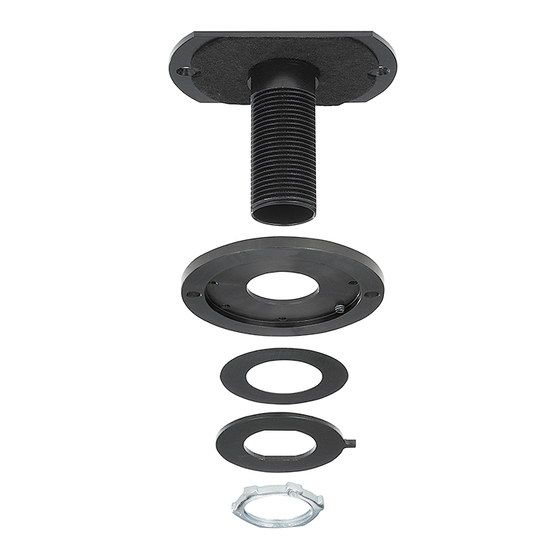
SMA-2 Parts
Touchpanel mounting plate
with threaded barrel
Base plate
Swivel disk
Frictionless disk
Lock nut
#6-32 flat head screws (2)
#6-32 set screws (2)
#6 round head wood
screws (2)
The kit also includes a 1/16" hex key (not shown).
NOTE:
surface against the bottom of the table and
the concave surface facing out.
Figure 2.
).
Product Category
1-1/8"
1 1
29 mm
2 2 2
2 2
3 3 3
3 3
The base plate is oriented with the at
Secure the Baseplate to the Table
1
Advertisement

Related Manuals for Extron electronics SMA-2


Summary of Contents for Extron electronics SMA-2
- Page 1 Step One — Prepare the Site Frictionless disk Choose a location for the SMA-2. The mounting site must be free of obstructions above and below the table so that the touchpanel can rotate without the cables getting tangled.
- Page 2 +86.21.3760.1566 FAX +971.4.299.1880 FAX +61.8.8351.2511 FAX +31.33.453.4040 +91.80.3055.3777 +1.714.491.1500 +1.919.850.1000 +31.33.453.4050 FAX +91.80.3055.3737 FAX +1.714.491.1517 FAX +1.919.850.1001 FAX © 2017 Extron Electronics All rights reserved. All trademarks mentioned are the property of their respective owners. www.extron.com 68-2831-51 Rev. A 04 17...
Need help?
Do you have a question about the SMA-2 and is the answer not in the manual?
Questions and answers