Advertisement
Surge Protection and DIN RAIL Mounting Kit
1. Introduction
Thank you for purchasing this Super-speed 16-port USB3.0 hub. It
provides an ideal solution to expand 16 USB3.0 ports from 2 selectable
USB3.0 host ports. It provides a wide range self power source
(+12~24VDC from 2-pin Terminal Blocks) to supply enough power on
USB3.0 buses.
Features:
Compliant with USB Specification Revision 3.0
Rigid and Wall-mountable Metal Case
Provides 2 Selectable Upstream and 16 Downstream USB3.0
Facing Ports
Supports 5Gbps (Super-speed), 480Mbps (High-speed), 12Mbps
Full-speed) and 1.5Mbps (Low-speed) Speed
Supports 350-Watt Surge Protection for Each Port
Multi Transaction Translators (TT) per Hub
Support USB Battery Charging: CDP and DCP modes
Supports USB Screw-Lock Cable Mechanism
Supports DIN RAIL Mounting Kit
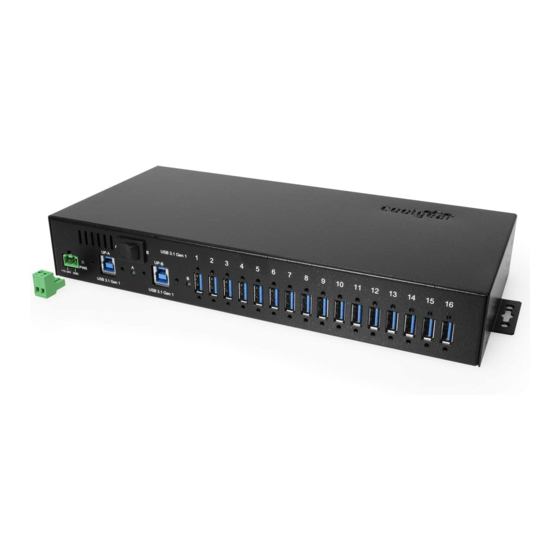
2. Connector Layout
USB3.0 Upstream
Port A Connector
Power LED
+12~24V DC
Power Input
Terminal
Blocks
16-Port USB3.0 Metal Hub with
Installation Guide
Upstream Port
A/B Selecting
Switch
USB3.0 Upstream
Port B Connector
16 USB3.0 Downstream Port
Connectors
1
Advertisement
Table of Contents

Related Manuals for CoolGear USB3- 16U1


Summary of Contents for CoolGear USB3- 16U1
- Page 1 16-Port USB3.0 Metal Hub with Surge Protection and DIN RAIL Mounting Kit Installation Guide 1. Introduction Thank you for purchasing this Super-speed 16-port USB3.0 hub. It provides an ideal solution to expand 16 USB3.0 ports from 2 selectable USB3.0 host ports. It provides a wide range self power source (+12~24VDC from 2-pin Terminal Blocks) to supply enough power on USB3.0 buses.
- Page 2 16-Port USB3.0 Metal Hub with Surge Protection and DIN RAIL Mounting Kit USB3.0 Upstream Port Connectors: There are 2 Type-B upstream connectors that selectable by the rocker switch. Either port A or port B (but not simultaneously) is used to control the downstream ports.
- Page 3 16-Port USB3.0 Metal Hub with Surge Protection and DIN RAIL Mounting Kit 3. Hardware Installation Use static electricity discharge precautions. Remove possible static discharge potential from any objects that the hub may come in contact with before installation. This can be accomplished by touching a bare metal chassis rail after you have turned off the power.
- Page 4 16-Port USB3.0 Metal Hub with Surge Protection and DIN RAIL Mounting Kit 4. Checking the USB3.0 Hub Installation To check the USB3.0 hub installation in Windows Device Manager, please follow the following steps: Click Start Control Panel System Device Manager button Double click Universal Serial Bus Controller Double click Generic USB Hub, the message will show that this device is working properly.
Need help?
Do you have a question about the USB3- 16U1 and is the answer not in the manual?
Questions and answers