Table of Contents
Advertisement
Quick Links
Advertisement
Table of Contents

Related Manuals for Silca Twister II NA


Summary of Contents for Silca Twister II NA
- Page 1 Twister II NA Operating Manual Original Instructions D445453XA vers. 1.0...
- Page 2 © 2015 SILCA S.p.A. - Vittorio Veneto All rights reserved. No part of this publication may be reproduced or used in any form or by any means (photocopying, microfi lm or other) without the written permission of Silca S.p.A. Edition: May 2015 Printed in India by MINDA SILCA Engineering Ltd.
-
Page 3: Table Of Contents
INDEX GENERAL INTRODUCTION ....................... 2 1 TRANSPORT ............................4 1.1 PACKING ...........................4 1.2 TRANSPORT ..........................4 1.3 UNPACKING ..........................4 1.4 HANDLING THE MACHINE ......................4 1.5 SAFETY ............................4 2 MACHINE DESCRIPTION ........................5 3 WORKING PARTS ..........................7 3.1 TECHNICAL DATA ........................8 3.2 ELECTRIC CIRCUIT ........................9 4 ACCESSORIES PROVIDED ......................10 5 MACHINE INSTALLATION AND PREPARATION ................11 5.1 CHECKING FOR DAMAGE ......................11... - Page 5 GUIDE TO THE MANUAL This manual has been produced to serve as a guide for users of the TWISTER II NA key-cutting machine. Read it carefully; it is essential if you wish to operate your machine safely and effi ciently.
-
Page 6: General Introduction
There are no further risks arising from the use of the machine. Protection and safety precautions for the operator The TWISTER II NA key-cutting machine is built entirely to CE standards. The operations for which it has been designed are easily carried out at no risk to the operator. - Page 7 Operating manual Twister II NA Machine identifi cation The TWISTER II NA key-cutting machine is provided with an identifi cation label which shows the serial number (Fig. 2). Fig. 2 Copyright Silca S.p.A. 2015...
-
Page 8: Transport
4) Remove the key-cutting machine from the protective shell. 1.4 HANDLING THE MACHINE When the TWISTER II NA has been unpacked, place it directly on its workbench. This operation can be carried out by one person. ATTENTION: hold the base, and no other part, to lift and carry the machine. -
Page 9: Machine Description
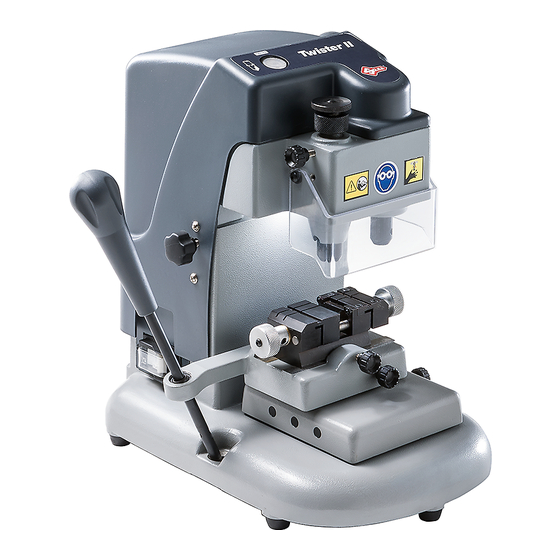
Twister II NA 2 MACHINE DESCRIPTION The TWISTER II NA is an excellent quality, high precision key-cutting machine. It features great versatility in cutting keys of different types without the need to replace the clamp or apply fi xed adapters. - Page 10 Operating manual Twister II NA High precision work is guarantee by the combination of the functional features on the TWISTER II NA and all its components, such as: • MOVEMENTS The two axes move on ball guides which provide smooth running and easy sliding without play.
-
Page 11: Working Parts
Operating manual Twister II NA 3 WORKING PARTS Fig. 6 A - clamp carriage (X-Y axes) H2 - locking knob tracer shaft B - left-hand jaw I - vertical carriage lever (Z axis) B1- right-hand jaw L - sleeve (cutting tool and tracer point holder) -
Page 12: Technical Data
9.8” (250 mm) depth: 14.6” (370 mm) height: 14.6” (370 mm) Weight: 53 lbs. (24 Kg.) Sound pressure: 74,7 dB(A) GRAPHICS ON THE TWISTER II NA MACHINE THE USE OF PROTECTIVE READ INSTRUCTIONS WARNING! GOGGLES IS REQUIRED BEFORE USE... -
Page 13: Electric Circuit
Operating manual Twister II NA 3.2 ELECTRIC CIRCUIT The main parts of the electrical and electronic circuit on the TWISTER II NA are listed below: 1) Machine plug 2) Fuses 8 Amp delayed (120V) 3) Master switch 4) Led 4.5W 120V... -
Page 14: Accessories Provided
Operating manual Twister II NA 4 ACCESSORIES PROVIDED A set of accessories is supplied for use with the machine or for servicing (tools, Allen keys and adapters). The accessories provided are: CUTTING TOOL 3 mm ALLEN KEY for dimple keys... -
Page 15: Machine Installation And Preparation
5.2 ENVIRONMENTAL CONDITIONS To ensure that the best use is made of the TWISTER II NA key-cutting machine, certain parameters must be borne in mind: damp, badly ventilated sites should be avoided. -
Page 16: Machine Regulation And Utilization
Operating manual Twister II NA 6 MACHINE REGULATION AND UTILIZATION Before carrying out cutting operations: • insert the proper cutter and tracer • activate the spring system (if cutting dimple keys) (section 7.2) 6.1 FITTING AND REGULATING THE TOOLS Fig. 9 ATTENTION: Turn power off on machine. -
Page 17: Cutting Operations
7.1 GAUGING KEYS When loading keys into the clamps on the TWISTER II NA both the pattern key and the key to be cut must be gauged properly in the clamp prior to beginning the cutting operation. Keys are gauged using either the shoulder stop or tip of the key (for keys that do not have a shoulder). -
Page 18: Cutting Laser (Sidewinder ) Type Keys
Operating manual Twister II NA Cutting the edge If cuts are to be made on the edge, place the key in a vertical position. Fig. 14 7.3 CUTTING LASER (SIDEWINDER ) TYPE KEYS NOTE: before attempting to cut laser (sidewinder) type keys, deactivate the spring system for dimple keys using knob (O ). -
Page 19: Cutting Narrow-Blade Laser (Sidewinder) Type Keys
Operating manual Twister II NA 7.4 CUTTING NARROW-BLADE LASER (SIDEWINDER) TYPE KEYS (ART.HU41P-HU55P- HU64P...) The clamp can also be used to cut narrow-stemmed Laser (sidewinder) keys but requires the use of the optional adapter. Proceed as follows: 1) Open the clamps by loosening knobs (E) and (E1). -
Page 20: Maintenance
Although the TWISTER II NA key-cutting machine does not require special maintenance, it is advisable to check and, if necessary, replace the parts subject to wear, such as: the belt (Section 8.1) and the lamp (Section 8.2). -
Page 21: Replacing The Light Bulb
Fuses must always be replaced with others of the same type and with the same Amps, as shown in the manual. The TWISTER II NA key-cutting machine has two fuses: 8 Amps delayed for machines with 120 Volt placed in the inlet socket, to protect the key-cutting machine from sudden changes in voltage or short circuits. -
Page 22: Replacing The Jaws On Right-Hand Clamp
Operating manual Twister II NA 8.4 REPLACING THE JAWS ON RIGHT-HAND CLAMP Fig. 22 Make sure the motor ON switch is OFF . 8.4.1 REPLACING LEFT JAW 1) Unscrew the knob (E1). 2) Loosen the 2 screws (B2) and remove the jaw. -
Page 23: Decommissioning
Packing The TWISTER II NA device is consigned in a cardboard packing box which can be re-used if undamaged. When it is to be thrown away it is classifi ed as solid urban waste and should be placed in the special paper collecting bins. -
Page 24: After-Sales Service
The limited warranty period for the TWISTER II NA key-cutting machine ensures free repairs or replacements of faulty parts within 24 months of purchase. All other service calls must be arranged by the customer with Silca or its Service Centres.
Need help?
Do you have a question about the Twister II NA and is the answer not in the manual?
Questions and answers
How do you change the carriage on a Twister II machine?