Table of Contents
Advertisement
Quick Links
Advertisement
Table of Contents

Subscribe to Our Youtube Channel
Related Manuals for Silca Unocode 299


Summary of Contents for Silca Unocode 299
- Page 1 Operating manual D425337XA vers. ®...
- Page 2 This manual has been drawn up by SILCA S.p.A. All rights reserved. No part of this publication may be reproduced or used in any form or by any means (photocopying, microfilm or other) without the written permission of SILCA S.p.A. Edition: december 2002 Printed in Vittorio Veneto by SILCA S.p.A.
-
Page 3: Table Of Contents
INDEX REFERENCE GUIDE .................... 1 GENERAL ......................2 MACHINE DESCRIPTION ..................3 ................3 AIN CHARACTERISTICS ......................4 AFETY .................. 5 AIN WORKING PARTS ..................6 ECHNICAL ................7 CCESSORIES PROVIDED TRANSPORT ......................8 ...................... 8 ACKING ....................9 NPACKING .................. - Page 4 ............50 CCESS TO BOTTOM COMPARTMENT 7.10 ................51 ENSOR REPLACEMENT 7.11 ................53 RUSH REPLACEMENT 7.12 WIN-TRANSFER P ..............54 ROGRAM DISPOSING OF MACHINE.................. 55 ASSISTANCE ...................... 56 ................ 56 OW TO REQUEST SERVICE Appendix 1 - ELECTRICAL DIAGRAMS ............I - VI...
-
Page 5: Reference Guide
UNOCODE 299 REFERENCE GUIDE This manual has been produced to serve as a guide for users of the UNOCODE 299 electronic key-cutting machine. Read it carefully; it is essential if you wish to operate your machine safely and efficiently. ONSULTATION The contents of the manual are divided into sections relating to: •... -
Page 6: General
No further risks will arise when properly using the UNOCODE 299. ROTECTION AND SAFETY PRECAUTIONS FOR THE OPERATOR UNOCODE 299 is entirely built in compliance to the Machine Directives. The operations for which it has been designed are easily carried out with no risk to the operator. -
Page 7: Machine Description
UNOCODE 299 MACHINE DESCRIPTION UNOCODE 299 is an electronic machine operating on two axes with controlled movement. Accurately studied, it adds a high degree of cutting precision to operating speed and ease of use. UNOCODE can be used in 2 different ways: •... -
Page 8: Safety
The cutter motor is protected against overheating by a cut-out switch (located inside the motor) that will automatically stop the motor if it reaches a certain temperature. Should the switch activate: 1) turn the machine off and disconnect the power supply cable. 2) contact Silca’s Technical Assistance Dept. Copyright Silca 2002... -
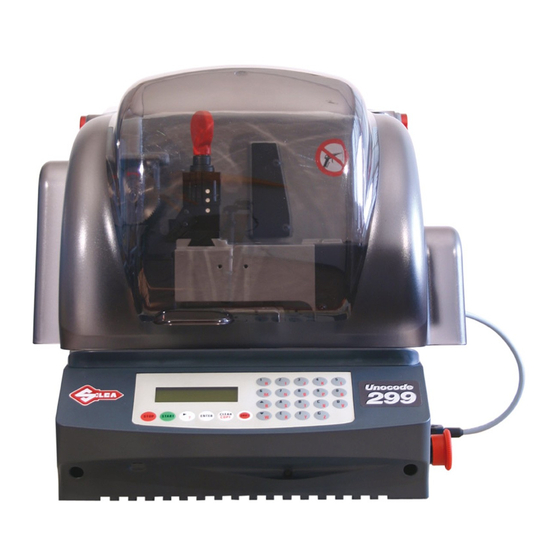
Page 9: Main Working Parts
Operating manual - English UNOCODE 299 AIN WORKING PARTS Fig. 4 A - master switch B - keyboard C - display D - clamp E - clamp knob F - key gauge H - cutter I - cutter shield N - emergency button... -
Page 10: Technical Data
UNOCODE 299 Operating manual - English ECHNICAL Electricity supply: 230V-50Hz (110V-60Hz) (100V - 50/60Hz) Maximum absorbed power: 230V: 2 Amp. 250 Watt 110V: 3,6 Amp. 250 Watt cutter motor: single phase and speed cutter: HSS (high speed steel) - optional hard metal carbide cutter Tool speed: •... -
Page 11: Ccessories Provided
Operating manual - English UNOCODE 299 CCESSORIES PROVIDED UNOCODE 299 comes with a set of accessories for its operation and maintenance (tools, hex wrenches, fuses) supplied in a special tool kit comprising: tool kit 4 mm allen key Z1 template... -
Page 12: Transport
The packed machine should be carried by at least two people. ACKING The packing for UNOCODE 299 is designed to ensure safe transportation and to protect the machine and all its parts. It comprises a pallet base (b) to which the machine is attached, and a cardboard box as a cover (a). -
Page 13: Unpacking
NOTE: we strongly recommend you keep the packing intact for future transportation. ACHINE HANDLING When the UNOCODE 299 has been unpacked, place it directly on its workbench; this operation should be carried out by at least two people. Take care to lift the machine firmly holding the base, and no other part. -
Page 14: Machine Installation And Preparation
HECKING FOR DAMAGE UNOCODE 299 is solid and compact and will not normally damage if transport, unpacking and installation have all been carried out according to the instructions in this manual. However, it is always advisable to check that the machine has not suffered any damage. -
Page 15: Description Of Work Station
Operating manual - English UNOCODE 299 ESCRIPTION OF WORK STATION The machine needs only one operator, who has the following controls at his/her disposal (fig. 4, page 5): • master switch placed on the back of the machine • key-positioning clamp •... -
Page 16: "Set Up" And Use Of The Machine
UNOCODE 299 Operating manual - English “SET UP” AND USE OF THE MACHINE EYBOARD AND FUNCTIONS The machine’s keyboard has 19 alphanumeric and 6 function keys. The alphanumeric keys are used for entering the data card number and the cutting data (numbers and/or letters) according to the code on the card in use. -
Page 17: Use Of The Clamp
Operating manual - English UNOCODE 299 SE OF THE CLAMP white V100 Clamp Fig. 10 The four-sided clamp ensures excellent grip on the keys placed on their back or profile sides (fig. 11). • Keys with 1 or 2 cuts to reproduce by code should be fitted mainly on the A and/or B side of the clamp. - Page 18 UNOCODE 299 Operating manual - English ATTENTION: when closing the clamp, do not apply excessive pressure to the knob. Turning the knob approximately 70˚ (equal to a force of 3NxM) is sufficient to secure the key (fig. 13). Fig. 13 NOTE: before starting the cutting process the V100 clamps key gauge will automatically tilt itself to its rest position.
-
Page 19: Cutting By Electric Contact
All data cards provided by Silca are in the machine’s memory. The cards are enabled or disabled for code cutting by electric contact at Silca’s discretion. -
Page 20: Fitting The Clamp To The Machine
UNOCODE 299 Operating manual - English ITTING THE CLAMP TO THE MACHINE To remove the clamp unit: loosen the grub screw (D2) (fig. 16) and slide the clamp out of the dovetail guide. To install the clamp unit on the machine: slide the clamp into the dovetail guide, pushing it all the way in, then secure it by tightening the grub screw (D2). -
Page 21: Inverting The Pulleys
Operating manual - English UNOCODE 299 NVERTING THE PULLEYS This operation must be carried out when the operator intends to use a hard metal carbide cutter (optional), in order to adapt the cutter speed to the new characteristics of the cutter’s material. -
Page 22: Operating Guide
When the UNOCODE 299 is used with a Personal Computer, the operating guide does not change its displays logic, with the exception of all the screens that are rendered unnecessary. -
Page 23: 1] Copy By Code
A data card is a database of cutting ‘spaces’, ‘depths’ and angles for all the keys in the machines data base. The number of data cards is increased periodically when the ‘Silca Code Program’ is updated. The updates can be bought separately and easily installed to a P.C. then transmitted over to the machine. -
Page 24: Special Cases
UNOCODE 299 Operating manual - English 5.2.1 PECIAL CASES • Cutting a key with two asymmetrical sides Enter card number STANDARD = 115 USER (ver. DB : 1) Operational keys: ENTER use the arrow keys to be able to visualize both sides of the keys possible cuts on the machines display. - Page 25 Operating manual - English UNOCODE 299 The reason for the conflict between certain cuts is explained simply in the case shown. With regard to the cut that originated the message <inadmissible combination> it can be seen that between the two deep cuts (8) and the constant angle (100˚) the intermediate cut (0)
- Page 26 Operating manual - English • Types of cut All the data cards provided by Silca have the type of cut pre-set according to the original parameters. The types of cut possible with UNOCODE 299 are: Normal, Flat, Laser and Vertical. ORMAL For conventional car and door keys.
- Page 27 No = STOP Yes = ENTER • Adapters Some of the data cards provided by Silca may Side 1 show a new parameter (Adapt.: 7) which indicates the type of accessory that is needed to cut the key Clamp: 100/A Pos.: 0...
-
Page 28: Limited Access To Data Protected Systems
LIMITED ACCESS TO DATA PROTECTED SYSTEMS Silca has predisposed limited access to some of the data in the Database, in compliance with agreements with some makers. Limitations apply to: DATA CARD: If the key-cutting card is protected, access is denied. -
Page 29: Use Of The Machine With A Personal Computer
Taken for granted that the user is in possession of some Silca software, the following are the possibilities available. The ‘Silca Code Program’ makes it possible to carry out searches by code for cutting data and to store the information in a special work queue (or file). -
Page 30: 4] Calibrations
UNOCODE 299 Operating manual - English [4] C ALIBRATIONS The following components on the machine have a specific ‘self-setting’ procedure with the use of regulating templates (Ch.1.5 "Accessories provided", page 7). CLAMPS CUTTERS ADAPTERS provided as optionals do not require calibrating. However, if necessary adjustments can be made to the cutting data, according to the procedures described in Ch.5.5.3 "Manual adjustments", page... - Page 31 Operating manual - English UNOCODE 299 3) replace the cutter with the (Z1) template (fig. 22). To remove the cutter follow the V100 SIDE A instructions on page 16, ch. 4.6 "Changing Install Z1 & Z3 temp. the cutter". See operating manual...
- Page 32 UNOCODE 299 Operating manual - English - the operational sequence will continue and the display will show the settings V100 SIDE B for sides B, C and D. Adjustment SIDE B • turn the V100 clamp to side B, insert the (Z3)
-
Page 33: Calibrating Cutters
Operating manual - English UNOCODE 299 5.5.2 ALIBRATING CUTTERS For this procedure always use side A of the V100 clamp. 1 - Clamps According to the cutter speed (determined by 2 - Cutters fitting the pulleys in the way described in ch.4.7, 3 - Adaptors page 17) and material (chosen from the ‘Options... -
Page 34: Manual Adjustments
UNOCODE 299 Operating manual - English 5.5.3 ANUAL ADJUSTMENTS – C LAMPS UTTERS DAPTERS The operator may carry out manual adjustments by entering new X and Y parameter values. ATTENTION: such adjustments should be made only when the automatic setting has already been carried out... -
Page 35: 5] Maintenance
• Test 3: CUTTER MOTOR Carefully follow the instructions on the machine’s display. Check that the cutter motor is working. NOTE: if the cutter motor does not turn, contact Silca’s Technical Assistance Dept. • Test 4: X AXIS SENSOR the machine’s display should show ON when the carriage is drawn away from the machine (to- wards the operator). - Page 36 Test 7: ELECTRIC CONTACT Use any metal conductor to contact clamp to cutter, checking that the machine’s display indicates OFF to ON. NOTE: if the ON/OFF transition is not made, check the brushes or contact Silca’s Technical Assistance Dept. •...
-
Page 37: Machine Zero Points
Operating manual - English UNOCODE 299 5.6.2 ACHINE ZERO POINTS With the use of regulating templates (Ch.1.5 "Accessories provided", page 7) the machine provides a ‘self- setting’ procedure. These procedures must be carefully carried out following the descriptions and illustrations indicated below. - Page 38 UNOCODE 299 Operating manual - English clamp’s knob clamp’s bushing top view Fig. 26 Regulating the Y axis sensor: • raise the protective shield. START • use the provided allen key to loosen the (C1) Pos. sensors. grub screw; manually rotate the (C2) rod (fig.
- Page 39 Operating manual - English UNOCODE 299 Y axis sensor Fig. 27 bottom view ATTENTION: if it is necessary to work close to this area with the machine turned on (e.g. to regulate the X axis sensor) take great care not to touch components machine’s electronic boards...
-
Page 40: Options [6]
UNOCODE 299 Operating manual - English PTIONS 5 - Maintenance 1) Enter ‘Options’ menu # 6. 6 - Options Operational keys: use the keys to move the cursor to the option required and press ENTER or directly press the numbered key corre- sponding to the option number. - Page 41 Operating manual - English UNOCODE 299 4 - C ARRIAGE APPROACH SPEED This is the speed at which the carriages move Carriage approach towards the cutting area, before starting the speed = 4000 cutting cycle. (1000 - 5000) We recommend to operate the machine with the speed that is set (4000).
- Page 42 UNOCODE 299 Operating manual - English 7 - P REFERENCES work parameters are chosen from this menu. Inches or millimetres : choose the measurements you intend to work with (mm = millimetres, inch. = inches). Start-up menu : choose the function in the Main menu that you...
- Page 43 Operating manual - English UNOCODE 299 11 - C UTTING CTRL Enable check on This option is used to enable and disable control of excluded the combinations included in the data card, by pressing the SHIFT + keys. combinations: YES Default is YES, i.e.
-
Page 44: Error Messages
UNOCODE 299 Operating manual - English RROR MESSAGES Data card not • The selected data card is for a different clamp from the one installed on the machine. compatible with Install proper clamp. clamp installed! • The entered data card number is not available in the machine’s data base. - Page 45 0. To set Machine ID ask for See operating manual a Software update valid for your machine (machine internal program version higher than or the same as 2.0.078) and install with the SILCA WinTransfer Program or SILCA Code Program. Copyright Silca 2002...
-
Page 46: Cleaning
UNOCODE 299 Operating manual - English CLEANING • keep the operational parts of the machine as clean as possible by brushing away the chippings in areas where they accumulate during cutting operations. • under no circumstances must compressed air be used to clear the work zone of chippings as this will blow them onto the moving parts. -
Page 47: Maintenance
ATTENTION: for repairs or replacement of parts for maintenance, the ‘CE’ mark is guaranteed only if original spare parts provided by the manufacturer are used. Although the UNOCODE 299 key-cutting machine does not require special maintenance, it is advisable to check and, if necessary, replace the parts subject to wear and electric/electronic parts (fuses, circuit boards, etc.) in the event of faulty operation. - Page 48 UNOCODE 299 Operating manual - English FAULT PROBABLE CAUSE Electric contact a) wiring between the J14 connector on the electronic control board and cutter shaft is loose working (during or disconnected calibrating or cutting). b) wiring inside the Y axis carriage is not seeded properly or disconnected c) defective electronic control board d) wear on the brushes (ch.
-
Page 49: Maintenance Operations
Operating manual - English UNOCODE 299 AINTENANCE OPERATIONS • Cutter replacement • Belt replacement and tension adjustment • Fuse check and replacement • Electronic circuit board replacement • Keyboard/display replacement • Access to back compartment • Access to bottom compartment •... -
Page 50: Belt Replacement And Tension Adjustment
UNOCODE 299 Operating manual - English ELT REPLACEMENT AND TENSION ADJUSTMENT To replace the belt, proceed as follows: 1) turn the machine off and unplug it. 2) remove the back panel (ch.7.8, page 50). 3) remove the bottom panel (ch.7.9, page 50). -
Page 51: Checking And / Or Replacing Fuses
Fuses must always be replaced with the same amperage and type (rapid or delayed), as indicated in this manual. There are 6 fuses in the UNOCODE 299. • 2 fuses: 4 Amps rapid located next to the power socket on the back of the machine, next to the main switch (fig. -
Page 52: Electronic Circuit Board Replacement
UNOCODE 299 Operating manual - English LECTRONIC CIRCUIT BOARD REPLACEMENT Proceed as follows: 1) turn the machine off and unplug it from its power supply cable. 2) remove the bottom panel (ch.7.9, page 50). 3) disconnect all cable connectors from the electronic circuit board (fig. 39). -
Page 53: Keyboard / Display Replacement
Operating manual - English UNOCODE 299 EYBOARD DISPLAY REPLACEMENT 1) turn the machine off and unplug it from its power supply cable. 2) remove the display’s support, by unscrewing the 3 (B1) fixing screws (fig. 41). 3) detach the flat cable and ground wire from the keyboard (fig. 42). -
Page 54: Access To Back Compartment
UNOCODE 299 Operating manual - English CCESS TO BACK COMPARTMENT To gain access to the back compartment, proceed as follows: 1) turn the machine off and unplug it from its power supply cable. 2) unscrew the 6 (M1) screws that secure the back panel (fig. 43) thus removing it. -
Page 55: S Ensor Replacement
Operating manual - English UNOCODE 299 7.10 ENSOR REPLACEMENT AXIS SENSOR REPLACEMENT 1) turn the machine off and unplug it from its power supply cable. 2) remove the bottom panel (chap.7.9 "Access to bottom compartment"). 3) disconnect the X axis sensor’s connector from the electronic circuit board (fig. 45). - Page 56 UNOCODE 299 Operating manual - English AXIS SENSOR REPLACEMENT 1) turn the machine off and unplug it from its power supply cable. 2) raise the protective shield. 3) disconnect the (J1) Y axis cable from the carriage (fig. 48). 4) remove the Y axis carriage cover by unscrewing the 3 (B5) locking screws and pull the cover in the direction shown in fig.
-
Page 57: B Rush Replacement
Operating manual - English UNOCODE 299 7.11 RUSH REPLACEMENT 1) open the rear compartment (ch. 7.8, page 50). 2) unscrew the two brush caps (M4) (fig. 51), remove and fit two new brushes. 3) replace the two caps (M4). 4) close the rear compartment. -
Page 58: Win-Transfer P Rogram
• Loading of customized key data cards provided by SILCA on Customer’s request 1) install on your personal computer the latest version received of the WinTransfer program and follow the instructions given on the instruction sheet provided with the program. -
Page 59: Disposing Of Machine
Operating manual - English UNOCODE 299 DISPOSING OF MACHINE To dispose the machine, it must be rendered unusable by carrying out the operations listed below: • deactivation of the electricity supply; • separation of the plastic and metal parts; When these operations have been carried out, the machine can be disposed of according to the current regulations in the country of use. -
Page 60: Assistance
The guarantee attached to the 299 UNOCODE ensures free repairs or replacements of faulty parts within 12 months of the date of purchase. All other service calls must be arranged by the customer with Silca or specialized Silca service centres. - Page 61 Operating manual - English UNOCODE 299 1 - ELECTRICAL DIAGRAMS Appendix The following pages contain the electrical diagrams for the UNOCODE 299 key-cutting machine described in this manual. Copyright Silca 2002 Appendix - I...
-
Page 63: Operating Manual - English Unocode
Operating manual - English UNOCODE 299 UNOCODE 299 ELECTRICAL DIAGRAMS Ver.1.0 Copyright Silca 2002 Appendix - III... - Page 64 Operating manual - English UNOCODE 299 Copyright Silca 2002 Appendix - IV...
- Page 65 Operating manual - English UNOCODE 299 Copyright Silca 2002 Appendix - V...
- Page 66 Operating manual - English UNOCODE 299 VI - Appendix Copyright Silca 2002...
- Page 67 SILCA S.p.A. Via Podgora, 20 (Z.I.) 31029 VITTORIO VENETO (TV) Tel. 0438 9136 Fax 0438 913800 www.silca.it Member of the Kaba Group...
Need help?
Do you have a question about the Unocode 299 and is the answer not in the manual?
Questions and answers