
Related Manuals for Kargo Master 40490


Summary of Contents for Kargo Master 40490
- Page 1 Instruction Guide 40490 Kargo Master Rancho Cordova, CA 95742 800-343-7486 CustomerService@KargoMaster.com 20200103R1 DATE: ______________...
- Page 2 Instructions – 40490 *PLEASE READ ALL INSTRUCTIONS AND WARNINGS PRIOR TO ASSEMBLING, INSTALLING, AND USING THIS PRODUCT* Warning Always check for wires, fuel tanks and lines, brake lines and other important vehicle functionality items prior to drilling and installing all products.
- Page 3 Instructions – 40490 Parts Hardware For Technical Support Call: 800-343-7486 Monday-Friday 7AM - 4 PM (PST) Page 2...
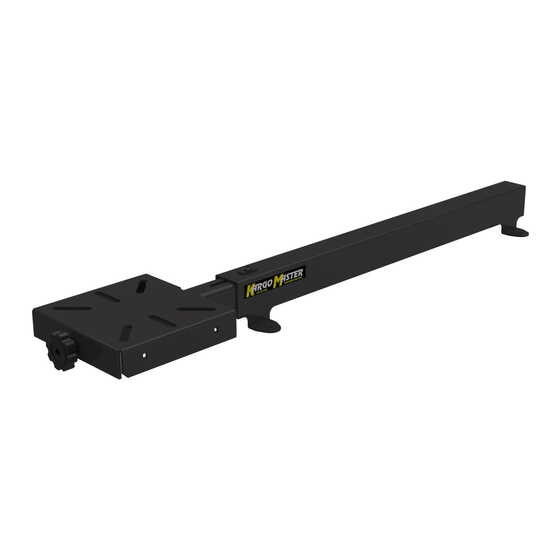
- Page 4 Instructions – 40490 Step 1 – Assemble Vise Mount Loosen the knob on the arm assembly to allow the arm assembly to be inserted into the base. Insert the arm assembly completely into the base in the orientation shown.
- Page 5 Instructions – 40490 Step 2 – Determine Location Determine the desired location of the vise mount and insert into the vehicle with the knob on the arm assembly is closest to the door. Typically these are installed near a door way so the vise mount can be extended outside of the vehicle.
- Page 6 Instructions – 40490 Step 3 – Install Vise Mount Determine if the installation will use plus nuts or through bolting. If the holes are accessible from the underside of the vehicle, it is recommended to use the fender washer and nyloc nut.
- Page 7 Instructions – 40490 Step 4 – Use of Vise Mount Install a vise at the end of the arm assembly. Use the knob at the end of the vise mount to tighten and loosen the arm assembly to slide the vise in and out of vehicle.
Need help?
Do you have a question about the 40490 and is the answer not in the manual?
Questions and answers