Table of Contents
Advertisement
Advertisement
Table of Contents

Related Manuals for BAFANG DP C10.CAN


Summary of Contents for BAFANG DP C10.CAN
- Page 1 DISPLAY MANUALS B I M A S B I K E S C10.CAN C15.CAN E10.CAN LOVE AT FIRST RIDE...
-
Page 2: Table Of Contents
7 DEALER MANUAL FOR DP C10.CAN C15.CAN E10.CAN CONTENT DP C10.CAN 7.1 Important Notice 7.6.2 Selection of Support Levels 7.2 Introduction of Display 7.6.3 Headlights / backlighting 7.3 Product Description 7.6.4 Walk Assistance 7.3.1 Specifications 7.6.5 Selection Mode 7.3.2 Functions Overview 7.6.6 SERVICE... -
Page 3: Important Notice
• Do not clean the display with a steam jet, high-pressure cleaner or water hose. 7.2 INTRODUCTION OF DISPLAY • Model: DP C10.CAN BUS • The label marking is as follows: • The housing material is PC and Acrylic, and the button material is made of silicone. -
Page 4: Product Description
7.3 PRODUCT DESCRIPTION 7.3.2 Functional Overview 7.3.1 Specifications • Speed display (including speed in real time • Operating temperature: -20℃~45℃ (SPEED), top speed (MAXS) and average • Storage temperature: -20℃~50℃ speed (AVG), switching between km and • Waterproof: IP65 miles) •... -
Page 5: Display Installation
7.4 DISPLAY INSTALLATION Open the clamps of display and insert Open the clamp (D) on the controller pad the rubber rings A on the handlebar. and place it in the correct position (it is (it is suitable for handlebar ∮22.2 or ∮... -
Page 6: Display
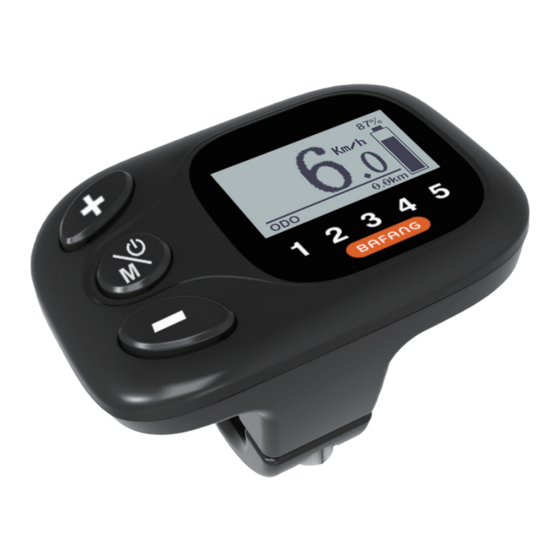
7.5 DISPLAY Display of battery capacity in real time. Menu. Service: please see the service section. Digital speed display. Speed mode , top speed (MAXS) - Average speed (AVG). Kilometer stand, Daily kilometers (TRIP) - Total kilometers (TOTAL). Data: Display data, which corresponds to the current mode. -
Page 7: Key Definition
7.6 KEY DEFINITION Light On/Off System On/Off Down OK/Enter 7.7 NORMAL OPERATION 7.7.1 Switching the System ON/OFF Press and hold (>2S) on the display to turn on the system. Press and hold (>2S) again to turn off the system. If the "automatic shutdown time" is set to 5 minutes (it can be set with the "Auto Off" function, See "Auto Off"), the display will automatically be turned off within the desired time when it is not in operation. -
Page 8: Selection Mode
7.7.3 Selection mode Briefly press (<0.5s) the button to see the different trip modes. Trip: daily kilometers (TRIP) - to- tal kilometers (TOTAL) - Maximum speed (MAXS) - Average speed (AVG) - Remaining distance (RANGE) - Output power (W) - Energy consumption (C (only with torque sensor fitted)). 7.7.4 Headlights / backlighting Hold (>2S) the button to activate the headlight and taillights. -
Page 9: Walk Assistance
7.7.5 Walk Assistance Bars Charge in Percentage The Walk assistance can only be activated ≥90% with a standing pedelec. 80%≤C<90% Activation: Briefly press (<0.5S) the button until to level null, and then press 70%≤C<80% (<0.5s) the button, the symbol is 60%≤C<70% displayed. -
Page 10: Settings
7.8 SETTINGS After the display is turned on, quickly press (<0.3S) the button twice to access the “MENU” interface. pressing the button, you can select and reset the options. Then press (<0.3S) the button twice to confirm your selected option and to return to the main screen. - Page 11 sensitivity for 0-5). Chose 0 means turn off button until the “OFF” appears on the the light sensitivity. display (as shown below). And then press Once you have chosen your desired selec- to increase or to reduce (brightness tion, press (<0.3S) the button twice for 1-9minute).
-
Page 12: View Information
7.8.2 View Information All data in this item cannot be changed, only to be viewed. 7.8.2.1 Wheel Size When the system is on, quickly press (<0.3S) the button twice to access the “MENU” interface, repetitively press the button until the “LUd” appears on the display (as shown below). - Page 13 Once you have viewed your desired informa- the “MENU” interface, repetitively press the tion, press (<0.3S) the button twice to button until the “dSc (Display Software save and return to the main screen, or you check)” appears on the display (as shown can press (<0.3S) the button once to below).
- Page 14 7.8.2.8 BMS software info When the system is on, quickly press (<0.3S) the button twice to access the “MENU” interface, repetitively press the button until the “dSc (Display Software check)” appears on the display (as shown below). Once you have viewed your desired informa- tion, press (<0.3S) the button twice to save and return to the main screen, or you...
- Page 15 7.8.2.11 Battery Information Charging cycles (number) When the system is on, quickly press Maximum not charging time (Hr) (<0.3S) the button twice to access the “MENU” interface, repetitively press the Recently not charging time (Hr) button until the “b01” appears on the Number of battery cell display (as shown below).
-
Page 16: Error Code Definition
7.9 ERROR CODE DEFINITION The display can show the errors of a pedelec. If an error is detected, the wrench icon appears on the display and one of the following error codes will be displayed. Note: Please read carefully the description of the error code. When the error code appears, please first restart the system. - Page 17 Error Declaration Troubleshooting 1. Check all connectors from the battery are correctly connected to the motor. Error with the temperature sensor inside of the battery 2. If the problem still occurs, please change the Battery. 1. Allow the pedelec to cool down and restart the The protection temperature system.
- Page 18 Error Declaration Troubleshooting 1. Check that all connections are connected correctly. 2. Please connect the pedelec to the BESST system to see if speed signal can be read by the BESST tool. Speed signal of the torque 3. Change the Display to see if the problem is solved. sensor has an error 4.
- Page 19 Error Declaration Troubleshooting Using the BESST tool update the controller to see if WDT circuit is faulty this resolves the problem. If not, please change the controller or contact your supplier. Total voltage from the battery is Please change the battery. too high Total voltage from the battery is Please Charge the battery.
-
Page 20: Dp C15.Can
7 DEALER MANUAL FOR DP C15.CAN BF-DM-C-DP C15-EN November 2019... -
Page 21: Introduction Of Display
7.1 IMPORTANT NOTICE • If the error information from the display • Please use this product with care. cannot be corrected according to the inst- • Do not use thinners or other solvents to ructions, please contact your retailer. clean the display. Such substances can •... -
Page 22: Product Description
7.3 PRODUCT DESCRIPTION 7.3.2 Functional Overview 7.3.1 Specifications • Battery capacity indicator • Operating temperature: -20℃~45℃ • Indication of performance support • Storage temperature: -20℃~50℃ • Switching between km and mile • Waterproof: IP65 • Motor output power indicator • Storage room Humidity: 30%-70% RH •... -
Page 23: Display Installation
7.4 DISPLAY INSTALLATION Open the clamps of display and place Now connect the Display connector to the on to the handlebar in the correct EB-Bus connector, ensuring both connec- position. tors are kept parallel when pushing firmly together. Now with a M4*10 hexagon socket screw tighten the display into position. -
Page 24: Display
7.5 DISPLAY System On/Off / Mode Down Display of battery capacity in real time. Speed display in real-time (km/h or MPH) Trip: Daily kilometers (TRIP) - Total kilome- ters (ODO) - Top speed (MAX) - Average speed (AVG) - Range (RANGE) - Energy Consumption (CAL(only with torque sensor fitted)) - Travel time (TIME) - Motor output power(POWER). -
Page 25: Headlights / Backlighting
7.6.3 Headlights / backlighting consumption (CAL(only with torque sensor fitted)) - Travel time (TIME) - Motor output Turn on the lights: press and hold button power(POWER). to darken the backlight and turn on the lights. Turn off the lights: press and hold button again to brighten the backlight and turn off the lights. -
Page 26: Settings
7.7 SETTINGS 7.7.1 "Display Setting" After the display is turned on, press and hold button (at the same time) to enter Press the button (<0.5S) to select into the Setting menu. By pressing the "Display Setting", and then briefly press the button (<0.5S) , you can select: Display, button (<0.5S) to access the following Settings, Information or EXIT. -
Page 27: Information
7.7.1.3 "Brightness" Display brightness choose between “NO” or “YES”. Once you have chosen your desired selection, press Press the button (<0.5S) to button (<0.5S) to save and exit to highlight “Brightness” in the Display setting the "Display setting". menu, and then press button (<0.5S) to select. - Page 28 7.7.2.2 Speed Limit Content Explanation Press the button (<0.5S) to Recently not charging time (Hr) highlight “Speed Limit”, then press the button (<0.5S) to confirm and view the Number of battery cell speed limit. To return, press the button Voltage of cell 1 (m/V) (<0.5S) to exit back to the "Information".
- Page 29 7.7.2.6 Torque Information Press the button (<0.5S) to highlight “Torque Info”, then press the button (<0.5S) to confirm. Now press the button (<0.5S) to view "Hard- ware Ver" or "Software Ver". To return, press the button (<0.5S) to exit back to the "Information". NOTE: If your Pedelec has not torque sensor, "--"...
-
Page 30: Error Code Definition
7.8 ERROR CODE DEFINITION The HMI can show the faults of Pedelec. When a fault is detected, one of the following error codes will be indicated too. Note: Please read carefully the description of the error code. When the error code appears, please first restart the system. - Page 31 Error Declaration Troubleshooting 1. Check all connectors from the battery are correctly connected to the motor. Error with the temperature sensor inside of the battery 2. If the problem still occurs, please change the Battery. 1. Allow the pedelec to cool down and restart the The protection temperature inside system.
- Page 32 Error Declaration Troubleshooting 1. Check that all connections are connected correctly. 2. Please connect the pedelec to the BESST system to see if speed signal can be read by the BESST tool. Speed signal of the torque sensor has an error 3.
- Page 33 Error Declaration Troubleshooting Using the BESST tool update the controller to see WDT circuit is faulty if this resolves the problem. If not, please change the motor. Total voltage from the battery is Please change the battery. too high Total voltage from the battery is Please Charge the battery.
-
Page 34: Dp E10.Can
7 DEALER MANUAL FOR DP E10.CAN BF-DM-C-DP E10-EN November 2019... -
Page 35: Important Notice
7.1 IMPORTANT NOTICE • If the error information from the display • Please use this product with care. cannot be corrected according to the inst- • Do not use thinners or other solvents to ructions, please contact your retailer. clean the display. Such substances can •... -
Page 36: Product Description
7.3 PRODUCT DESCRIPTION 7.3.2 Functional Overview 7.3.1 Specifications • Battery capacity indicator • Operating temperature: -20℃~45℃ • Indication of performance support • Storage temperature: -20℃~50℃ • Walk assistance • Waterproof: IP65 • Automatic sensors explanation of the light- • Storage room Humidity: 30%-70% RH ing system •... -
Page 37: Display
7.5 DISPLAY Support level and walk assistance indicator Battery capacity LED indicator Light sensor for lighting system 7.6 KEY DEFINITION System On/Off Down BF-DM-C-DP E10-EN November 2019... -
Page 38: Normal Operation
7.7 NORMAL OPERATION 7.7.1 Switching the System ON/OFF Press and hold (>2S) on the display to turn on the system. Press and hold (>2S) again to turn off the system. 7.7.2 Selection of Support Levels When the display is turned on, press the (<0.5S) button to switch to the support level, the lowest level is 1, the highest level is 5. -
Page 39: Battery Capacity Indication
After releasing the button, the motor stops automatically. The Level indicators stop flash and the level 5 indicator starts to flash. If no any operation is happened in 5 second, the level indicator will be automatically switched to level 0. 7.7.5 Battery Capacity Indication The battery capacity is indicated with 5 levels. -
Page 40: Error Code Definition
7.8 ERROR CODE DEFINITION The display can show the errors of a pedelec. When the fault is detected, the error code will be displayed through the level indicator in flashing. Level 1 indicates the Level 2 tens digit of an error code while level 2 indicates the units digit. For example: Level 1 1) Error code 04 The LED indicator for level 1 does not light, and level 2 flickers for 4 times. - Page 41 Error Declaration Troubleshooting 1. Check all connectors from the battery are correctly connected to the motor. Error with the temperature sensor inside of the battery 2. If the problem still occurs, please change the Battery. 1. Allow the pedelec to cool down and restart the The protection temperature system.
- Page 42 Error Declaration Troubleshooting 1. Check that all connections are connected correctly. 2. Please connect the pedelec to the BESST system to see if speed signal can be read by the BESST tool. Speed signal of the torque 3. Change the Display to see if the problem is solved. sensor has an error 4.
- Page 43 Error Declaration Troubleshooting Using the BESST tool update the controller to see if WDT circuit is faulty this resolves the problem. If not, please change the controller or contact your supplier. Total voltage from the battery is Please change the battery. too high Total voltage from the battery is Please Charge the battery.
Need help?
Do you have a question about the DP C10.CAN and is the answer not in the manual?
Questions and answers