
Related Manuals for BAFANG DP C181.CAN


Summary of Contents for BAFANG DP C181.CAN
-
Page 1: Table Of Contents
7 DEALER MANUAL FOR DP C181.CAN CONTENT 7.1 Important Notice 7.7.2 Selection of Support Levels 7.2 Introduction of Display 7.7.3 Selection Mode 7.3 Product Description 7.7.4 Headlights / backlighting 7.7.5 Walk Assistance 7.3.1 Specifications 7.7.6 SERVICE 7.3.2 Functions Overview 7.8 Settings 7.4 Display Installation... -
Page 2: Important Notice
• Do not clean the display with a steam jet, high-pressure cleaner or water hose. 7.2 INTRODUCTION OF DISPLAY • Model: DP C181.CAN BUS • The label marking is as follows: • The housing material is PC; the Display Glass... -
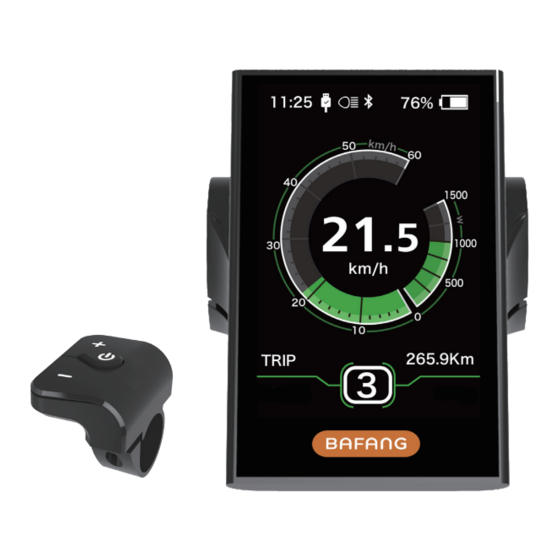
Page 3: Product Description
• Energy consumption indicator CALORIES (Note: If the display has this function). • Display for the remaining distance. (Depends on your riding style) • Setting password. • Bluetooth function. (the display can connect to the mobile through Bafang Go APP) BF-DM-C-DP C181-EN November 2019... -
Page 4: Display Installation
7.4 DISPLAY INSTALLATION Open the clamps of display and insert Open the clamp on the D-pad and place it the rubber rings on the inside of the in the correct position, Using 1 X M3*10 clamps. screw tighten the D-pad onto the handle- bar. -
Page 5: Display Information
7.5 DISPLAY INFORMATION The display shows this symbol, if the light is on. Speed Graphics Trip: Daily kilometers (TRIP) - Total kilometers (ODO) - Top speed (MAX) - Average speed (AVG) - Range (RANGE) - Energy Consump- tion (CALORIES(only with torque sensor fitted)) - Travel time (TIME). -
Page 6: Normal Operation
7.7 NORMAL OPERATION 7.7.1 Switching the System ON/OFF Press and hold (>2S) on the display to turn on the system. Press and hold (>2S) again to turn off the system. If the "automatic shutdown time" is set to 5 minutes (it can be set with the "Auto Off" function, See "Auto Off"), the display will automatically be turned off within the desired time when it is not in op- eration. -
Page 7: Headlights / Backlighting
7.7.4 Headlights / backlighting Hold the (>2S) button to activate the headlight and taillights. Hold the (>2S) button again to turn off the headlight. The brightness of the backlight can be set in the display settings "Brightness". If the display /Pedelec is switched on in a dark environment, the display backlight/headlight will automatically be switched on. -
Page 8: Walk Assistance
7.7.5 Walk Assistance The Walk assistance can only be activated with a standing pedelec. Activation: Press the button until this symbol appears. Next hold down the button whilst symbol is displayed. Now the Walk assistance will activate. The symbol will flashes and the pedelec moves approx. -
Page 9: Settings
7.8 SETTINGS 7.8.1 “Display setting” After the display is turned on, press and hold (>1S) button, to access the Press the (<0.5S) button to select “SETTINGS” menu. By pressing the Display Settings, and then briefly press the (<0.5S) button, you can select: Display (<0.5S) button to access the following Settings, Information or EXIT. - Page 10 7.8.1.2 “Service” Switching the 7.8.1.6 “Power View” Setting the power notification on and off indicator Press the (<0.5S) button to high- Press the (<0.5S) button to high- light “Service” in the Display settings menu, light “Power View” in the Display settings and then press (<0.5S) to select.
- Page 11 7.8.1.8 “TRIP Reset” Reset mileage Press the (<0.5S) button to highlight “TRIP Reset” in the Display settings menu, and then press (<0.5S) to select. Then with the button choose between “YES” or “NO”. Once you have chosen your desired selection, press the (<0.5S) button to save and exit to the "Display setting"...
- Page 12 Deactivating the password: To deactivate the password, use the buttons to get to the menu point “Password” and press the (<0.5S) button to highlight your selection. Press the (<0.5S) button until is shows “OFF”. Then press briefly (<0.5S) to select. Now enter your password, to deactivate it.
-
Page 13: Information
7.8.2 “Information” Content Explanation Once the system is turned on, press and hold the Current temperature in (>1S) button to access the "SET- TEMP degrees (°C) TINGS" menu. Now by pressing the (<0.5S) button, Highlight the "information" in the TotalVolt Voltage (V) display Settings, and press the (<0.5S) button... - Page 14 7.8.2.3 Controller Information 7.8.2.5 Torque Information Press the (<0.5S) button and select Press the (<0.5S) button and select "CTRL Info", and then press the (<0.5S) “Torque info”, then press the (<0.5S) button to confirm. Now you can read the button to read the software and hardware controller information.
-
Page 15: Error Code Definition
7.9 ERROR CODE DEFINITION The HMI can show the faults of Pedelec. When a fault is detected, the icon will be indicated and one of the following error codes will be indicated too. Note: Please read carefully the description of the error code. When the error code appears, please first restart the system. - Page 16 Error Declaration Troubleshooting 1. Check all connectors from the battery are correctly connected to the motor. Error with the temperature sensor inside of the battery 2. If the problem still occurs, please change the Battery. 1. Allow the pedelec to cool down and restart the The protection temperature system.
- Page 17 Error Declaration Troubleshooting 1. Check that all connections are connected correctly. 2. Please connect the pedelec to the BESST system to see if speed signal can be read by the BESST tool. Speed signal of the torque 3. Change the Display to see if the problem is solved. sensor has an error 4.
- Page 18 Error Declaration Troubleshooting Using the BESST tool update the controller to see if WDT circuit is faulty this resolves the problem. If not, please change the controller or contact your supplier. Total voltage from the battery is Please change the battery. too high Total voltage from the battery is Please Charge the battery.
Need help?
Do you have a question about the DP C181.CAN and is the answer not in the manual?
Questions and answers