
Related Manuals for BAFANG DP C18.CAN


Summary of Contents for BAFANG DP C18.CAN
-
Page 1: Table Of Contents
7 USER MANUAL FOR DP C18.CAN CONTENT 7.1 Important Notice 7.6.3 Selection Mode 7.2 Introduction of Display 7.6.4 Headlights / backlighting 7.3 Product Description 7.6.5 ECO/SPORT Modus 7.6.6 Walk Assistance 7.3.1 Specifications 7.6.7 SERVICE 7.3.2 Functions Overview 7.7 Settings 7.4 Display 7.5 Key Definition... -
Page 2: Important Notice
• Do not clean the display with a steam jet, high-pressure cleaner or water hose. 7.2 INTRODUCTION OF DISPLAY • Model: DP C18.CAN BUS • The label marking is as follows: • The housing material is PC; the Display Glass is made of high-currentem material: DPC18CP10101.0... -
Page 3: Product Description
7.3 PRODUCT DESCRIPTION 7.3.2 Functional Overview 7.3.1 Specifications • Speed display (including top speed and • Operating temperature: -20℃~45℃ average speed, switching between km and • Storage temperature: -20℃~50℃ miles). • Waterproof: IP65 • Battery capacity indicator. • Bearing humidity: 30%-70% RH •... -
Page 4: Display
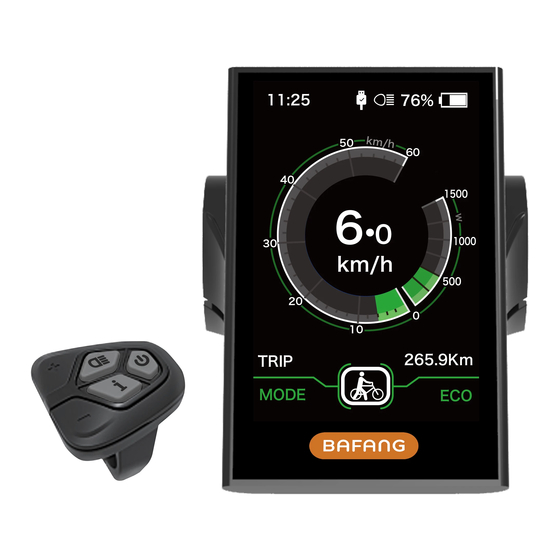
7.4 DISPLAY The display shows this symbol, if the light is on. Speed Graphics Trip: Daily kilometers (TRIP) - Total kilometers (ODO) - Top speed (MAX) - Average speed (AVG) - Range (RANGE) - Energy Consump- tion (CALORIES(only with torque sensor fitted)) - Travel time (TIME). -
Page 5: Normal Operation
7.6 NORMAL OPERATION 7.6.1 Switching the System ON/OFF Press and hold (>2S) on the display to turn on the system. Press and hold (>2S) again to turn off the system. If the "automatic shutdown time" is set to 5 minutes (it can be set with the "Auto Off" function, See "Auto Off"), the display will automatically be turned off within the desired time when it is not in op- eration. -
Page 6: Headlights / Backlighting
7.6.4 Headlights / backlighting Hold the (>2S) button to activate the headlight and taillights. Hold the (>2S) button again to turn off the headlight. The brightness of the backlight can be set in the display settings "Brightness". If the display /Pedelec is switched on in a dark environment, the display backlight/headlight will automatically be switched on. -
Page 7: Walk Assistance
7.6.6 Walk Assistance The Walk assistance can only be activated with a standing pedelec. Activation: Press the button until this symbol appears. Next hold down the button whilst symbol is displayed. Now the Walk assistance will activate. The symbol will flashes and the pedelec moves approx. -
Page 8: Settings
7.7 SETTINGS 7.7.1 “Display setting” After the display is turned on, quickly press the button twice, to access the Press the (<0.5S) button to select “SETTINGS” menu. By pressing the Display Settings, and then briefly press the (<0.5S) button, you can select: Display (<0.5S) button to access the following Settings, Information or EXIT. - Page 9 7.7.1.2 “Service Tip” Switching the menu, and then press (<0.5S) to select. notification on and off Then with the button choose between “3/5/9” (the amount of support Press the (<0.5S) button to levels). Once you have chosen your desired highlight “Service tip” in the Display settings selection, press the (<0.5S) button to menu, and then press...
- Page 10 7.7.1.8 “SOC View” Battery view in volt 7.7.1.11 “Password” percent Press the (<0.5S) button to choose Press the (<0.5S) button to Password in the menu. Then by briefly highlight “SOC View” in the Display settings pressing (<0.5S) to enter the password menu, and then press (<0.5S) to select.
- Page 11 Changing the password: Press the (<0.5S) button to choose Password in the menu. Then by briefly pressing (<0.5S) to enter the password section. Now again with the (<0.5S) button highlight “Pass- word set" and press the (<0.5S) button to confirm. Now with the (<0.5S) buttons and highlight “Reset Password”...
-
Page 12: Information
7.7.1.12 “Set Clock” 7.7.2.2 Battery Information Press the (<0.5S) Button to access Press the (<0.5S) button to access the “Set Clock” menu. Then briefly press the the Battery Info menu, and then press the (<0.5S) button to confirm selection. Now (<0.5S) button to select confirm. - Page 13 7.7.2.3 Controller Information 7.7.2.5 Torque Information Press the (<0.5S) button and select Press the (<0.5S) button and select "CTRL Info", and then press the (<0.5S) “Torque info”, then press the (<0.5S) but- button to confirm. Now you can read the ton to read the software and hardware data controller information.
-
Page 14: Error Code Definition
7.8 ERROR CODE DEFINITION The display can show the errors of a pedelec. If an error is detected, the wrench icon appears on the display and one of the following error codes will be displayed. Note: Please read the description of the error code carefully. If you see the error code, restart the system first. If the problem is not resolved, please contact your dealer. - Page 15 Error Declaration Troubleshooting 1. Turn off the system and let the pedelec cool The protection temperature inside down. the controller has reached its maxi- 2. If the problem persists, please contact your mum protection value retailer. Error with the temperature sensor Please contact your retailer.
- Page 16 Error Declaration Troubleshooting Detection circuit for 15V has an error Please contact your retailer. Detection circuit on the keypad has Please contact your retailer. an error WDT circuit is faulty Please contact your retailer. Total voltage from the battery is too Please contact your retailer.
Need help?
Do you have a question about the DP C18.CAN and is the answer not in the manual?
Questions and answers
Can I adjust the amount of power assist for each of the levels 1-2-3-4-5. (befang DP C18.C 1.3)
Yes, you can adjust the power assist levels 1–5 on the BAFANG DP C18.CAN. When the display is powered on, briefly press the designated button (<0.5 seconds) to switch between assistance levels. Level 0 means no assistance, and Level 5 is the highest level.
This answer is automatically generated