Sign In
Upload
Download
Table of Contents
Contents
Add to my manuals
Delete from my manuals
Share
URL of this page:
HTML Link:
Bookmark this page
Add
Manual will be automatically added to "My Manuals"
Print this page
×
Bookmark added
×
Added to my manuals
Manuals
Brands
BAFANG Manuals
Bicycle Accessories
E-SYSTEM
Manual
BAFANG E-SYSTEM Manual
Hide thumbs
1
2
3
4
5
6
7
8
9
10
11
12
13
14
15
16
17
18
19
20
21
22
23
24
25
26
27
28
29
30
31
32
33
34
35
36
37
38
39
40
41
42
43
44
45
46
47
page
of
47
Go
/
47
Contents
Table of Contents
Bookmarks
Table of Contents
Dp C11.Can
Table of Contents
Important Notice
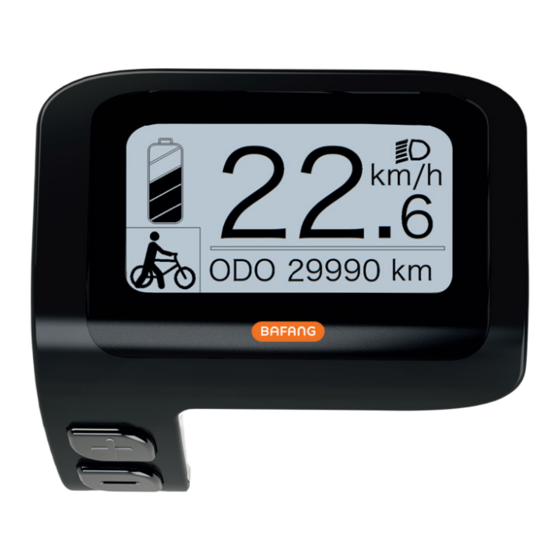
Introduction of Display
Product Description
Specifications
Functions Overview
Display
Key Definition
Normal Operation
Switching the System On/Off
Selection of Support Levels
Selection Mode
Headlights / Backlighting
Walk Assistance
Service
Battery Capacity Indication
Settings
Display Setting
Information
Error Code Definition
Dp C240.Can
Important Notice
Introduction of Display
Product Description
Specifications
Functions Overview
Display
Key Definition
Normal Operation
Switching the System On/Off
Selection of Support Levels
Selection Mode
Headlights / Backlighting
Walk Assistance
BOOST Function
Battery Capacity Indication
USB Charge Function
Settings
Display Setting
Information
Error Code Definition
Advertisement
Quick Links
1
Dp C11.Can
2
Introduction of Display
3
Specifications
4
Error Code Definition
5
Boost Function
6
Error Code Definition
Download this manual
MANUAL
BAFANG E-SYSTEM
EN
EN
Table of
Contents
Previous
Page
Next
Page
1
2
3
4
5
Advertisement
Chapters
Dp C11.Can
3
Dp C240.Can
21
Table of Contents
Need help?
Do you have a question about the E-SYSTEM and is the answer not in the manual?
Ask a question
Questions and answers
Related Manuals for BAFANG E-SYSTEM
Bicycle Accessories BAFANG H400 Dealer's Manual
Drive system (49 pages)
Bicycle Accessories BAFANG BT C01.340.UART Customer's Manual
E-bike system (34 pages)
Bicycle Accessories BAFANG DP C240.CAN Dealer's Manual
(18 pages)
Bicycle Accessories BAFANG DP C240.CAN Manual
Intelligent display (16 pages)
Bicycle Accessories BAFANG H600 Dealer's Manual
(6 pages)
Engine BAFANG H300 User Manual
(4 pages)
Engine BAFANG H600 User Manual
(4 pages)
Bicycle Accessories BAFANG DP C10.CAN Manual
Display manuals bimas bikes (43 pages)
Bicycle Accessories BAFANG DP E08.CAN User Manual
(8 pages)
Bicycle Accessories BAFANG DP E170.CAN Dealer's Manual
(9 pages)
Bicycle Accessories BAFANG DP E170.CAN User Manual
(7 pages)
Bicycle Accessories BAFANG DP E171.CAN User Manual
(7 pages)
Bicycle Accessories BAFANG DP E161.CAN User Manual
(9 pages)
Bicycle Accessories BAFANG DP E161.CAN Dealer's Manual
(10 pages)
Bicycle Accessories BAFANG DP C080.CB User Manual
(13 pages)
Bicycle Accessories BAFANG DP C07.UART Manual
Max drive system (20 pages)
This manual is also suitable for:
Dp c11.can
Dp c240.can
H300
H400b
H600
Rm g010.250.d rm g020.250.dc
...
Show all
Rm g020.350.dc rm g370.250.dc
Table of Contents
Save PDF
Print
Rename the bookmark
Delete bookmark?
Delete from my manuals?
Login
Sign In
OR
Sign in with Facebook
Sign in with Google
Upload manual
Upload from disk
Upload from URL


Need help?
Do you have a question about the E-SYSTEM and is the answer not in the manual?
Questions and answers