Table of Contents
Advertisement
Advertisement
Table of Contents
Troubleshooting

Related Manuals for UNIS Ticket Dome R


Summary of Contents for UNIS Ticket Dome R
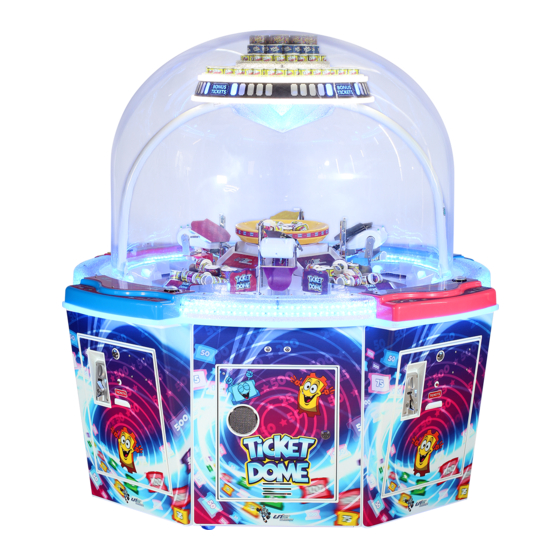
- Page 1 IMPORTANT Operation Manual...
- Page 2 Ticket Dome R Manual WE ARE HERE TO ASSIST For parts and service Have Questions? Contact us! UNIS SERVICE CENTER Tel: 972-241-4263 Email: service@unispartsandservice.com 03/16/2020...
- Page 3 Ticket Dome R Manual CONTENT IMPORTANT SAFETY INSTRUCTIONS ............... 3 1. SPECIFICATIONS ....................5 2. CONTENTS OF THE ACCESSORY KIT ..............6 3. PART NAME ......................7 4. SET UP & INSTALLATION ..................8 5. HOW TO PLAY ...................... 14 6.
- Page 4 Ticket Dome R Manual Thank you for purchasing Ticket Dome R. We hope you enjoy the product. This manual contains valuable information about how to operate and maintain your game machine properly and safely. It is intended for the owner and/or personnel in charge of product operation.
- Page 5 Ticket Dome R Manual Use the following safety guidelines to help ensure your own personal safety and to help protect your equipment and surrounding environment from potential damage. This product is an indoor game machine. Do not install outdoors. Avoid installing in the following places to prevent fire, electric shock, injury and/or machine malfunctioning: ...
- Page 6 Ticket Dome R Manual 1. SPECIFICATIONS Rated power supply: AC110V 50/60Hz; AC220V -240V~ 50/60Hz (It is subject to the nameplate on the back of the machine.) Min. Power consumption: 240W Max. Power consumption: 380W Dimension:Width: 58.66’’ (1490mm) Depth: 58.66’’ (1490mm) Height: 56.94’’(1515mm)
- Page 7 Ticket Dome R Manual 2. CONTENTS OF THE ACCESSORY KIT Open the package and make sure all the items are included: Following accessories Part No. Code No. Name Spec. Picture 1 T151-801-000 41440000308 Manual English 2 T151-802-000 25300171002 171A 3 T151-803-000 25300172002...
- Page 8 Ticket Dome R Manual 3. PART NAME Key Components Marquee Button Scoop Ticket dispenser Speaker Coin mechanism 03/16/2020...
- Page 9 Ticket Dome R Manual 4. SET UP & INSTALLATION NOTICE We do not recommend using power tools as they may cause damage. This product is an indoor game machine. Do not install outdoors. Refer to IMPORTANT SAFETY INSTRUCTIONS (Pg. 3) for places to avoid ...
- Page 10 Ticket Dome R Manual This procedure requires 4 people assistance. 4.2 Level Adjustment Install this game on a flat surface. If the game is installed on an unsuitable floor, it could cause game malfunction. To secure the game, loosen the nut, utilize wrench to adjust the leveler down until it touches the floor, lifting the casters off the ground by 0.2 in.
- Page 11 Ticket Dome R Manual 4.3 Play Zone This machine requires space for playing and for maintenance as shown below. Leave space around the game upon installation: Play area: 20 in Play area 03/16/2020...
- Page 12 Ticket Dome R Manual 4.4 Instruction of Resetting The Machine to Normal Mode In order to avoid damage during transportation, the machine is preset to Transportation mode, in which all the scoops are lowered and fixed. Warning: The machine needs to be reset to Normal mode upon unpacking. Please follow the steps.
- Page 13 Ticket Dome R Manual 4.5 Card Reader Installation Step 1 Locate the Coin door. Open the coin door. Utilize Allen wrench(2.5mm) to loosen 4 screws to remove Card reader plate. Card reader plate Step 2 Utilize knife or scissors to cut properly decal position for Card reader. Utilize Spanner to loosen 2 nuts indicated by circles.
- Page 14 Ticket Dome R Manual 4.6 DBV Installation Step 1 Locate the Coin door. Open the coin door. Utilize Spanner(5.5/7) to loosen 4 nuts to remove DBV plate. DBV plate Step 2 Utilize knife or scissors to cut properly decal position for DBV.
- Page 15 Ticket Dome R Manual 5. HOW TO PLAY 1 Please insert coin(s) /swipe/tap card to play. 2 Aim at ticket rolls and press Button to scoop. 3 Ticket rolls drop down to be collected. 4 Ticket rolls will activate BONUS mode.
- Page 16 Ticket Dome R Manual 6. GAME OPTION 6.1 Ticket Dome I/O chart: Item Value Coin Per Game Scoop Times* Demo Music Normal Free Play Game Mode Bonus Factory Restore *Scoop times: When the player win BONUS, the machine will automatically scoop the prizes to the disk.
- Page 17 Ticket Dome R Manual Controller Item Value Stepping Motor Setting off off off off Main board input: Extension board input INPUT Content INPUT Content INPUT Content INPUT Content 1P Coin 2P Coin 3P Coin 4P Coin J1-1 J1-9 J7-1 (1)
- Page 18 Ticket Dome R Manual Sub board input: Extension board input: INPUT Content INPUT Content INPUT Content INPUT Content 1P Claw depth 3P Claw depth Turntable J1-9 J1-1 (1) J1-9 (9) J1-1 (1) zero sensor 1P Scoop 3P Scoop upper J1-10...
- Page 19 Ticket Dome R Manual Separate port J5: Main board Separate port J6: Main board PROT Content PROT Content Display SCK Display RCK Display SI Separate port: Sub board LED display: Ticket Time PROT Content 1,2,3 bit 4,5,6,7 bit 8,9,10 bit 11,12,13,14 bit...
- Page 20 Ticket Dome R Manual 6.2 Ticket Dome R I/O Chart 6.2.1 M3_MB.PCB board Input:J20 INPUT INPUT INPUT INPUT Content Content Content Content 1#Gate motor 1#Ticket IN17 J25-T1_IN Switch DIP1 initial feedback 2#Gate motor 2#Ticket IN10 IN18 J25-T2_IN Switch DIP2 initial...
- Page 21 Ticket Dome R Manual 6.2.2 ZKL_HANDLE_MB.PCB board Content Content Content Content P1 Serial port 3 P2 Serial port 3 P3 Serial port 3 P4 Serial port 3 P1 Serial port 2 P2 Serial port 2 P3 Serial port 2 P4 Serial port 2...
- Page 22 Ticket Dome R Manual Communication: Separate port: Item Content Item Content Content COM1 Ticket dome RXD IIC(J14) Separate port: Ticket dome TXD Communication 1 COM(J12) Communication 2 Communication GNG PWM1 PWM2 Error Code: PWM3 PWM1-6 (J15) Reader abnormal PWM4 Ticket detect...
- Page 23 Ticket Dome R Manual 7. TROUBLESHOOTING 7.1 Common Problem Please confirm whether every connector connected tightly. Symptom Possible Cause Recommended action Frame assembly connector is Game will not Plug the connector tightly. loose. start Frame assembly fault Contact with UNIS Service.
- Page 24 Ticket Dome R Manual 8.2 Mechanism Maintenance Instruction Before processing the following operation assure you have the following tools. Name SPEC. Qty. Picture Phillips screwdriver Allen wrench 2.5mm Spanner 5.5/7 Note: Place the game on a flat surface. Adjust levelers to lift casters off the ground to level the game.
- Page 25 Ticket Dome R Manual 8.2.1 Scoop Upper Sensor Replacement Instruction (E01 Error) Step 1 Locate the scoop. Utilize Phillips screwdriver to loosen the screws as shown below. Scoop Step 2 Open the Scoop upper shell. Locate the Upper sensor. Unplug the connector. Utilize Phillips screwdriver to loosen the screw to remove Upper sensor.
- Page 26 Ticket Dome R Manual Step 2 Open the Scoop upper shell. Utilize Phillips screwdriver to loosen 2 screws to remove Scoop electrical assembly. Screw Scoop electrical assembly Screw Step 3 Locate the Bottom sensor. Unplug the connector. Utilize Phillips screwdriver to loosen the screw to remove Bottom sensor.
- Page 27 Ticket Dome R Manual Step 2 Open the Scoop upper shell. Unplug the Scoop micro switch connector. Connector Step 3 Utilize Phillips screwdriver to loosen Left side screw. Utilize Phillips screwdriver and Spanner to loosen Right side screw. Screw Step 4 Loosen the nut.
- Page 28 Ticket Dome R Manual 8.2.4 Scoop Motor Replacement Instruction Step 1 Locate the scoop. Utilize Phillips screwdriver to loosen the screws as shown below. Scoop Step 2 Unplug the Scoop motor connector. Connector Step 3 Utilize Allen wrench(2.5mm) to loosen 2 screws to remove Gear. Utilize Phillips screwdriver to loosen 3 screws to remove Scoop motor.
- Page 29 Ticket Dome R Manual 8.2.5 Pusher Motor Replacement Instruction Step 1 Utilize Phillips screwdriver to loosen 4 screws to remove Middle cover. Screw Step 2 Unplug the Pusher motor connector. Utilize Spanner(5.5/7) to loosen 4 nuts to remove Pusher motor assembly.
- Page 30 Ticket Dome R Manual 8.2.6 Pusher Sensor Replacement Instruction Step 1 Take the BONUS Prize plate off. BONUS Prize plate Step 2 Locate the Pusher sensor. Unplug the connector. Utilize Phillips screwdriver to loosen screw to remove Pusher sensor. Step 3 Replace it with new Pusher sensor and install it in reversed order.
- Page 31 Ticket Dome R Manual Step 2 Utilize Phillips screwdriver to loosen the left screw. Utilize Phillips screwdriver and Spanner to loosen the right screw and nut. Step 3 Adjust the Micro switch. Tight the screws and nut back after adjustment.
- Page 32 Ticket Dome R Manual Step 2 Utilize Phillips screwdriver to loosen 2 screws and cotter pins to remove Cover. Cover Push rod motor Push rod motor Screw Cotter pin Step 3 Locate the service door. Turn the Switch to DOWN side. Power off the machine.
- Page 33 Ticket Dome R Manual Step 5 Utilize Phillips screwdriver to loosen 4 screws to remove Push rod plate. Screw Step 6 Utilize Phillips screwdriver to loosen 2 screws to remove Push Rod Motor. Screw Step 7 Replace it with new Push Rod Motor and install it in reversed order.
- Page 34 Ticket Dome R Manual 8.2.9 Ticket Dome IO Board Replacement Step 1 Open the service door. Unplug IO Board connector. IO board Step 2 Utilize Phillips screwdriver to loosen 4 screws to remove Main board. Screw Step 3 Replace it with new IO Board and install it in reversed order.
- Page 35 Ticket Dome R Manual 8.2.10 Ticket Dome R IO Board Replacement Step 1 Open the service door. Unplug IO Board connector. Step 2 Utilize Phillips screwdriver to loosen 4 screws to remove IO board. Step 3 Replace it with new IO board and install it in reversed order.
- Page 36 Ticket Dome R Manual 8.2.1 Reader Replacement Step 1 Open the coin door and locate Reader. Reader Step 2 Loosen 4 cables counterclockwise. Step 3 Utilize Phillips screwdriver to loosen 4 screws to remove Reader. Step 4 Utilize Phillips screwdriver to loosen 2 screws to remove Reader power cord.
- Page 37 Ticket Dome R Manual 9. OVERALL CONSTRUCTION 9.1 Prize Pushing Assembly 03/16/2020...
- Page 38 Ticket Dome R Manual Part No. Drawing NO. Name 1 T151-270-000 PQXS-2304 Sliding cover 2 T151-221-000 PQXS-2312 Pulley 3 T151-171-000 PQXS-2319 Pressing rod B 4 T151-222-000 PQXS-2314 Pressing rod wheel 5 T151-265-000 PQXS-2313 Pressing rod spring 6 T151-172-000 PQXS-2320 Pressing rod A...
- Page 39 Ticket Dome R Manual 9.2 Scoop Assembly Part No. Drawing No. Name 1 T151-178-000 PQXS-2413 Pallet 2 T151-264-000 PQXS-2418 Spring 3 T151-177-000 PQXS-2412 Pallet plate 4 T151-278-000 PQXS-2411 Scoop upper cover 5 T151-468-000 PQXS-WG-06 Motor 6 T151-232-000 PQXS-2406 Wheel gear B...
- Page 40 Ticket Dome R Manual Part No. Drawing No. Name T151-225-000 PQXS-2405-1 Scoop separate plate T151-277-000 PQXS-2410 Scoop bottom cover T151-176-000 PQXS-2403 Scoop arm T151-276-000 PQXS-2409 Scoop T151-105-000 PQXS-2407-1 Depth pin T151-476-000 PQXS-WG-14 Scoop micro Switch T151-156-000 PQXS-2207 Scoop vertical plate...
- Page 41 Ticket Dome R Manual 9.3 Ticket Detect Assembly Part No. Drawing NO. Name 1 T151-117-000 PQXS-1202 Pusher check plate 2 T151-208-000 PQXS-1205 Ticket check column 3 T151-492-000 PQXS-WG-30 Micro Switch 4 T151-116-000 PQXS-1201 Ticket check bracket 5 T151-475-000 PQXS-WG-13 Track...
- Page 42 Ticket Dome R Manual 9.4 BONUS Prize Assembly 03/16/2020...
- Page 43 Ticket Dome R Manual Part No. Drawing NO. Name 1 T151-241-000 PQXS-2103 BONUS support plate 2 T151-268-000 PQXS-2104 BONUS base plate 3 T151-149-000 PQXS-2110 BONUS support column 4 T151-214-000 PQXS-2113 Axis 5 T151-215-000 PQXS-2114 Axis sleeve 6 T151-146-000 PQXS-2102 BONUS base...
- Page 44 Ticket Dome R Manual 9.5 Marquee Assembly 03/16/2020...
- Page 45 Ticket Dome R Manual Part No. Drawing NO. Name 1 T151-242-000 PQXS-3002 Marquee plastic 2 T151-258-000 PQXS-3006 Marquee top plastic 3 T151-259-000 PQXS-3010 BONUS plastic 4 T151-261-000 PQXS-3013 BONUS base plastic 5 T151-260-000 PQXS-3011 Marquee light strip pressing plate 12...
- Page 46 Ticket Dome R Manual 9.6 Cover Assembly Part No. Drawing NO. Name 1 T151-244-000 PQXS-4001 Cover 2 T151-186-000 PQXS-4003 Push rod pressing plate 2 3 T151-185-000 PQXS-4002 Push rod top plate 4 T151-228-000 PQXS-4004 Cotter pin 5 T151-109-000 PQXS-1010 Upper pressing plate...
- Page 47 Ticket Dome R Manual 9.7 Control Panel Assembly Part No. Drawing NO. Name 1 T151-248-000 PQXS-1008 Inner circle light plastic C 2 T151-247-000 PQXS-1006 Inner circle light plastic A 3 T151-249-000 PQXS-1012 Button plate plastic 4 T151-235-000 PQXS-1013 Control panel plate...
- Page 48 Ticket Dome R Manual 9.8 Turntable Assembly 03/16/2020...
- Page 49 Ticket Dome R Manual Part No. Drawing NO. Name 1 T151-238-000 PQXS-1804 Prize plate 2 T151-129-000 PQXS-1801 Column 3 T151-503-000 PQXS-1805 Turntable board 4 T151-122-000 PQXS-1402 Turntable cover 5 T151-477-000 PQXS-WG-15 Chain 6 T151-229-000 PQXS-1403 Running wheel 7 T151-121-000 PQXS-1401...
- Page 50 Ticket Dome R Manual 9.9 Electrical Components Part No. Drawing No. Name 1 T151-410-000 PQXS.DQ-10 Coin mechanism 4 Part No. Drawing No. Name Qty T151-439-000 PQXS.DQ-39 Speaker 2 Part No. Drawing No. Name 1 T151-444-000 PQXS.DQ-44 Filter 2 T151-445-000 PQXS.DQ-45 Fuse 3 T151-443-000 PQXS.DQ-43 Residual current circuit breaker 1...
- Page 51 Ticket Dome R Manual 03/16/2020...
- Page 52 Ticket Dome R Manual Part No. Drawing No. Name 1 T151-401-000 PQXS.DQ-01 Main board 2 T151-402-000 PQXS.DQ-02 Extension board 3 T151-403-000 PQXS.DQ-03 PCB board 4 T151-405-000 PQXS.DQ-05 Light control board 5 T151-408-000 PQXS.DQ-08 Display 6 T151-409-000 PQXS.DQ-09 Fuse board 7 T151-429-000 PQXS.DQ-29 8 T151-430-000 PQXS.DQ-30...
- Page 53 Ticket Dome R Manual 03/16/2020...
- Page 54 Ticket Dome R Manual 03/16/2020...
- Page 55 Ticket Dome R Manual Part No. Drawing No. Name Spec XS_BONUS_CEC. 1 T151-407-000 PQXS.DQ-07 Light board PCB V2.0 2 T151-406-000 PQXS.DQ-06 LED PCB board XS_ZM.PCB V1.1 4 3 T151-411-000 PQXS.DQ-11 Inside breath light 181.1 in(4.6m) 4 T151-412-000 PQXS.DQ-12 Outside breath light 196.8 in(5m)
- Page 56 Ticket Dome R Manual Part No. Drawing No. Name 1 T151-510-000 20621901001 25 point ticket roll 2 T151-511-000 20621901002 50 point ticket roll 3 T151-512-000 20621901003 75 point ticket roll 4 T151-513-000 20621901004 100 point ticket roll 5 T151-514-000 20621901005...
- Page 57 Ticket Dome R Manual 9.10 Decals 03/16/2020...
- Page 58 Ticket Dome R Manual 03/16/2020...
- Page 59 Ticket Dome R Manual Part No. Drawing No. Name 1 T151-707-000 PQXS.HM-01 Speaker door decal 2 T151-708-000 PQXS.HM-02 Service door decal 3 T151-709-000 PQXS.HM-03 Coin mechanism door decal T151-710-000 PQXS.HM-04 Red player decal T151-711-000 PQXS.HM-05 Yellow player decal T151-712-000 PQXS.HM-06 Blue player decal T151-713-000 PQXS.HM-07...
- Page 60 Ticket Dome R Manual Part No. Drawing No. Name T151-730-000 PQXS.HM-24 Pusher side blue decal T151-731-000 PQXS.HM-25 Pusher side purple decal 1 T151-732-000 PQXS.HM-26 Pusher side red decal T151-733-000 PQXS.HM-27 Pusher side yellow decal T151-734-000 PQXS.HM-28 Blue LOGO decal T151-735-000 PQXS.HM-29 Purple LOGO decal T151-736-000 PQXS.HM-30...
- Page 61 Ticket Dome R Manual 03/16/2020...
- Page 62 Ticket Dome R Manual Part No. Drawing No. Name T151-744-000 PQXS.HM-38 Counter decal T151-745-000 PQXS.HM-39 Ticket decal T151-746-000 PQXS.HM-40 DBV port decal T151-747-000 PQXS.HM-41 Service door label(green) T151-748-000 PQXS.HM-42 High voltage warning decal T151-749-000 PQXS.HM-43 High voltage label T151-750-000 PQXS.HM-44...
- Page 63 Ticket Dome R Manual 10. WIRING DIAGRAM 95N*2 50N*2 C0*2 10*2 VH-4A VH-4A 38*2 38*2 3#Out of tik light 4#Out of tik light 38*2 38*2 3# Card reader port 4# Card reader port TL131 TL131 10N*2 XS_COUNTER_UL.PCB V1.0 XS_COUNTER_UL.PCB V1.0...
- Page 64 Ticket Dome R Manual 5A Fuse 5A Fuse DM442 5A Fuse 5A Fuse 03/16/2020...
Need help?
Do you have a question about the Ticket Dome R and is the answer not in the manual?
Questions and answers