Table of Contents
Advertisement
Quick Links
Advertisement
Table of Contents

Related Manuals for CAB 4214 Series


Summary of Contents for CAB 4214 Series
- Page 1 Assembly Instructions Stroke-Turn Applicator 4214 MADE IN GERMANY...
- Page 2 Edition: 08/2019 - Part No. 9009135 Copyright This documentation as well as translation hereof are property of cab Produkttechnik GmbH & Co. KG. The replication, conversion, duplication or divulgement of the whole manual or parts of it for other intentions than its original intended purpose demand the previous written authorization by cab.
-
Page 3: Table Of Contents
Table of Contents Introduction ............................4 Instructions ............................... 4 Intended Use ............................4 Safety Instructions ............................ 4 Safety Marking ............................5 Environment ............................. 5 Product Description ..........................6 Important Features ........................... 6 Technical Data ............................6 Overview ..............................7 Contents of Delivery ..........................8 Mounting .............................. -
Page 4: Introduction
• The device applicator mounted on a cab printer of the HERMES Q and Hermes+ series is intended exclusively for applying suitable materials that have been approved by the manufacturer. Any other use or use going beyond this shall be regarded as improper use. -
Page 5: Safety Marking
Introduction • In operation, moving parts are easily accessible. This applies especially for the zone, where the pad is moved between the starting and the labelling position. During operation do not reach into that zone and keep long hair, loose clothes, and jewelry away. Before any manipulations in those areas, close the shutoff valve. -
Page 6: Product Description
Product Description Important Features • The supporting air, the vacuum as well as the speed of the cylinder are adjustable. That way the applicator can be adapted to different label materials and sizes. • To avoid contamination within the vacuum channels, tamps are cleaned by an air pressure pulses after each application. -
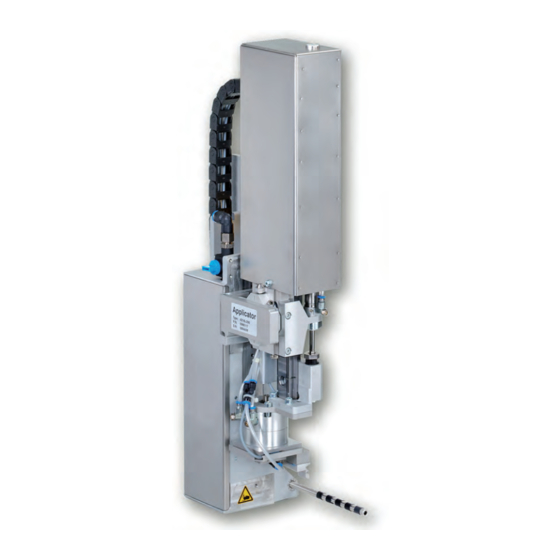
Page 7: Overview
Product Description Overview Fig. 2 Device overview 1 Cover 5 Blow tube for supporting air 2 Compressed air connector 6 Knurled screw for attaching the applicator to the printer 3 Shutoff valve 7 Hinges 4 Pad (customized) 8 SUB-D 15 Connector - elec. connection applicator-printer... -
Page 8: Contents Of Delivery
Product Description Contents of Delivery 1 Applicator 2 Blow tube (as ordered) 3 Pad (as ordered) 4 Screws (part of the pad) 5 Documentation Fig. 3 Contents of delivery Note! Please keep the original packaging in case the applicator must be returned. Attention! The device and printing materials will be damaged by moisture and wetness. -
Page 9: Mounting
Mounting Fig. 4 Mounting applicator on printer Attention! Initiation, adjustments and changing of parts is only for qualified service personal only. Service Manual Mount the applicator 1. Hang the applicator with the female part of hinges (1) at the printer mounted hinges parts (2). 2. -
Page 10: Operation
Operation Standard Operation Check all external connections. Load the material. Ensure that the locking system is locked "Operator's Manual" of the printer. Open the shutoff valve. Attention! Ensure that the pad is not covered by a label when switching on the printer-applicator system. Otherwise the vacuum sensor may be calibrated incorrectly. -
Page 11: Movement Of The Pad
Operation Movement of the Pad The applicator 4214 has different modes for picking up labels. The position of the pad can also be adjusted to suit different applications of the labels. The standard position of the pad will be described in Service Manual. The take up mode is mainly dependant on the size and material of the label. -
Page 12: Error Messages
Error Messages Error Messages of the Printer For detailed information about printer errors (e.g. 'Paper out', 'Ribbon out', etc.) Check the operator's manual of the printer. Error treatment: Clearing the error results. Press the respectively feed to synchronize the label feed, remove the left over labels manually. To quit the error state press Repeat (HERMES Q) respectively the pause key (Hermes +). -
Page 13: Licences
Person authorised to compile the technical file: Erwin Fascher Am Unterwege 18/20 99610 Sömmerda Signed for, and on behalf of the Manufacturer: Sömmerda, 08.07.2019 cab Produkttechnik Sömmerda Gesellschaft für Computer- und Automationsbausteine mbH Erwin Fascher 99610 Sömmerda Managing Director The product must not be put into service until the final machinery into which it is to be incorporated has been declared in conformity with the provisions of the Directive on machinery. -
Page 14: Eu Declaration Of Conformity
Annex II to Directive 2011/65/EU of the European Parliament and of the Council as regards the list of restricted substances Signed for, and on behalf of the Manufacturer: Sömmerda, 08.07.2019 cab Produkttechnik Sömmerda Gesellschaft für Computer- und Automationsbausteine mbH Erwin Fascher 99610 Sömmerda...
Need help?
Do you have a question about the 4214 Series and is the answer not in the manual?
Questions and answers