Table of Contents
Advertisement
Quick Links
Advertisement
Table of Contents

Subscribe to Our Youtube Channel
Related Manuals for SIIG AV-GM07C3-S1


Summary of Contents for SIIG AV-GM07C3-S1
- Page 1 4x8 HDMI Matrix Switcher with Full 3D Support P/N: AV-GM07C3-S1...
-
Page 2: Table Of Contents
However, like all electronic equipments, the AV-GM07C3-S1 should be used with care. Please read and follow the safety instructions to protect yourself from possible injury and to minimize the risk of damage to the unit. -
Page 3: Introduction
● Easy installation with rack-mounting and wall-mounting designs for master and receiver respectively ● Fast response time – 2~5 seconds for channel switch PACKAGE CONTENTS ● 1x AV-GM07C3-S1 ● 1x IR receiver ● 1x Rack-mounting ear set ● 1x UL AC C13 power cord... - Page 4 ● 1x IR remote control ● 1x Installation CD ● 1x User Manual...
-
Page 5: Specifications
SPECIFICATIONS Model Name AV-GM07C3-S1 Technical Role of usage True 4x8 matrix HDMI compliance HDMI Deep Color & full 3D HDCP compliance Video bandwidth Single-link 225MHz [6.75Gbps] Video support 480i / 480p / 720p / 1080i / 1080p60 12-bit color Audio support Surround sound (up to 7.1ch) or stereo digital audio... -
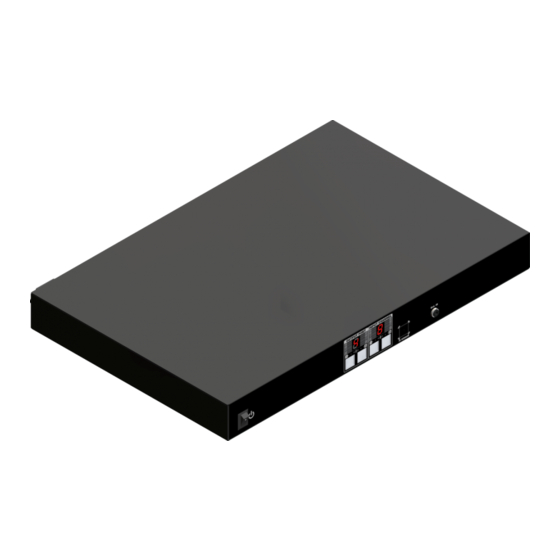
Page 6: Panel Descriptions
Storage temperature -20~60°C [-4~140°F] Relative humidity 20~90% RH [no condensation] * USB or RS-232 control must be connected either one at a time. Connecting both types of cables may cause command confusion. PANEL DESCRIPTIONS Front Panel Power: Power control Seven Segment LED Indicators: Control display Front panel push buttons: Used to input source and display channel number IR SENSOR: IR sensor for receiving the IR commands from the IR remote Ext. - Page 7 INPUT 1-4: HDMI inputs OUPUT 1-8: HDMI outputs for each output channel AC Power: 100-240V (for more detail please see DIP Switch section) SW MAIN: DIP switches USB: For channel control via USB control portr...
-
Page 8: Dip Switch
DIP SWITCH SW1-SW8 for EDID/Audio DIP Switch Position Video Audio Description Pin#1 Pin#2 Default Mode 1 – EDID up to 1080p video & surround sound Up to 1080p Surround OFF [ ] OFF [ ] audio output up to 7.1ch (DTS-HD Master & Dolby TrueHD) Default Mode 2 –... - Page 9 [Firmware update only can be done via RS-232 port and connection to PC set at COM1) 1. Power off the AV-GM07C3-S1. Execute the firmware update program on your PC via COM1 port connection to the RS-232 port of the AV-GM07C3-S1.
-
Page 10: Hardware Installation
1. Connect all sources to HDMI Inputs on the 4x8 HDMI Matrix 2. Connect all outputs to HDMI devices 3. Connect the +5V 6A DC power supply to the 4x8 HDMI Matrix 4. Power on the 4x8 HDMI Matrix AV-GM07C3-S1. CONNECTION DIAGRAM... -
Page 11: Operation And Ir Control
OPERATION AND IR CONTROL Source Side Method A: Push Button 1. Use the “+” or “-” channel button on output port to select which port to be changed. “+”: change selected output port in ascending order “-”: change selected output port in descending order 2. - Page 12 Channel Control Method C: Software Control through RS-232 port HDMI Input Source Selection Mapping Area HDMI Output Port Selection Mapping Area Status Indicator Software Control Menu 1. Setting button: Click Get button to read back device ID. Click Set button to write device ID. Click Rename button to open the String Table.
- Page 13 Click Save String Table to save the caption setting (turn effective after program restart). Click Set Default to pop up the confirmation message below to erase the captions and reset the string table back to default setting (turn effective after program restart). 2.
- Page 14 Click this button to close or open COM port. 5. Mapping button: Select All Output elect “set all output”, and then select the source on main menu. You can quickly set all output to the same source. Unselect All Output Release output selection.
- Page 15 select the output port one by one, the selected output port will change to gray. The linking line will change to yellow. Group setting First select output ports one by one. Then select the input source. The selected output ports change the setting at the same time.
-
Page 16: Edid Learning
EDID LEARNING The EDID learning function is only necessary whenever you encounter any display on the HDMI output port that cannot play audio and video properly. Because the HDMI source devices and displays may have various level of capability in playing audio and video, the general principle is that the source device will output the lowest standards in audio format and video resolutions to be commonly acceptable among all HDMI displays. - Page 17 One by One learning 1. Select the desired Output Port and Input Channel that you want the EDID of the display connected to this specified output port can be learned for the specified input channel. 2. Press the “+” button of the Output Port and “−” button of the Input Channel” at the same time for 2 seconds.
-
Page 18: Faq
Can every TV work with the HDMI matrix? Basically, the answer is YES. But if your TV can not support 1080p, please refer the EDID LEARNING section to learn EDID from your TV. What is EDID? Why do I need to learn EDID? EDID contains the whole information of the display such as the resolution and audio setting which this display can support. -
Page 19: Warranty
The SELLER will NOT be liable for direct, indirect, incidental, special, or consequential damages resulting from any defect or omission in this manual, even if advised of the possibility of such damages. Also, the technical information contained herein regarding the AV-GM07C3-S1 features and specifications is subject to change without further notice.
Need help?
Do you have a question about the AV-GM07C3-S1 and is the answer not in the manual?
Questions and answers