Table of Contents
Advertisement
Advertisement
Table of Contents

Related Manuals for thomann Stairville Replay Show


Summary of Contents for thomann Stairville Replay Show
- Page 1 Replay Show DMX manager user manual...
- Page 2 Musikhaus Thomann Thomann GmbH Hans-Thomann-Straße 1 96138 Burgebrach Germany Telephone: +49 (0) 9546 9223-0 E-mail: info@thomann.de Internet: www.thomann.de 26.11.2019, ID: 474470...
-
Page 3: Table Of Contents
Table of contents Table of contents General information..........................5 1.1 Further information........................... 6 1.2 Notational conventions........................7 1.3 Symbols and signal words....................... 8 Safety instructions..........................10 Features............................... 14 Installation and starting up........................ 15 Connections and controls........................18 Operating..............................23 6.1 Starting the device........................... 23 6.2 Setting the operating modes....................... - Page 4 Table of contents Protecting the environment......................39 DMX manager...
-
Page 5: General Information
Our products and user manuals are subject to a process of continuous development. We there‐ fore reserve the right to make changes without notice. Please refer to the latest version of the user manual which is ready for download under www.thomann.de. Replay Show... -
Page 6: Further Information
General information 1.1 Further information On our website (www.thomann.de) you will find lots of further information and details on the following points: Download This manual is also available as PDF file for you to download. Use the search function in the electronic version to find the topics of Keyword search interest for you quickly. -
Page 7: Notational Conventions
General information 1.2 Notational conventions This manual uses the following notational conventions: Letterings The letterings for connectors and controls are marked by square brackets and italics. Examples: [VOLUME] control, [Mono] button. Displays Texts and values displayed on the device are marked by quotation marks and italics. Examples: ‘24ch’... -
Page 8: Symbols And Signal Words
General information Instructions The individual steps of an instruction are numbered consecutively. The result of a step is indented and highlighted by an arrow. Example: Switch on the device. Press [Auto]. ð Automatic operation is started. Switch off the device. 1.3 Symbols and signal words In this section you will find an overview of the meaning of symbols and signal words that are used in this manual. - Page 9 General information Signal word Meaning DANGER! This combination of symbol and signal word indicates an immediate dangerous situation that will result in death or serious injury if it is not avoided. NOTICE! This combination of symbol and signal word indicates a pos‐ sible dangerous situation that can result in material and environmental damage if it is not avoided.
-
Page 10: Safety Instructions
Safety instructions Safety instructions Intended use This device is used for real-time recording, playback and distribution of DMX signals via LAN or WLAN. Use the device only as described in this user manual. Any other use or use under other operating conditions is considered to be improper and may result in personal injury or prop‐... - Page 11 Safety instructions DANGER! Electric shock caused by high voltages inside Within the device there are areas where high voltages may be present. Never remove any covers. There are no user-serviceable parts inside. Do not use the device if covers, protectors or optical components are missing or damaged.
- Page 12 Safety instructions NOTICE! Operating conditions This device has been designed for indoor use only. To prevent damage, never expose the device to any liquid or moisture. Avoid direct sunlight, heavy dirt, and strong vibrations. Only operate the device within the ambient conditions specified in the chapter ‘Technical specifications’...
- Page 13 Safety instructions NOTICE! External power supply The device is powered by an external power supply. Before connecting the external power supply, ensure that the input voltage (AC outlet) matches the voltage rating of the device and that the AC outlet is protected by a residual cur‐ rent circuit breaker.
-
Page 14: Features
Features Features DMX manager with the following features: DMX recorder and Art-Net-Node with wireless function 2 DMX universes (1024 DMX channels) Real-time recording and playback of DMX and Art-Net signals Built-in WiFi access point Art-Net in / out via RJ45 socket or WLAN 8 directly recallable memory locations, each with up to 20 hours of recording capacity Operation via buttons and display on the device as well as via Android and iOS applica‐... -
Page 15: Installation And Starting Up
Installation and starting up Installation and starting up Unpack and check carefully there is no transportation damage before using the unit. Keep the equipment packaging. To fully protect the product against vibration, dust and moisture during transportation or storage use the original packaging or your own packaging material suitable for transport or storage, respectively. - Page 16 Installation and starting up Connections in ‘DMX’ mode Connect the output of the first DMX device to the input of the second one and so on, to form a series connection. Connect the output of this DMX chain to input A on the front or back of the DMX Manager.
- Page 17 Installation and starting up DMX indicator While both the device and the DMX manager are in operation, the DMX indicators [DMX IN 1]/ [DMX IN 2] show that a DMX signal is being received on the input. Rack mounting The unit has been designed for rack mounting in a standard 19" rack; it occupies one rack unit. Replay Show...
-
Page 18: Connections And Controls
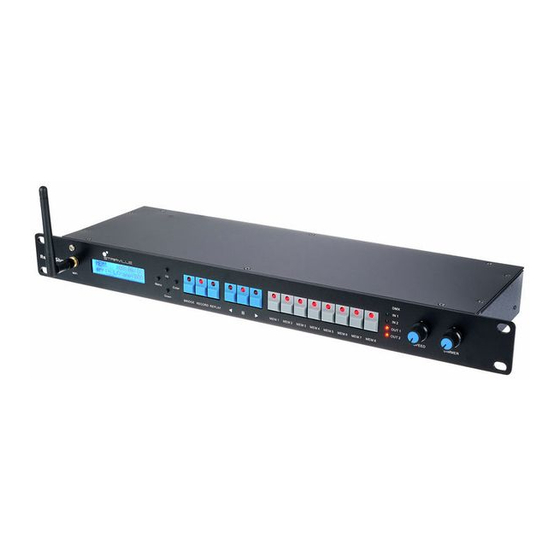
Connections and controls Connections and controls Front panel DMX manager... - Page 19 Connections and controls 1 [WiFi] Unscrewable WLAN antenna 2 Display 3 [MENU] Button to activate the main menu and to switch between the menu items. Closes an opened submenu. [UP] / [DOWN] Button to switch between the menu items of a menu level, increases or decreases the displayed value by one. [ENTER] Button to confirm the set value.
- Page 20 Connections and controls 6 [MEM 1]…[MEM 8] Buttons to select the memory locations 7 [DMX IN 1] / [DMX IN 2] Status display. The indicator LED for the DMX input lights up green as soon as a signal is received. [DMX OUT 1] / [DMX OUT 2] Status display.
- Page 21 Connections and controls Rear panel 10 [DMX OUT 1] / [DMX OUT 2] 2 × DMX output, designed as XLR socket 11 [DMX IN 1] / [DMX IN 2] 2 × DMX input, designed as XLR plug Replay Show...
- Page 22 Connections and controls 12 [ETHERNET IN] Network connection, designed as RJ45 socket, for data input and output 13 [USB] USB 2.0, type B for alternative power supply 14 [SD CARD] SD card slot for the supplied memory card 15 [ON] / [OFF] Main switch.
-
Page 23: Operating
Operating Operating 6.1 Starting the device Connect the device to the power grid and turn it on with the main switch to start operation. The display shows the current firmware version. Press [MENU] to enter the main menu and make further settings. 6.2 Setting the operating modes The device offers three different operating modes: BRIDGE, RECORD and PLAY. - Page 24 Operating Menu level 1 Menu level 2 ‘Bridge Mode01’ ‘IN1/2>OUT1/2’ ‘DMXin>DMXout’ ‘IN1>OUT1&2’ ‘IN2>OUT1&2’ ‘Bridge Mode02’ ‘DMXin>LAN’ Signal input: DMX inputs, signal output: LAN socket ‘Bridge Mode03’ ‘LAN>DMXout’ Signal input: LAN socket, signal output: DMX outputs DMX manager...
- Page 25 Operating Menu level 1 Menu level 2 ‘Bridge Mode04’ ‘WiFi>DMXout’ Signal input: WLAN, signal output: DMX out‐ puts ‘Bridge Mode05’ ‘WiFi>LAN’ Signal input: WLANasD, signal output: LAN socket ‘Bridge Mode06’ ‘HTP’ ‘DMX MERGE’ ‘LTP’ ‘override’ ‘backup’ Replay Show...
- Page 26 Operating 6.2.1.1 SPLITTER operation In SPLITTER mode, the device has three different ways to divide incoming signals. Press [BRIDGE] to enter BRIDGE mode. The LED lights. Press [UP] or [DOWN] until the display shows ‘ Bridge Mode01’ and confirm with [ENTER]. Press [UP] or [DOWN] until the display shows the desired signal distribution and confirm with [ENTER].
- Page 27 Operating 6.2.1.2 MERGE operation In MERGE mode, the device has four different ways to merge DMX signals into a new signal: HTP, LTP, Override and Backup. HTP (High Take Precedence In HTP mode, the highest DMX value has priority. Modus) Press [BRIDGE] to enter BRIDGE mode.
- Page 28 Operating LTP (Latest Takes Precedence) In LTP mode, the last DMX value has priority. Press [BRIDGE] to enter BRIDGE mode. The LED lights. Press [UP] or [DOWN] until the display shows ‘ Bridge Mode06’ and confirm with [ENTER]. Press [UP] or [DOWN] until the display shows ‘ LTP’ and confirm with [ENTER]. ð...
- Page 29 Operating Press [UP] or [DOWN] to increase or decrease the DMX value for ‘ DMX2’ and confirm with ‘ENTER’ . ð The operating mode Override is activated. The signals of both DMX inputs are com‐ bined to form a new signal specifying a start address. BACKUP In BACKUP mode, the signal of the other input is accepted if no DMX signal is present at one input.
- Page 30 Operating 6.2.2 Operating mode Record In RECORD mode, the data of a light show can be recorded via Ethernet (LAN), WLAN or the two DMX inputs. There are 8 memory slots, each with up to 20 hours of recording capacity. The data is stored on the included SD card .
- Page 31 Operating Press to start recording, to pause recording or to stop recording and save. 6.2.3 Operating mode Replay In the REPLAY mode, you can play the recordings individually or in an endless loop directly on the device or via your Android or iOS device. Press [REPLAY] to enter REPLAY mode.
- Page 32 Operating With the [DIMMER] control you can set the brightness of the stored light show between values of 0 % (dark) to 100 % (bright). Press again , to stop playback. DMX manager...
-
Page 33: Control Via App
Operating 6.3 Control via app You can control the device's recording function from your Android and iOS devices. Download the app from the PlayStore or AppStore of your Android or iOS device. Press [BRIDGE] to enter BRIDGE mode. The LED lights. Use [UP] or [DOWN] to select the menu item ‘... - Page 34 Operating Use [UP] / [DOWN] to select the menu item ‘ WiFi Local Set [Port-Address]’ and enter the port address of the DMX manager. Use [UP] / [DOWN] to select the menu item ‘ CWIFI SSID & IP’ and confirm with [ENTER] to apply the network settings.
-
Page 35: Software Update
6.4 Software update You can perform software updates using the supplied SD card. Download the software update at www.thomann.de and save it in the main directory of the SD card. Insert the SD card into the SD card slot [SD CARD]. -
Page 36: Technical Specifications
Technical specifications Technical specifications Operating modes Bridge (HTP, LTP, Override, Backup), Record, Replay Control Buttons and display on the device, Android and iOS applications (e.g. Aurora DMX, Photon, ArtNetDMXRemote) Input connections Voltage supply 1 × lockable input socket (Power Twist) USB 2.0, type B DMX signal input 2 ×... - Page 37 Technical specifications Fuse 5 mm × 20 mm, 1 A, 250 V, fast-acting Mounting properties 19 inch, 1 RU Dimensions (W × H × D) 482 mm × 44 mm × 135 mm Weight 2.1 kg Ambient conditions Temperature range 0 °C…40 °C Relative humidity 50 %, non-condensing...
-
Page 38: Plug And Connection Assignments
Plug and connection assignments Plug and connection assignments Introduction This chapter will help you select the right cables and plugs to connect your valuable equip‐ ment so that a perfect light experience is guaranteed. Please take our tips, because especially in ‘Sound & Light’ caution is indicated: Even if a plug fits into a socket, the result of an incorrect connection may be a destroyed DMX controller, a short circuit or ‘just’... - Page 39 Protecting the environment Protecting the environment Disposal of the packaging mate‐ rial For the transport and protective packaging, environmentally friendly materials have been chosen that can be supplied to normal recycling. Ensure that plastic bags, packaging, etc. are properly disposed of. Do not just dispose of these materials with your normal household waste, but make sure that they are collected for recycling.
- Page 40 Notes DMX manager...
- Page 41 Notes Replay Show...
- Page 42 Notes DMX manager...
- Page 44 Musikhaus Thomann · Hans-Thomann-Straße 1 · 96138 Burgebrach · Germany · www.thomann.de...
Need help?
Do you have a question about the Stairville Replay Show and is the answer not in the manual?
Questions and answers