Table of Contents
Advertisement
Quick Links
Advertisement
Table of Contents

Subscribe to Our Youtube Channel
Related Manuals for thomann SDC-16


Summary of Contents for thomann SDC-16
- Page 1 DMX Controller SDC-16 DMX controller...
- Page 2 Musikhaus Thomann Thomann GmbH Hans-Thomann-Straße 1 96138 Burgebrach Germany Telephone: +49 (0) 9546 9223-0 E-mail: info@thomann.de Internet: www.thomann.de 16.10.2017, ID: 224882...
-
Page 3: Table Of Contents
1.2 Notational conventions........................6 1.3 Symbols and signal words....................... 7 Safety instructions............................. 9 Features............................... 13 Starting up..............................14 Connections and controls........................17 Operating..............................20 Technical specifications........................22 Plug and connection assignments....................23 Protecting the environment......................24 DMX Controller SDC-16 DMX controller... -
Page 4: General Notes
If you sell the unit please make sure that the buyer also receives this manual. Our products are subject to a process of continuous development. Thus, they are subject to change. DMX Controller SDC-16 DMX controller... -
Page 5: Further Information
General notes 1.1 Further information On our website (www.thomann.de) you will find lots of further information and details on the following points: Download This manual is also available as PDF file for you to download. Use the search function in the electronic version to find the topics of Keyword search interest for you quickly. -
Page 6: Notational Conventions
The letterings for connectors and controls are marked by square brackets and italics. Examples: [VOLUME] control, [Mono] button. Displays Texts and values displayed on the device are marked by quotation marks and italics. Examples: ‘24ch’ , ‘OFF’ . DMX Controller SDC-16 DMX controller... -
Page 7: Symbols And Signal Words
ð Automatic operation is started. Switch off the device. 1.3 Symbols and signal words In this section you will find an overview of the meaning of symbols and signal words that are used in this manual. DMX Controller SDC-16 DMX controller... - Page 8 This combination of symbol and signal word indicates a pos- sible dangerous situation that can result in material and environmental damage if it is not avoided. Warning signs Type of danger Warning – danger zone. DMX Controller SDC-16 DMX controller...
-
Page 9: Safety Instructions
This device may be used only by persons with sufficient physical, sensorial, and intellectual abilities and having corresponding knowledge and experience. Other persons may use this device only if they are supervised or instructed by a person who is responsible for their safety. DMX Controller SDC-16 DMX controller... - Page 10 They could swallow the pieces and choke! Never let children unattended use electrical devices. NOTICE! Risk of fire Do not block areas of ventilation. Do not install the device near any direct heat source. Keep the device away from naked flames. DMX Controller SDC-16 DMX controller...
- Page 11 Failure to do so could result in damage to the device and pos- sibly the user. Unplug the external power supply before electrical storms occur and when the device is unused for long periods of time to reduce the risk of electric shock or fire. DMX Controller SDC-16 DMX controller...
- Page 12 PVC floor and after some time cause permanent dark stains. In case of doubt, do not put the rubber feet directly on the floor, but use felt-pad floor protectors or a carpet. DMX Controller SDC-16 DMX controller...
-
Page 13: Features
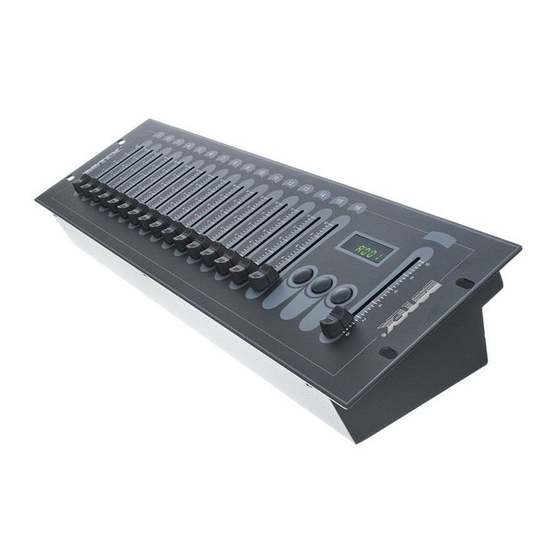
Features Features Special features of this DMX controller: 16 channel faders 1 master fader Compact design Simple operation Power supply via the supplied 9 V external power adapter DMX Controller SDC-16 DMX controller... -
Page 14: Starting Up
Possible data transmission errors For error-free operation make use of dedicated DMX cables and do not use ordi- nary microphone cables. Never connect the DMX input or output to audio devices such as mixers or ampli- fiers. DMX Controller SDC-16 DMX controller... - Page 15 DMX device to the input of the second one, and so on to form a daisy chain. Always ensure that the output of the last DMX device in the daisy chain is termi- nated with a resistor (110 Ω, ¼ W). DMX Controller SDC-16 DMX controller...
- Page 16 When all cable connections are made, turn on the device with the main switch on the rear panel. The device is immediately ready for operation, the display shows the current DMX start address, for example ‘A001’ . DMX Controller SDC-16 DMX controller...
-
Page 17: Connections And Controls
Connections and controls Connections and controls Front panel DMX Controller SDC-16 DMX controller... - Page 18 3 [MASTER] Master fader The master fader serves as a controller for all 512 channels of the DMX universe. 4 Control buttons [MODE]: Toggles the display mode. [UP], [DOWN]: Increases or decreases the displayed value. DMX Controller SDC-16 DMX controller...
- Page 19 Connections and controls Rear panel 5 [Dc Input] Connection socket for the power adapter. 6 [POWER] Main switch. Turns the device on and off. 7 [DMX OUT] DMX output DMX Controller SDC-16 DMX controller...
-
Page 20: Operating
0 to 255 appears in the display for approximately 10 seconds. To switch the display to percentage (0 to 100), press [MODE]. ð The LED [%] lights. To switch the display to DMX values (0 to 255), press again [MODE]. ð The [0-255] LED lights. DMX Controller SDC-16 DMX controller... - Page 21 10 seconds. To switch the display to percentage (0 to 100), press [MODE]. ð The LED [%] lights. To switch the display to DMX values (0 to 255), press again [MODE]. ð The [0-255] LED lights. DMX Controller SDC-16 DMX controller...
-
Page 22: Technical Specifications
XLR socket, 3-pin Voltage supply 9 V plug-in power supply , 300 mA, positive pole via inner contact Dimensions (W × H × D) 482 mm × 80 mm × 132 mm Weight 2.3 kg DMX Controller SDC-16 DMX controller... -
Page 23: Plug And Connection Assignments
The unit offers a 3-pin XLR socket for DMX output and a 3-pin XLR plug for DMX input. Please refer to the drawing and table below for the pin assignment of a suitable XLR plug. Configuration Ground, shielding Signal inverted (DMX–, ‘cold signal’) Signal (DMX+, ‘hot signal’) DMX Controller SDC-16 DMX controller... -
Page 24: Protecting The Environment
Batteries must not be disposed of as domestic waste or thrown into fire. Dispose of the bat- teries according to national or local regulations regarding hazardous waste. To protect the environment, dispose of empty batteries at your retail store or at appropriate collection sites. DMX Controller SDC-16 DMX controller... - Page 25 Dispose this device through an approved waste disposal firm or through your local waste facility. When discarding the device, comply with the rules and regulations that apply in your country. If in doubt, consult your local waste disposal facility. DMX Controller SDC-16 DMX controller...
- Page 26 Notes DMX Controller SDC-16 DMX controller...
- Page 28 Musikhaus Thomann · Hans-Thomann-Straße 1 · 96138 Burgebrach · Germany · www.thomann.de...
Need help?
Do you have a question about the SDC-16 and is the answer not in the manual?
Questions and answers