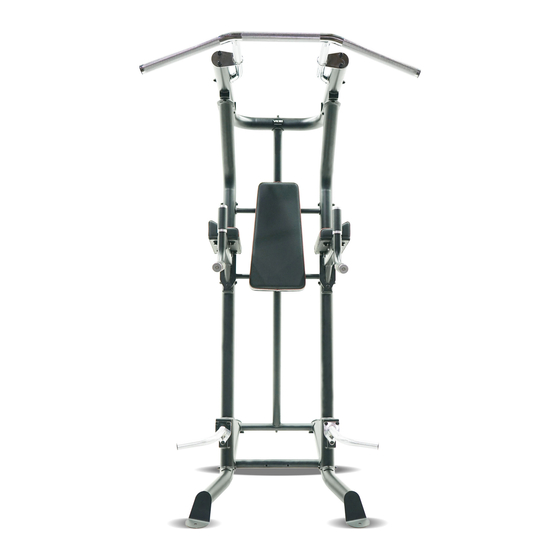
Summary of Contents for Inspire VKR1
- Page 1 ASSEMBLY & OPERATION MANUAL RECORD SERIAL NUMBER HERE www.inspirefitness.com by Health In Motion LLC Sept. 2017...
- Page 2 CONGRATULATIONS… You’ve just taken the first step to a healthier and stronger body. This home gym by Inspire Fitness offers the key to unlocking your body’s potential. Regular strength training on a home gym has been shown to deliver a host of benefits including: increased muscle tone, decreased body fat, improved energy levels, a reduction in stress, and improved cardiac output.
-
Page 3: Table Of Contents
TABLE OF CONTENTS Section Description……………………………………………………. Page Important Safety Instructions………………………………………. Parts List…………………………………………………………………………. Exploded Diagram…….……………………………………………………. Assembly Instructions.…………………………………………………… Accessories………...…………………………………………………………… Decal Reference……………………………………………………………… General Maintenance Information…….…………………………… Maintenance Schedule…….……………………………………………… Limited Warranty………………………………………………………………... -
Page 4: Important Safety Instructions
• Use the VKR1 for its intended purpose as described in this Operation Manual. Do not use attachments not recommended by the manufacturer. • Make sure bystanders are at least 5 feet away from the VKR1 while it is in use. - Page 5 PARTS & HARDWARE LIST Item Part Number Part Description GM576-100-010 Bottom Base Tube, L GM576-100-011 Bottom Base Tube, R GM576-100-012 Center Brace Tube, Front GM576-100-013 Center Brace Tube, Rear GM576-220-003 Upright Tube, L GM576-220-004 Upright Tube, R GM576-220-005 Main Upright GM576-220-006 Top Beam GM576-320-011...
- Page 7 Step 1 DO NOT TIGHTEN ANY HARDWARE IN THIS STEP NOTE: The front and rear center brace tubes look similar but they are not. When installed, the holes on the rear center brace should face up. Attach the Front & Rear Center Brace Tube (3,4) to the Left Bottom Base Tube (1) using 2-M10 bolts (19), 2-M10 lock washers (28), and 2-M10 washers (26).
- Page 8 Step 2 DO NOT TIGHTEN ANY HARDWARE IN THIS STEP Attach the Left Upright Tube (5) to the Left Bottom Base Tube (1) using 2-M10 bolts (18), 4-M10 washers (26), and 2-M10 Hex nuts (29). Attach the Right Upright Tube (6) to the Right Bottom Base Tube (2) using 2-M10 bolts (18), 4-M10 washers (26), and 2-M10 Hex nuts (29).
- Page 9 Step 3 DO NOT TIGHTEN ANY HARDWARE IN THIS STEP Attach the Backrest Frame (10) to the Left & Right Upright Tubes (5, 6) using 4-M10 bolts (20), 8-M10 washers (26), and 4-M10 Hex nuts (29). Attach the Backrest Frame (10) to the Main Upright (7) using 1-M10 bolts (21), 2-M10 washers (26), and 1-M10 Hex nuts (29).
- Page 10 Step 4 DO NOT TIGHTEN ANY HARDWARE IN THIS STEP Attach the rear end of the Pull-Up Bar (9) to the Top Beam (8) using 2-M10 bolts (18), 4-M10 washers (26), and 2-M10 nuts (29). Attach the front of the Pull-Up Bar (9) to the Top Beam (8) using 4-M10 bolts (25), 4- M10 Lock washers (28), and 4-M10 washers (27).
- Page 11 Step 5 Attach the Top Beam (8) to the Main Upright (7) using 1-M10 bolts (19) and 1-M10 lock washer (28). Attach the Top Beam (8) to the Left & Right Upright Tubes (5, 6) using 6-M10 bolts (24), 12-M10 washers (27), and 6-M10 Hex nuts (29). Tighten all hardware from steps 1-5.
- Page 12 Step 6 Attach the Armrest Tube (11) to the Left Upright Tube (5) using 3-M10 bolts (24), 6- M10 washers (27), and 3-M10 nuts (29). Attach the Armrest Tube (11) to the Right Upright Tube (6) using 3-M10 bolts (24), 6- M10 washers (27), and 3-M10 nuts (29).
- Page 13 Step 7 Attach the Arm Pads (14) to the Armrest Tubes (11) using 8-M10 bolts (25), 8-M10 lock washers (28), and 8-M10 flat washers (27). PAGE 10...
- Page 14 THE NARROW END OF THE PAD MUST FACE THE TOP OF THE MACHINE Step 8 Note: The back pad must be installed with the wide end facing down. Attach the Back Pad (15) to the Backrest Frame (10) using 2-M10 bolts (23), 2-M10 lock washers (28), and 2-M10 curved washers (26).
- Page 15 Step 9 Attach the Left Push Up Bar (12) to the bottom of the Left Upright Tube (5) using 3-M10 bolts (24), 6-M10 washers (27), and 3-M10 nuts (29). Attach the Right Push Up Bar (13) to the bottom of the Right Upright Tube (6) using 3-M10 bolts (24), 6-M10 washers (27), and 3-M10 nuts (29).
-
Page 16: Accessories
ACCESSORIES (Sold Separately) AB Bench Training Tips CONSULT A PHYSICIAN BEFORE STARTING ANY EXERCISE PROGRAM Always warm up before you start weight training. This helps get your muscles warm and prevents injury. You can warm up with light cardio or by doing a light set of each exercise before going to heavier weights. - Page 17 DECAL PLACEMENT "INSPIRE" Logo Decal "WARNING" Label on right side of Main Upright (40 x 170) "NOTICE" Label on left side of Main Upright (40 x 170) Serial number label (40 x 30) on top of Rear Center Brace PAGE 14...
-
Page 18: Decal Reference
DECAL REFERENCE Page 15... -
Page 19: General Maintenance Information
GENERAL MAINTENANCE INFORMATION • Regularly inspect product for loose hardware. • Do not use or store equipment outdoors. • Locate and familiarize yourself with all warning decals on the home gym. • Replace damaged or worn upholstery immediately. MAINTENANCE SCHEDULE HOME ROUTINE ENTRY DATE... - Page 20 This is the only express warranty applicable to Health In Motion’s “Inspire” branded strength products. Health In Motion neither assumes nor authorizes anyone to assume for it any other express warranty.


Need help?
Do you have a question about the VKR1 and is the answer not in the manual?
Questions and answers