Table of Contents
Advertisement
Quick Links
Advertisement
Table of Contents

Related Manuals for Rimage Professional 3410


Summary of Contents for Rimage Professional 3410
- Page 1 Rimage Professional™ 3410 and 5410N User Guide...
- Page 2 Rimage Corporation reserves the right to make improvements to the equipment and software described in this document at any time without any prior notice. Rimage Corporation reserves the right to revise this publication and to make changes from time to time in the content hereof without obligation of Rimage Corporation to notify any person or organization of such revisions or changes.
-
Page 3: Table Of Contents
Label Design Requirements ....................7 Overview ........................ 25 Print Requirements......................7 Cautionary Information ..................25 Identify the Parts of the Professional 3410 and 5410N ..... 8 Preventative Maintenance Schedule ..............25 Clean the Everest 400 Printer ................26 Front View ........................ 8 Clean the Print Head ...................... - Page 4 For technical information, refer to the Rimage Professional 3410 and 5410N Specification document found at www.rimage.com/support. From the The 3410 and 5410N are part of the Rimage Professional series of products. Support page select: Professional Series > Product Name > User Manuals The 3410 system consists of the 3410 autoloader and an integrated tab.
-
Page 5: Introduction
Unpacking and Setup Instructions The Rimage Accessory Kit that shipped with your Professional 3410 or To unpack your Professional 3410 or 5410N, refer to the unpacking label 5410N contains the following: on the autoloader box. For setup instructions, refer to the Setup and Installation Guide that shipped with your product. -
Page 6: Accessory Kit
Mexico/Latin America: 952-944-8144 Fax: 952-944-7808 Attn: Rimage Services Rimage offers a variety of service and support options for the Professional 3410 and 5410N, including Next Business Day On-site Agreements, Exchange Europe Services, and Software Subscriptions and Support. Please contact your... -
Page 7: Important Information
To ensure safety, read these precautions and familiarize yourself with their • The Professional 3410 and 5410N contain a lithium battery. There is a risk of explosion if the battery is replaced by an incorrect battery. Dispose of the old battery meaning before using the equipment. -
Page 8: Safety And Compliance Information
France: Do not use outdoors. • Italy: If used outside of own premises, general authorization is required. • Norway: This subsection does not apply for the geographical area within a radius of 20km from the center of NY-Alesund. 2002552_D For more information visit rimage.com/support... -
Page 9: Country-Specific Cautions And Warnings For Wideband Data Transmission Systems: 2400- 2483.5 Mhz
Important Information Compliance Information Product Professional 3410 Professional 5410N Model RAS27 RAS27E Notice for USA NOTE: This equipment has been tested and found to comply with the limits for a Class A digital device, pursuant to part 15 of the FCC Rules. -
Page 10: Compliance Information
Important Information Compliance Information 2002552_D For more information visit rimage.com/support... -
Page 11: Printer Requirements
Print ribbons are also available in black (monochrome) and Cyan, Magenta, Yellow and White (CMY+W). Tip: The media in Rimage Media Kits have a printable area of 118-24 mm Everest 400 Ribbons (see above diagram). On most labels, print settings of 118 mm and 24 mm... -
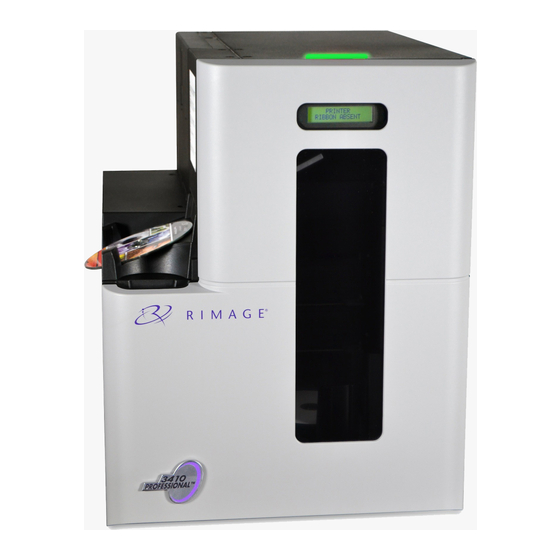
Page 12: Identify The Parts Of The Professional 3410 And 5410N
Identify the Parts of the Professional 3410 and 5410N This section describes the hardware and features of the 3410 and 5410N systems. Front View DiscWatch Status Light Control Panel Front Door Disc Dispenser Printer Door Output Bin Lift Arm Recorders... -
Page 13: Back View
Identify the Parts of the Professional 3410 and 5410N Back View 3410 5410N Power Power Switch Switch Network Cable Power Power Cord Cord USB Cable For more information visit rimage.com/support... -
Page 14: Parts Information
Status Light 3410 and 5410N. It includes the operator panel, The Professional 3410 and 5410N is equipped with a built-in status light that the rotate carousel button (button 1), and the printer tray button (button indicates various conditions. The table below illustrates status light states 2). -
Page 15: Pc Power Button
Identify the Parts of the Professional 3410 and 5410N PC Power Button Only the 5410N has the PC power button. The PC power button powers on the embedded computer. Refer to the Operate the Professional 3410 and 5410N section on page 12 for more information. -
Page 16: Operate The Professional 3410 And 5410N System
Operate the Professional 3410 and 5410N System Power Off the System This section provides the information needed to operate your system. Power On the System 1. Close all open applications. 2. If you have a 5410N, press and release the PC power button. This shuts 1. -
Page 17: Pause The System
Important! Place the discs with the recording side facing down. Press the printer tray button. The printer tray closes. Tip: Through the Rimage software, you may designate bins 1 through 3 as input, output, reject/output, and specify a media type for each bin . -
Page 18: Place A Disc On The Recorder Tray
Operate the Professional 3410 and 5410N System Place a Disc on the Recorder Tray Use this procedure to manually place a disc on the recorder tray. Press the recorder button on the recorder you wish to open. The recorder tray opens. -
Page 19: Set Your Printing Preferences On A Windows Pc
Set Your Printing Preferences on a Windows PC This section provides the information needed to set up your printing Tip: The Rimage Everest 400 printer may display as the default printer. preferences and check the amount of print and retransfer ribbon remaining using a Windows PC. -
Page 20: Set The Media Type, Media Size, Orientation And Ribbon Type
• Select Make pure white transparent to print only the areas 4. When you have made the desired choices in the Rimage Everest 400 of the label that are not pure white. Pure white label areas Printing Preferences window, select Apply. -
Page 21: Set The Printable Area
Select OK to save the changes. The Printable Area Settings window closes. 4. When you have made the desired choices in the Rimage Everest 400 Printing Preferences window, select Apply. 5. Select OK to close the Rimage Everest 400 Printing Preferences window. -
Page 22: Check The Ribbon Remaining
5. Select Close to close the Status Monitor dialog box. 6. Select OK to close the Rimage Everest 400 Printing Preferences window. Check the Ribbon Remaining The operator panel on the front of the 3410 and 5410N displays the estimated number of prints remaining on the print ribbon and the retransfer ribbon. -
Page 23: Change The Print And Retransfer Ribbons
Print Ribbon Important! Carrier Rimage supports only the use of Rimage brand ribbons in our printers. • Printer issues that occur as a result of using ribbons from manufacturers other than Rimage are not included under your Rimage warranty or maintenance agreement. -
Page 24: Install The Print Ribbon
Lift up on the take-up roll to remove it from the left side of the carrier. d. Set the take-up roll aside. e. Lift the print ribbon carrier off of the print ribbon and set it aside. Discard the used print ribbon. Used Take-Up Roll 2002552_D For more information visit rimage.com/support... - Page 25 Adjust the Print Alignment and Color Density section on page 17 for more information. h. Set the print ribbon carrier upright. The supply role should be at the top of the carrier. The printer is ready for use. 2002552_D For more information visit rimage.com/support...
-
Page 26: Change The Retransfer Ribbon
Important! e. Lay the retransfer ribbon carrier on a flat surface. Rimage supports only the use of Rimage brand ribbons in our printers. • Printer issues that occur as a result of using ribbons by manufacturers... -
Page 27: Install The Retransfer Ribbon
Supply Roll b. Place the retransfer ribbon on a clean, flat surface. c. Place the retransfer ribbon carrier on top of the retransfer ribbon. New Supply Roll New Take-Up Roll Guide Rollers 2002552_D For more information visit rimage.com/support... - Page 28 5. Reassemble the printer. a. Slide the retransfer ribbon carrier into the printer. b. Turn the center latch clockwise to lock it. c. Close the printer cover. The printer is ready for use. Take-Up Roll 2002552_D For more information visit rimage.com/support...
-
Page 29: Maintain The 3410 And 5410N
Can of compressed air Monthly the fan at the back of the For information on autoloader and printer maintenance, refer to the Rimage autoloader. Professional 3410 and 5410N User Guide that was included with your Remove dust and debris from Vacuum Monthly autoloader. -
Page 30: Clean The Everest 400 Printer
The component is shown outside of the printer for instructional purposes only. Sponge Swab Notch Swab Handle Wipe Direction Area to Clean Roller a. Remove the sponge swab and the swab handle from the Everest cleaning kit. For more information visit rimage.com/support... -
Page 31: Clean The Tacky Rollers
Install the print ribbon carrier in the printer. c. Turn the center latch clockwise to lock it. d. Close the printer cover. The system is ready for use. Print Ribbon Center Latch Carrier For more information visit rimage.com/support... -
Page 32: Clean The Sensors
Disconnect the power cord from the back of the 5410N or 3410. ii. Disconnect the power cord from the power outlet. Swab 2. Locate the sensors. Handle • Print ribbon sensor • Upper sensor • Lower sensor For more information visit rimage.com/support... - Page 33 Tip: One end of the handle has a slot with a notch in it approximately ¼ inches from the end. This is the end that goes into the printer. d. Position the can of compressed air’s nozzle in the unnotched end of the handle. For more information visit rimage.com/support...
-
Page 34: Operate Gemini Utilities
Other Windows operating system navigation may differ slightly. Start Gemini Utilities 1. Close all open software applications and stop all Rimage Services. Tip: Refer to your Rimage software online help for additional information. 2. From the Windows Start menu select: All Programs >...
Need help?
Do you have a question about the Professional 3410 and is the answer not in the manual?
Questions and answers