Advertisement
Assembly Instructions:
To purchase parts or accessories, please contact us at
www.spectrumfurniture.com
1-800-235-1262
Thank you for choosing Spectrum products!
(1) 042342
(1) 040857
17-3/4" Slide
"Z" Bracket
for 95501 only
(1) 044480
(8) 026070
Spacer Block
#8 x 1-3/4" PHSM
Parts Bag 2 includes the following:
1.
Attaching the "Z" or "Micro-Arm" Bracket to Keyboard Tray
A. Align the "Z" or "Micro-Arm" Bracket with the 6 pre-drilled holes in the center of the keyboard tray. Figure 1.
B. Using (6) #8 x 5/8" PHSM screws, attach the bracket to the keyboard tray and tighten securely.
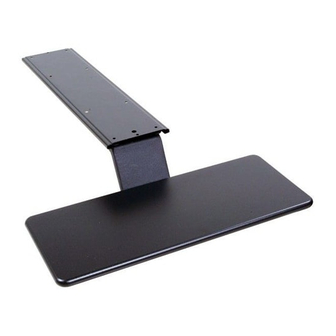
Keyboard Tray
2.
Attaching the Keyboard Tray to Desk
Note: Some desk products will have a metal support bar underneath the worksurface. If this is the case, go to steps 4 & 5.
A. Flip the worksurface /desk upside-down onto a non-abrasive surface.
B. Locate the slide perpendicular and about 1" from the front edge of the worksurface. The slide should not be mounted
closer than 8" to the nearest leg.
C. Attach the slide using (8) #8 x 5/8" PHM screws and tighten securely. Figure 2.
D. Attach the rubber bumper toward the back of the slide in the middle hole.
(1) 044217
"Micro-Arm" Bracket
for 95506
(5) 043878
Plastic Spacer
(1) 044321
(8) #8 x 5/8" PHSM screw
(1) Rubber Bumper
(1) R bb
B
(1) Slide guard
(6) #8 x 5/8" PHSM Screws
"Z" Bracket shown
Figure 1
95506
Keyboard Tray
#95501, #95506
Before you begin, please make sure all parts and proper quantities are
included. Any parts damaged during shipment must be reported within
15 days of receipt. To report information regarding damages or if you
have any questions, please call 1-800-235-1262.
Slide
Underside of
worksurface
95501
Tools Required:
Phillips Screwdriver
Rubber Bumper
Attach 1" from edge
Figure 2
043548XR6 Page 1 of 2
Advertisement
Table of Contents

Related Manuals for Spectrum Industries Touchboards 95501


Summary of Contents for Spectrum Industries Touchboards 95501
- Page 1 Assembly Instructions: To purchase parts or accessories, please contact us at www.spectrumfurniture.com 1-800-235-1262 Thank you for choosing Spectrum products! 95506 95501 (1) 042342 (1) 040857 (1) 044217 17-3/4" Slide "Z" Bracket "Micro-Arm" Bracket Keyboard Tray for 95501 only for 95506 #95501, #95506 (1) 044480 (8) 026070...
- Page 2 Attaching the Slide Guard A. Slide the bracket with keyboard tray into the slide. B. Using (3) #8 x 5/8" PHSM screws, attach the slide guard to the front of the slide. Figure3. Slide Guard Figure 3 #8 x 5/8" PHSM (3) req'd Attaching the Slide to desks with a Support Bar A Flip the orks rface/desk pside do n onto a non abrasi e s rface...
Need help?
Do you have a question about the Touchboards 95501 and is the answer not in the manual?
Questions and answers