Advertisement
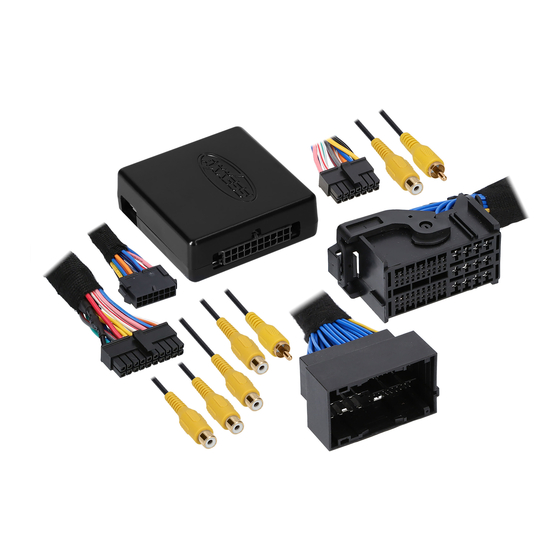
INTERFACE COMPONENTS
• AXAC-CH5 interface
• AXAC-CH5 interface harness
• AXAC-CH5 vehicle harness
APPLICATIONS
Dodge
Jeep
Challenger
2015-Up
Grand Cherokee
Charger
2015-Up
Durango
2014-Up
AxxessInterfaces.com
Dodge/Jeep/Ram† Camera Interface With
Pre-Wired
Harness
†
With 8.4-inch U-Connect radio
Visit
AxxessInterfaces.com
for more detailed information about the product and up-to-date
vehicle specific applications
INTERFACE FEATURES
• (4) Camera inputs
• Reverse signal trigger generated via CAN bus communication of the vehicle
• Turn signal trigger generated via CAN bus communication of the vehicle
• (4) Programmable camera control wires
• Micro-B USB updatable
RAM
2014-Up
1500 (DS chassis code)
1500
2013-2018
2500
2013-2018
© COPYRIGHT 2020 METRA ELECTRONICS CORPORATION
2013-Up
2019
3500
2013-2018
AXAC-CH5
I N S TA L L AT I O N I N S T R U C T I O N S
TABLE OF CONTENTS
Introduction............................................................2
Configuration ..................................................... 2-4
Connections ............................................................5
Installation .............................................................6
Programming .........................................................6
REQUIRED ITEMS (sold separately)
Update Cable: AXUSB-MCBL
TOOLS REQUIRED
• Crimping tool and connectors, or solder gun,
solder, and heat shrink
• Tape • Wire cutter • Zip ties
CAUTION!
All accessories, switches, climate
controls panels, and especially air bag indicator
lights must be connected before cycling the
ignition. Also, do not remove the factory radio
with the key in the on position, or while the
vehicle is running.
REV. 2/19/20 INSTAXAC-CH5
Advertisement
Table of Contents

Related Manuals for Axxess AXAC-CH5


Summary of Contents for Axxess AXAC-CH5
-
Page 1: Table Of Contents
TOOLS REQUIRED INTERFACE COMPONENTS • Crimping tool and connectors, or solder gun, • AXAC-CH5 interface solder, and heat shrink • AXAC-CH5 interface harness • Tape • Wire cutter • Zip ties • AXAC-CH5 vehicle harness APPLICATIONS CAUTION! All accessories, switches, climate... -
Page 2: Introduction
• Connect the AXUSB-MCBL update cable (sold separately) between the interface and the computer. The cable will connect into the micro-B USB port in the interface. • Open the Axxess Updater and wait until the word Ready is listed in the bottom left of the screen. • Select Add-Cam Configuration. - Page 3 CONFIGURATION (CONT.) • Select the vehicle in the drop down list. A tab labeled Configuration will appear after the † • Under Configuration, configure the (4) video trigger inputs to the desired settings. vehicle has been selected. • Once all selections have been configured, press Write Configuration to save the settings. •...
- Page 4 CONFIGURATION (CONT.) Video trigger legend Video trigger description • Disable (will turn off the input) • Control 2 (negative trigger activation) • Reverse camera: Dedicated by default to Video Trigger 1. Will activate the backup camera while the vehicle is in reverse. •...
-
Page 5: Connections
The (optional) analog control wires can be used with either a negative or positive trigger, depending • Disregard the following (3) wires: Blue/Green, Green/Blue, Red on how they are configured in the Axxess Updater. These wires will only be used for manual control of the camera(s). Otherwise disregard them. -
Page 6: Installation
For models with a factory backup camera: 1. Cycle the ignition on and wait until the LED in the interface comes on. 1. Remove the harness from the factory radio, then install the AXAC-CH5 vehicle harness in between. Note: If the LED doesn’t come on within a few seconds, yet blinks instead, turn the key to the off position, disconnect the interface, check all connections, reconnect the interface, and then try again. - Page 7 REV. 2/19/2020 INSTAXAC-CH5...
- Page 8 AXAC-CH5 I N S TA L L AT I O N I N S T R U C T I O N S IMPORTANT If you are having difficulties with the installation of this product, please call our Tech Support line at 386-257-1187. Before doing so, look over the instructions a second time, and make sure the installation was performed exactly as the instructions are stated.
Need help?
Do you have a question about the AXAC-CH5 and is the answer not in the manual?
Questions and answers