Table of Contents
Advertisement
Quick Links
INTERFACE FEATURES
• Provides accessory power (12-volt 10-amp)
• Maintains the retained accessory power
(R.A.P.) feature
• Provides NAV outputs (parking brake,
reverse, speed sense)
• Retains chimes
* Only for models that have the RSE controlled through the factory radio. Not for models that have an external power button at the RSE.
† To retain fade in digital amplified models, use the AX-ADBOX1
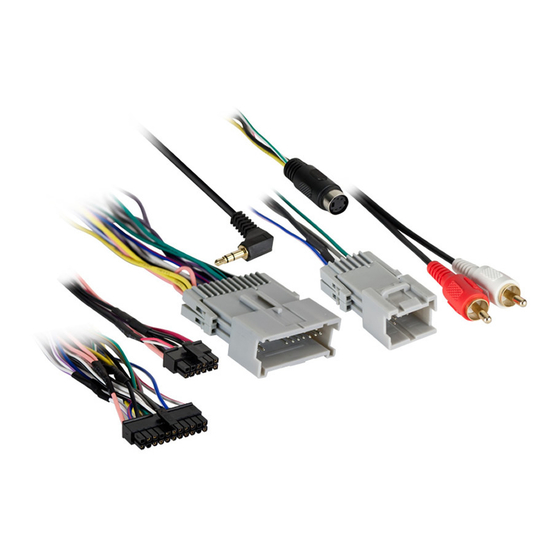
INTERFACE COMPONENTS
• AX-ADGM03 harness • 4-pin to 4-pin resistor pad harness
APPLICATIONS
See inside front cover
AxxessInterfaces.com
GM Data Interface
INTRODUCTION
The AX-ADGM03 harness is designed for, and must be used with, the
AX-ADBOX1 or AX-ADBOX2 interface (sold separately). Please refer to the
AX-ADBOX1 or AX-ADBOX2 for the 16-pin connector with stripped leads.
• Retains OnStar / OE Bluetooth
• Adjustable OnStar level
• Retains RSE (rear seat entertainment) *
• Retains satellite radio
• Retains the factory AUX-IN jack
© COPYRIGHT 2018 METRA ELECTRONICS CORPORATION
2000-2013
• Pre-wired ASWC-1 harness (ASWC-1 sold
separately)
• Can be used in non-amplified, or analog/
digital amplified models
• Retains balance and fade†
• Micro "B" USB updatable
AX-ADGM03
I N S TA L L AT I O N I N S T R U C T I O N S
TABLE OF CONTENTS
For models without an amplifier ................... 3-4
For models with an analog amplifier ............4-5
For models with a digital amplifier ...................6
12-pin pre-wired ASWC-1 harness ......................7
DIN jack ................................................................7
AX-ADBOX1 ...........................................................8
AX-ADBOX2 ......................................................8-9
Adjusting the AX-ADGM03 ................................... 10
Extra features ................................................... 10-11
TOOLS REQUIRED
• Crimping tool and connectors, or solder gun, solder,
and heat shrink • Small flat-blade screwdriver
• Tape • Wire cutter • Zip ties
CAUTION!
All accessories, switches, climate
controls panels, and especially air bag indicator
lights must be connected before cycling the
ignition. Also, do not remove the factory radio
with the key in the on position, or while the
vehicle is running.
REV. 7/2/18 INSTAX-ADGM03
Advertisement
Table of Contents

Related Manuals for Axxess AX-ADGM03


Summary of Contents for Axxess AX-ADGM03
-
Page 1: Table Of Contents
For models without an amplifier ....3-4 INTRODUCTION For models with an analog amplifier ....4-5 The AX-ADGM03 harness is designed for, and must be used with, the For models with a digital amplifier ....6 AX-ADBOX1 or AX-ADBOX2 interface (sold separately). Please refer to the AX-ADBOX1 or AX-ADBOX2 for the 16-pin connector with stripped leads. -
Page 2: Rendezvous
APPLICATIONS BUICK CHEVROLET (CONT) OLDSMOBILE Century 2004-2005 Silverado* 2003-2006 Alero 2001-2004 SSR* 2003-2006 Lacrosse 2005-2009 Bravada* 2002-2004 Suburban* 2003-2006 Rainier 2005-2007 Intrigue 2002 Tahoe* 2003-2006 Rainier* 2004 PONTIAC Trailblazer 2005-2009 Regal 2004 Aztec 2001-2005 Trailblazer* 2002-2004 Rendezvous 2002-2007 Grand Am 2001-2005 Uplander 2005-2008... -
Page 3: Connections To Be Made
Note: If installing either an ASWC-1 or AX-LCD (both sold separately), connect the (2) Red wires on the AX-ADGM03 harness as well. From the AX-ADGM03 harness to the aftermarket radio: • Connect the Blue/White wire to the amp turn on wire. This wire must be connected for the •... -
Page 4: For Models With An Analog Amplifier
Note: If installing either an ASWC-1 or AX-LCD (both sold separately), connect the (2) Red wires on the AX-ADGM03 harness as well. • Connect the Red and White RCA jacks to the audio AUX-IN jacks from the aftermarket radio. - Page 5 Green, Green/Black, Purple, Purple/Black • Connect the Red and White RCA jacks to the audio AUX-IN jacks from the aftermarket radio. From the AX-ADGM03 harness to the aftermarket radio: Continue to 12-pin pre-wired ASWC-1 harness • Connect the Black wire to the ground wire.
-
Page 6: For Models With A Digital Amplifier
• Connect the Light Green wire to the parking brake wire • Connect the Red wire to the accessory wire. From the AX-ADGM03 harness to the aftermarket radio: Note: If installing either an ASWC-1 or AX-LCD (both sold separately), connect the (2) Red •... -
Page 7: 12-Pin Pre-Wired Aswc-1 Harness
CONNECTIONS TO BE MADE (CONT.) 12-pin pre-wired ASWC-1 harness: CADILLAC (CONT) Escalade Pin-2, Pin-3, Pin-4 2003-2006 Sierra Pin-2, Pin-3, Pin-4 2003-2006 This harness is to be used along with the optional ASWC-1 (sold Escalade ESV Pin-2, Pin-3, Pin-4 2003-2006 Sierra Classic Pin-2, Pin-3, Pin-4 2007 separately) to retain steering wheel audio controls. -
Page 8: Din Jack
• Connect the 16-pin harness with stripped leads, and the AX-ADGM03 harness, into the interface . • Connect the AX-ADGM03 harness to the wiring harness in the vehicle. • If an ASWC-1 (sold separately) will be used, do not connect it until the AX-ADGM03 is programmed and fully functional. -
Page 9: Ax-Adbox2
1. The Blue reset button is located inside the interface, between the two connectors. The button is accessible outside the interface, no need to open the interface. • If an ASWC-1 (sold separately) will be used, do not connect it until the AX-ADGM03 is programmed and fully functional. -
Page 10: Adjusting The Ax-Adgm03
• If the vehicle is equipped with AUX-IN, rear seat entertainment, or satellite radio, • With the vehicle and radio turned on, turn the volume up 3/4 of the way. the AX-ADGM03 can retain these features. • With a small flat-blade screwdriver, adjust the potentiometer clockwise to raise the audio •... -
Page 11: Extra Features
EXTRA FEATURES (CONT.) • Listed below are the functions of the steering wheel control buttons while accessing the advanced features: • SEEK UP - Scrolls menu up. • SEEK DOWN - Scrolls menu down. • VOLUME UP- Enter • Listed below are the advanced menu options: •... - Page 12 AX-ADGM03 I N S TA L L AT I O N I N S T R U C T I O N S IMPORTANT If you are having difficulties with the installation of this product, please call our Tech Support line at 1-800-253-TECH. Before doing so, look over the instructions a second time, and make sure the installation was performed exactly as the instructions are stated.
Need help?
Do you have a question about the AX-ADGM03 and is the answer not in the manual?
Questions and answers