Bioness StimRouter Clinician's Reference Card
Neuromodulation system
Hide thumbs
Also See for StimRouter:
- Clinicians manual (108 pages) ,
- Clinician manual (107 pages) ,
- User manual (90 pages)
Advertisement
Neuromodulation System
Clinician's Reference Card
Programming Set-Up
1. Log into the StimRouter Clinician's Software.
2. Connect the Patient Programmer to the Clinician Programmer via the Programmer
Connector Cable.
3. Create a new patient record or open an existing patient record.
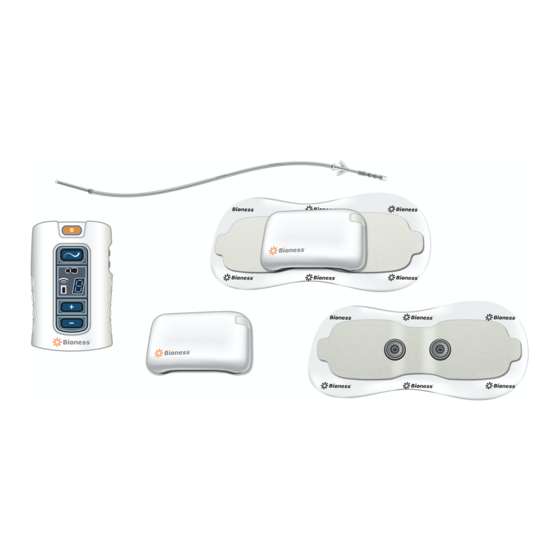
StimRouter Electrode/External Pulse Transmitter (EPT) Set-Up
1. After the EPT is charged, snap the EPT onto the StimRouter Electrode.
2. Remove the electrode liner and store it in the StimRouter Electrode Carrying Case.
3. Grasp the edges of the EPT attached to the StimRouter Electrode so the gel pads face down.
4. Adhere the end of the StimRouter Electrode, that has the EPT charging port, directly over the
receiver end of the lead.
Note: The center of the gel pad should be above the receiver end of the lead.
1
3
Software Navigation
Settings Tabs
Program Bar
Intensity Level Bar
Menu Bar
Bioness Inc.
25103 Rye Canyon Loop
Valencia, CA 91355 USA
Telephone: 800.211.9136 or 661.362.4850
Website: www.bioness.com
®
2
4
Save Icon
Print Icon
Delete
Program
See Clinician's
Add
Program
Guide
Advertisement
Table of Contents

Related Manuals for Bioness StimRouter


Summary of Contents for Bioness StimRouter
- Page 1 2. Remove the electrode liner and store it in the StimRouter Electrode Carrying Case. 3. Grasp the edges of the EPT attached to the StimRouter Electrode so the gel pads face down. 4. Adhere the end of the StimRouter Electrode, that has the EPT charging port, directly over the receiver end of the lead.
- Page 2 1. From the Stim Settings Tab or the Time Settings Tab press the add program icon on the program bar. 2. A new program will open. The StimRouter software can support up to eight stimulation programs, labeled (A-H). 3. Program the settings, test the settings and press the “Stop & Save” button to save the new settings.
Need help?
Do you have a question about the StimRouter and is the answer not in the manual?
Questions and answers