Table of Contents
Advertisement
Quick Links
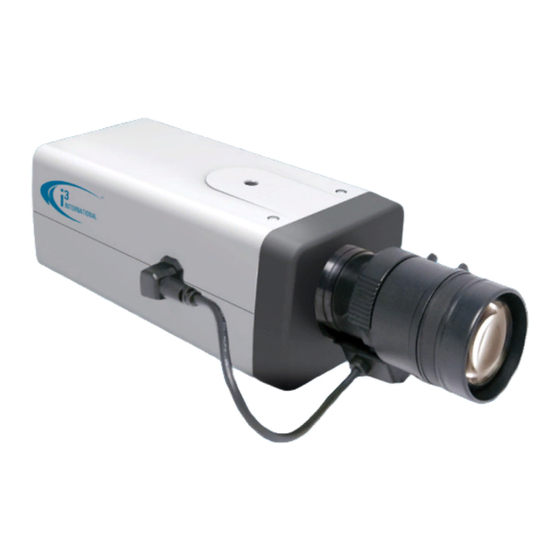
8MP (4K) H.265 Box IP Camera with P Iris Control
CAMERA PARTS AND DEFINITIONS
72 mm (2.8")
1
2
AUDIO
ALARM
RS485
IN
OUT
COM1 COM2
GND GND
GND GND
OUT1 OUT2
IN2
AUDIO
AUDIO
ALARM
AUDIO
RS485
RS485
IN
OUT
IN
COM1 COM2
OUT
COM1 COM2
RS485
IN
GND GND
OUT
GND GND
COM1 COM2
OUT1 OUT2
GND GND
OUT1 OUT2
RESET/
4
MINI USB
DEFAULT
RESET/
MINI USB
MINI USB
DEFAULT
POWER
5
RESET/
VIDEO OUT
MINI USB
DEFAULT
6
POWER
POWER
VIDEO OUT
VIDEO OUT
7
POWER
VIDEO OUT
8
1. Iris Control Port. Connect lens' iris control cable for P Iris or DC Auto Iris control.
2. CS Mount. Remove the protective CMOS cover and attach compatible CS-mount lens (sold separately) or a C-mount lens with a spacer.
Compatible i3 lenses:
• L5 - 5 Megapixel Lens, 2.8-8.5mm, F1.2, P Iris
• L6 - 8 Megapixel Lens (4K), 3.9-10mm, F1.5, P Iris
3. Mounting Thread Hole. Connect to a compatible i3 mounting bracket.
• i3-6801HB - IP67, Vandal-proof di-cast aluminum housing with mounting bracket.
• i3-6801HBR - IP67, Vandal-proof di-cast aluminum housing with IR illuminators and mounting bracket.
• D-i3-6800HB - IP66, Vandal-proof di-cast aluminum outdoor box camera housing with mounting bracket.
4. I/O Connector. Connect external devices: Audio IN/OUT (i3 Mo-1 microphone), Alarm IN1, IN2 (sensor inputs),
Alarm OUT1, OUT2 (control outputs).
5. RESET/DEFAULT. Using a pointed object, press and hold the RESET/DEFAULT button for 1 second to reboot the camera or
6 seconds to restore camera's settings to factory defaults.
continue holding for
6. Mini USB Port (reserved for factory use)
7. Power LED. Solid red LED indicates that the camera is powered ON.
8. Video Out port. Connect to a portable display monitor for camera view adjustment and lens focus during installation.
9. DC 12V/AC 24V: Power Terminal. (If using PoE power from your switch, do not use this connector). Connect the power terminals to a power supply.
If using DC 12V power supply, make sure to connect the power connector to correct ports (Red+/White –).
10. Green LED / Orange LED. Solid green LED indicates a live network connection. Flashing orange LED indicates data being transmitted and received.
11. ETHERNET/PoE port. Connect the network cable to the network switch.
12. ABF Pin-hole button. (Automatic Back Focus). After mounting the camera and positioning it for the perfect shot, using a pointed object, press and
2 seconds to automatically calibrate camera's back focus to achieve accurate focus.
hold the ABF button for
13. Micro SD card slot. Insert a microSDHC/SDXC card into the slot for edge video recording and storage. Card sold separately.
i3-TRNG-CAMS-83C.indd
User Manual
145 mm (5.7")
3
DC12V
AC24V
IN1
DC12V
DC12V
ALARM
DC12V
AC24V
AC24V
ALARM
AC24V
LINK
ACT
GND GND
GND GND
OUT1 OUT2
IN2
GND GND
IN1
IN2
IN1
IN2
IN1
10
ABF
LINK
LINK
ACT
ACT
LINK
ACT
RESET/
ABF
ABF
DEFAULT
11
ABF
12
13
Ax83C
SAFETY
When installing your Ax83C camera be sure to avoid:
• excessive heat, such as direct sunlight or heating appliances
• contaminants such as dust and smoke
• strong magnetic fields
• moisture and humidity
• areas with mechanical vibration
• fluorescent lamps, objects that reflect light, and unstable light sources
• temperatures below -20° C (-4° F) and above 50° C (122° F).
To avoid electrical shock and to preserve the product warranty, DO NOT
disassemble the camera. Refer servicing to qualified personnel only.
POWER
Ensure the supplied voltage meets the power consumption requirements of
this camera before powering the camera on. Incorrect voltage may cause
irreparable damage to the video camera and will effectively void the camera
warranty.
Ax83C camera accepts: DC12V, AC24V and PoE IEEE 802.3af, class 3 compliant.
Power Consumption: 7.5W max.
CLEANING
• For maximum optical clarity, the camera lens must remain clean.
9
• Use a blower to remove dust from the lens.
• Clean the body with a soft, dry cloth. If it is very dirty, use a cloth dampened
with a small quantity of neutral detergent, then wipe dry.
• Do not use volatile solvents such as alcohol, benzene, or thinners, as they
may damage the surface finishes.
PACKAGE CONTENTS
Ensure that the items received match those listed on the order form and the
packing slip. In addition to this manual, the camera packing box includes:
• Fixed Box Network Camera w/ CMOS cover x1
• BNC Video Output cable x1
• Standard RJ45 Connector x2
*lens sold separately
x1
x2
i3-6801HB
i3-6801HBR
D-i3-6800HB
Rev. 200227
Advertisement
Table of Contents

Subscribe to Our Youtube Channel
Related Manuals for i3 International Ax83C


Summary of Contents for i3 International Ax83C
- Page 1 Incorrect voltage may cause irreparable damage to the video camera and will effectively void the camera warranty. Ax83C camera accepts: DC12V, AC24V and PoE IEEE 802.3af, class 3 compliant. Power Consumption: 7.5W max. CLEANING...
- Page 2 You should be able to see the camera image on the screen. If you do not see Ethernet cable. OR the camera image on the screen, call i3 International technical support team for • DC12V or AC24V: Use the power terminals on the rear panel.
Need help?
Do you have a question about the Ax83C and is the answer not in the manual?
Questions and answers