Table of Contents
Advertisement
Ax47R/67R-series
User Manual
CONTENTS
1. Warnings and operation notes..................................3
2. Unpacking................................................................5
3. Dimensions & Parts Identification............................6
4. Installation............................................................7
5. Connecting to the SRX-Pro Server.........................13
6. Advanced Camera Setup.........................................18
7. Specifications.....................................................42
Before attempting to connect or operate this product, read these instructions carefully.
Save this manual for future use.
Advertisement
Table of Contents

Related Manuals for i3 International Ax47R4


Summary of Contents for i3 International Ax47R4
-
Page 1: Table Of Contents
Ax47R/67R-series User Manual CONTENTS 1. Warnings and operation notes........3 2. Unpacking..............5 3. Dimensions & Parts Identification......6 4. Installation............7 5. Connecting to the SRX-Pro Server......13 6. Advanced Camera Setup.........18 7. Specifications.............42 Before attempting to connect or operate this product, read these instructions carefully. Save this manual for future use. - Page 2 Neither i3 International Inc. nor its dealers or distributors shall be liable to any person or entity with respect to any liability, loss, or damage, caused or alleged to have been caused directly or indirectly by this information.
-
Page 3: Warnings And Operation Notes
Keep this guide for future reference. Thank you for purchasing an i3 Ax47R/67R-series IR Outdoor Dome Camera. If the system needs to be modified or repaired, contact a certified i3 International Dealer/Installer. When serviced by unauthorized technician, the system warranty will be voided. -
Page 4: Routine Maintenance
1.2 Power This camera supports PoE power only. IEEE 802.3af Class 3, max load of 8.5W. Incorrect voltage may cause irreparable damage to the video camera and will effectively void the camera warranty. For PoE power, insert the RJ45 cable into the RJ45 jack on the camera’s cable. -
Page 5: Unpacking
2. Unpacking Ensure that the items received match those listed on the order form and the packing slip. In addition to this manual and a fully assembled camera, the dome camera packing box includes: 1. Drill Template sticker x1 2. Torx key x1 3. -
Page 6: Dimensions & Parts Identification
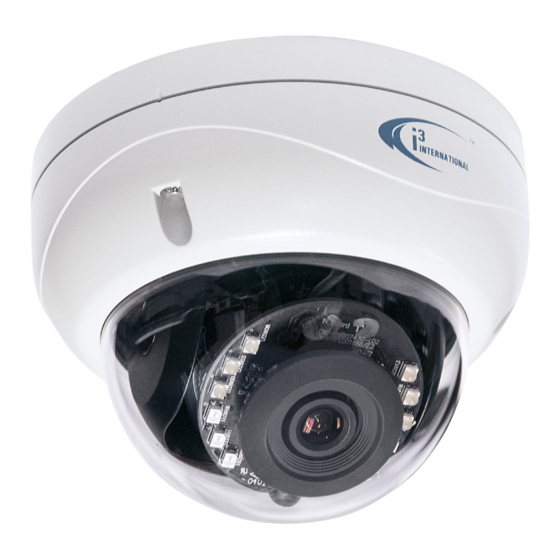
3. Dimensions & Parts Identification This dome camera is suitable for both indoor and outdoor installation in commercial and residential environment. With 3-axis mount support, it provides flexible installation on a ceiling or wall, even on an angle. The dome camera is a fully integrated enclosure with camera and lens. -
Page 7: Installation
Mounting holes (x3) Dome bubble housing / Dome cover Screws securing the dome bubble housing to camera module (x3, silver) Lexan bubble Screws attaching camera module to the camera base (x4, black) Tilt bracket with two locking screws. Loosen the screws and tilt to adjust lens angle. -
Page 8: Disassembling The Camera
4.1 Disassembling the Camera Before mounting and adjusting the camera, follow these steps to disassemble the camera. Use the provided security Torx key to loosen three screws securing the dome bubble housing to camera module. Do not completely remove the screws from the dome bubble. - Page 9 4.3 3-Axis lens position adjustment Pan Adjustment Rotate the lens base (max 360°) until satisfied with the field of view. Note: Over-rotation past 360° will cause internal cables to become damaged, disconnected, or twisted. Horizontal Rotation Firmly grasp the camera lens assembly and rotate counter-clockwise / clockwise (max 350°) until satisfied with the field of view.
-
Page 10: Surface Mounting
4.4 Surface Mounting This installation method is suitable for both indoor and outdoor applications. Attach the supplied Drill Template to the mounting surface. Drill 3 (three) 4.5 mm (0.2”) holes at the marked template positions on the mounting surface. Insert the supplied screw anchors into the holes on mounting surface. - Page 11 4.5 Mounting w/ Ax61BB Back Box (optional) The Ax61BB is an optional extension back box for cable management and surface mounting. Ax61BB back box is also needed for pendant or horizontal wall mount installations (additional mounting accessories required). Ax61BB back box is compatible with i3’s optional DB60 (Goose Neck Wall Bracket).
- Page 12 1/2” thread Secure the camera module to the Ax61BB back box with three screws Retaining (not provided with the camera). clip Pull the camera cable through the opening in the Ax61BB housing. Feed the CAT5/6 cable through the supplied waterproof RJ45 connector assembly before crimping and plugging in.
-
Page 13: Connecting To The Srx-Pro Server
5. Connecting to the SRX-Pro Server 5.1 Camera Connection Options Connection Option 1 (Single camera) Crossover direct connection i3 SRX-Pro Server Connection Option 2 (Multiple cameras) Via Gigabit Switch i3 SRX-Pro Server 5.2 Hardware/Software Requirements The following requirements must be met to achieve a successful network connection with the Ax47R/67R-series IP camera. - Page 14 5.3 RTSP Stream Information Camera’s RTSP stream URL information is as follows: Stream 1>> rtsp://192.0.0.16:554/stream1 Stream 2>> rtsp://192.0.0.16:554/stream2 Stream 3>> rtsp://192.0.0.16:554/stream3 5.4 Configuring Internet Explorer for Video Display Your Internet Explorer (v.10.0 or higher) must first be configured in order to properly display video stream from your Annexxus camera.
- Page 15 4. Turn on your Annexxus camera. 5. Launch the CD that came with your Annexxus camera and double-click “AnnexxusConfigurationTool.msi” file to install Annexxus Configuration Tool (ACT) application. ACT application discovers all Annexxus cameras connected to your network. 6. Follow the ACT installation instructions until the application has been successfully installed on your SRX-Pro Server.
- Page 16 Repeat Step 1 to launch Internet Explorer for your Annexxus camera again. The camera’s live video stream will now be seen in the Live View screen. If you do not see the camera image on the screen, call i3 International tech support for troubleshooting tips: 1.877.877.7241.
- Page 17 5.7 Adding your IP Camera to your SRX-Pro Server Make sure that the latest version of GiPi adapter is installed on your SRX-Pro Server. Once the latest GiPi adapter has been installed, restart i3 SRX-Pro Server. Download the most recent GiPi from http://i3international.com/download. Log In and go to the Setup >...
-
Page 18: Advanced Camera Setup
Assign the IP camera to the SRX-Pro video channel in the Ch. In. column. Click the Save button in the bottom right-hand corner to save settings. Your Annexxus camera is now connected to SRX-Pro Server and is ready to record. You may change resolution and frame rate for the Annexxus camera in the IP Camera tab menu or you may choose to configure the camera’s advanced settings through the IE browser. -
Page 19: Main Screen
6.1 Main Screen Use Brightness, Contrast, Saturation, Hue and Sharpness sliders on the Main screen to modify camera’s live video stream appearance. Click Save to save new settings or click Default to return video adjustments to factory settings. Live Mode. Click to view camera’s live video. Search Mode. -
Page 20: Basic Setup
6.2 Basic Setup Click the Setup button to access Annexxus camera Setup features. You may switch to the Advanced Setup mode at any time by clicking the Advance Setup button in the bottom left-hand corner. To switch back to the Basic Setup, click the Basic Setup button. -
Page 21: Video Setup
in high quality video images. Network infrastructure must be able to provide the set bandwidth to account for bit rate variations. » CBR (Constant Bit Rate): This setting will produce a constant bit rate video stream at the cost of video quality. The quality may deteriorate considerably. This setting is beneficial for installations with limited bandwidth. -
Page 22: Camera Settings
Camera Settings: • Camera Name: Enter a descriptive name for your camera. • Mirror: Flips the video image. The options for Mirror setting are: » Flip: flip images upside-down. » Mirror: flip images left to right. » Both: flip the image upside-down AND from left to right. »... - Page 23 • H264 GOP (I-Frame Interval): Provide a value from 1-60. The default value will follow the Frame Rate. • H264 Rate Control Mode: (for H264 codec): VBR (Variable Bit Rate) or CBR (Constant Bit Rate). » VBR (Variable Bit Rate) (recommended): This setting will produce a variable bit rate video stream, however the video quality will remain constant resulting in high quality video images.
- Page 24 Advance Settings: • White Balance: Set White Balance mode to ATW (Auto Tracing White Balance), Auto or Manual. » Auto: Automatically controls color temperature ranging from 2500°K to 10000°K » ATW (Auto Tracing White Balance): continuously adjusts the camera color balance in accordance with any change in color temperature.
- Page 25 Privacy Zone List: Privacy Zone List contains 8 place-holder entries for up to 8 custom Privacy Zones. To create a new privacy zone, 1. Click on the placeholder Privacy Zone name in the Privacy Zone List. E.g. Privacy Zone 1. 2.
- Page 26 Exposure Mode > Auto Exposure (Default): Shutter speed (exposure time) is the length of time the camera’s shutter stays open, exposing the CMOS sensor to light. The lower (slower) the shutter speed, the more light enters; the higher (faster) the shutter speed, the less light.
- Page 27 Exposure Mode > Flickerless: • DC Iris Control: same as Auto Exposure Mode • EV: same as Auto Exposure Mode • BLC: same as Auto Exposure Mode • HLC: same as Auto Exposure Mode • WDR: same as Auto Exposure Mode Exposure Mode >...
- Page 28 • Time: Set the Time value to Slow, Normal or Fast. Time value is the time delay for Auto Day/Night mode switching. This setting is used in conjunction with the Day Night setting and is unavailable when Manual Exposure is enabled. •...
- Page 29 6.6 SD Card (edge recording) Your Ax47R/67R series camera supports edge video recording to a microSD card for the purposes of data redundancy. One microSD card (64GB max) is supported (not supplied with the camera). Note: Camera’s edge video recording is not related to SRX- Pro Server video recording and functions independently.
- Page 30 » Backup: Same as Continuous recording type, however Third stream is used for recording. Third stream must be enabled and set to H264 codec in the Video tab. • Clip Duration: (applies to One Shot recording type only ) Set to 5 or 10 seconds. •...
- Page 31 • SD Card Life Expectancy: Remaining writing lifespan is calculated based on the card’s maximum supported number of overwrite cycles, as defined by the manufacturer. It is represented as a percentage value. Lower values indicate shorter remaining lifespan and can also be used as an indicator for microSD replacement.
- Page 32 FTP Record > FTP Server • FTP Server: Enter your FTP Server address. • Login ID: Enter your FTP login • Password: Enter your FTP password • FTP Port: Enter your FTP Port (Available ports: 21 and 1025~65535 range) SMTP Record > SMTP Server •...
- Page 33 Sending E-mail by SCHEDULE: Note: SMTP settings must be configured for this feature. • Enable: Check to Enable scheduled E-mail after each Trigger Interval. Snapshot image will be added to the email. Note that at least one MJPEG stream must be enabled for this function in Video setup tab.
-
Page 34: Network Settings
Sending E-mail by DEFOCUS: Note: SMTP settings must be configured for this feature. • Enable: Check to Enable scheduled E-mail after each Defocus Event. Snapshot image will be added to the email. Note that at least one MJPEG stream must be enabled for this function in Video setup tab. - Page 35 • IP Address: Enter the camera’s IP address here. This option is disabled when DHCP is enabled. • Subnet Mask: Enter the camera’s Subnet Mask here. This option is disabled when DHCP is enabled. • Default Gateway: Enter the IP address of the network’s router if necessary. Contact your network administrator for this information.
-
Page 36: User Management
6.9 User Management User Management tab displays the list of users that have access to the camera. Username and password from this setup tab are used when connecting to the camera through the supported Internet browser or SRX-Pro Server. Three types of user permissions exist: Administrator, Operator and User. Administrator has access to the camera’s setup settings and user administration, Operators have access to the camera’s settings, but not user administration, while Users may only view camera’s live streams. -
Page 37: System Setup
Change user name, password or permission Note: After changing user credentials, do not forget to update SRX-Pro camera connection information in the SRX-Pro Setup>IP Camera tab. To update an existing username, password, or user permission, Click on the user name in the list. In the Modify User setup area, enter New Username and/or Password and Confirm Password, or adjust Permission (not available for the Administrator account). - Page 38 Date & Time • Time Zone: Set your Time Zone to automatically adjust your camera to Daylight Savings Time. Default Time Zone: America/Toronto (EST). • Current Date & Time: This section shows camera’s current date and time. Set your camera’s Date format. Default date format is set to YYYY/MM/DD •...
- Page 39 Upgrade & Maintenance > Configuration Settings Export Configuration: • Click Export File to export your camera’s custom settings. If you have multiple cameras of the same model and you would like to apply a set of custom settings to each one, exporting the configuration file may save time. •...
- Page 40 6.11 Logs Note: Logs setup page is not available in IE v8 and IE v9. Use IE v10 or higher, or Firefox. Logs tab allows searching for event occurrence by date, time and event type. Log events are created for Defocus events and Scheduled recording occurrences. Searching by Event Type: To filter the Log Event List, check off one or more Event Type.
-
Page 41: Specifications
F-stop Range (F-number) Ax47R4: 1.6 Ax67R4: 1.6 Ax47R2: 93° (H) ~ 70° (V) Ax67R2: 100° (H) ~ 74° (V) Angle of View Ax47R4: 63° (H) ~ 47° (V) Ax67R4: 68° (H) ~ 51° (V) Day/Night Mechanical ICR Electric Digital Noise Reduction... - Page 42 INTERNATIONAL INC. U.S.A. i3 America Inc. Canada 780 Birchmount Road, 1.866.840.0004 4450 Witmer Industrial Estates Unit 4 Unit 16, Scarborough, www.i3international.com Niagara Falls, NY 14305 ON, M1K 5H4...
Need help?
Do you have a question about the Ax47R4 and is the answer not in the manual?
Questions and answers