Table of Contents
Advertisement
Advertisement
Table of Contents

Subscribe to Our Youtube Channel
Related Manuals for Thor Broadcast H-HDMI-RF-PETIT


Summary of Contents for Thor Broadcast H-HDMI-RF-PETIT
- Page 1 User Manual Petit HDMI RF MODULATOR H-HDMI-RF-PETIT...
- Page 2 H-HDMI-RF-PETIT A Note from Thor Broadcast about this Manual Intended Audience This user manual has been written to help people who have to use, integrate and to install the product. Some chapters require some prerequisite knowledge in electronics and especially in broadcast technologies and standards.
-
Page 3: Table Of Contents
H-HDMI-RF-PETIT Table of Contents INTRODUCTION .............................. 4 BUTTON LAYOUT ................................. 4 QUICK INSTALLATION QUIDE .......................... 5 TROUBLESHOOTING ............................6 NO LINK LIGHT ............................. 6 THE TV CANNOT FIND MY CHANNEL! ......................6 FEATURES..................................6 SPECIFICATIONS ............................. 7 SAFETY INSTRUCTIONS ..........................8 UNPACKING HANDLING ......................... -
Page 4: Introduction
H-HDMI-RF-PETIT INTRODUCTION The H-HDMI-RF-PETIT is the most cost-effective and smallest form factor solution in the market. With a second HDMI output port and a RF loop port, user can easily install the system with different requirement. Extremely compact and wall mountable, the H-HDMI-RF-PETIT fits into any space with quick installment in less than a minute or two. -
Page 5: Quick Installation Quide
ASR, press UP button once, the ASR will appear on the LCD and start blinking, to save press DOWN once 7) The Thor Broadcast PETIT’s static IP address is 192.168.1.10 It can be set up for HDCP. Press middle button 2x to see dHOF which means HDCP OFF, press UP button, the... -
Page 6: Troubleshooting
NO LINK LIGHT 3) Encoding LED not lit; press the MENU button 3x to restore factory default, and try setting up the unit again If you continue to not see the Encoding light, contact Thor Broadcast Support 1-800-521-8467 ext 2 FEATURES ... -
Page 7: Specifications
H-HDMI-RF-PETIT SPECIFICATIONS ENCODING Input Connector HDMI 1.4 Encoding MPEG 2 1920*1080_60P; 1920*1080_50P; 1920*1080_60i; VIDEO Input Resolution 1920*1080_50i;1280*720_60P; 1280*720_50P Bitrate 2 ~ 18 Mbps Encoding MPEG 1 Layer II, AC3 AUDIO Sample Rate 32/44.1/48KHz Bitrate 384kbps MODULATION Standard ATSC A/53 (6M) -
Page 8: Safety Instructions
H-HDMI-RF-PETIT GENERAL Power Supply DC12V 1A Power Consumption < 10W Net Weight 0.36KG Dimension 136*165*25 (mm) TO REDUCE THE RISK OF ELECTRICAL SHOCK, DO NOT REMOVE COVER FROM THIS UNIT. NO USER-SERVICEABLE PARTS INSIDE. REFER SERVICING TO QUALIFIED SERVICE PERSONNEL. -
Page 9: Unpacking And Handling
UNPACKING and HANDLING The H-HDMI-RF-PETIT is shipped with all equipment assembled, wires, factory tested, and then packaged in an appropriate shipping container. Unit Inspection Inspect the front and rear of the equipment for shipping damage. -
Page 10: Installation
Please follow the instructions below to install the H-HDMI-RF-PETIT 1. Connect the power plug to the jack. 2. Connect the video source to the H-HDMI-RF-PETIT like DVD or STB 3. Connect the H-HDMI-RF-PETIT to a set-top box or a digital TV 4. -
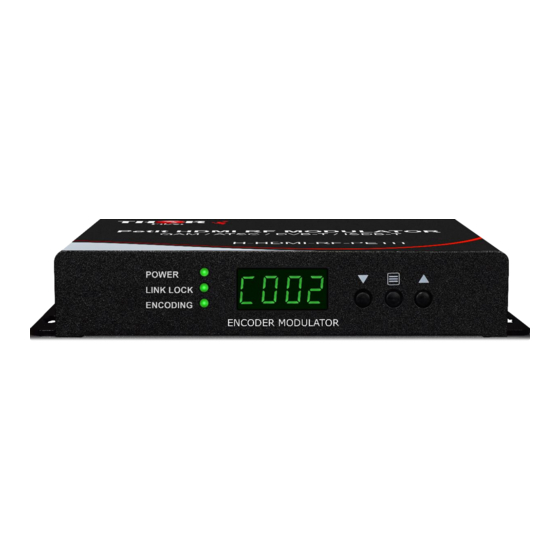
Page 11: Display And Buttons
10. RF INPUT Login : user / user ) To combiner another external RF signal WARNING: For the protection of your equipment and its proper working is necessary to connect the H-HDMI-RF-PETIT to a ground connection. Tel: (800) 521-8467 Email: sales@thorfiber.com... -
Page 12: Setting Up The System
H-HDMI-RF-PETIT SETTING UP THE SYSTEM THE SYSTEM MAP Loading System Channel Setting Mode Setting MENU • DHCP MENU • Restore DETAILS Loading System Software Version CHANNEL SELECTION to change the channel. QUICK SWITCH QUICK SWITCH: Press to switch the mode from ATSC and QAM. -
Page 13: Web Management
H-HDMI-RF-PETIT WEB MANAGEMENT Notice: 1.Please turn off the DHCP in the modulator, if you connect your laptop to the modulator directly 2. Please use Google Chrome or Microsoft Edge to login the system (best browsers) 1. Connect the modulator and the computer by the RJ45 port. -
Page 14: System Status
H-HDMI-RF-PETIT SYSTEM STATUS You can quickly check out the modulator working status here. BASIC PARAMETERS Tel: (800) 521-8467 Email: sales@thorfiber.com http://www.thorbroadcast.com... -
Page 15: Modulation Parameters
H-HDMI-RF-PETIT 1. Device ID: The unique ID for this modulator 2. Device Name: Input name for the device (The unique name) 3.Server Address: For online management 4. Signal Source: Indicate the input signal type 5. Input Resolution: Please check SPECIFICATIONS for supported resolutions No Video Input or Unsupported Resolution 6. - Page 16 H-HDMI-RF-PETIT 1 Modulation: Air is for ATSC standard and Cable is for QAM. When it is Air, the constellation will be 8VSB. While it is Cable, the constellation will be QAM64 or QAM256. 2 Major number and Minor number will help you to sort out the channel order.
-
Page 17: Ts Parameters
H-HDMI-RF-PETIT TS PARAMETERS – (this setting is set automatically and does not need to be changed) These settings are sometimes needed to work with Cable TV STB’s only Input Range : 1 ~ 65535 Input Range : 32 ~ 8190... -
Page 18: Network Parameters
H-HDMI-RF-PETIT NETWORK PARAMETERS 1. DHCP: If you need to put the modulator under a router with DHCP on, you might switch it to ON. THE MODULATOR WILL RECEIVE A UNIQUE IP ADDRESS FROM THE ROUTER, to find out this IP Address; log into your router and check “attached devices”... -
Page 19: System Parameters
H-HDMI-RF-PETIT SYSTEM PARAMETERS 1 Backup settings You can backup your settings and import to another modulator. Or if the modulator isn’t working well, you can send the backup file to us for modification. 2 Restore settings from file From here you can import the setting file to save time or import the right one to recover. -
Page 20: Account
H-HDMI-RF-PETIT ACCOUNT The default user name is user and the default password is user. If you forget your new user name or new password, you can use the reset button in the front panel to restore. If you want to change the password only, the user name is required to be input as well. -
Page 21: Quick Ip Ethernet Connection Guide
H-HDMI-RF-PETIT Quick IP Ethernet Connection Guide We appreciate your recent order for our Petit Modulator! We value your trust in our company, and we will do our best to meet your service expectations. You will need to change your subnet on your PC in order for the petit to work. All the instructions are in the manual. - Page 22 H-HDMI-RF-PETIT 6) Double click on the Ethernet Source or Right Click and Select “Properties” 7) Open Properties 8) Go to “Internet Protocol Version 4 (TCP/IPv4)” Tel: (800) 521-8467 Email: sales@thorfiber.com http://www.thorbroadcast.com...
- Page 23 H-HDMI-RF-PETIT 9) Go to “Properties” 10) Go to “Use the following IP address” 11) Set IP address Tel: (800) 521-8467 Email: sales@thorfiber.com http://www.thorbroadcast.com...
- Page 24 H-HDMI-RF-PETIT 12) Save all the Settings 13) Open internet browser, Enter the IP address - 192.168.1.10 192.168.1.10 Username: user Password: user Tel: (800) 521-8467 Email: sales@thorfiber.com http://www.thorbroadcast.com...
Need help?
Do you have a question about the H-HDMI-RF-PETIT and is the answer not in the manual?
Questions and answers