Advertisement
Available languages
Available languages
Quick Links
VIDEOREGISTRATORE DIGITALE
IBRIDO STAND ALONE
CON 4‐8-16-32 INGRESSI
ART. AHDVR040B-AHDVR080B-AHDVR160B
ART. AHDVR042B-AHDVR082B-AHDVR162B
ART. AHDVR0320A
ART. AHDVR043A-AHDVR083A-AHDVR163A
ART. AHDVR045A-AHDVR085A-AHDVR165A
Leggere questo manuale prima dell'uso e conservarlo per consultazioni future
GUIDA RAPIDA
0
Advertisement

Related Manuals for Comelit AHDVR040B


Summary of Contents for Comelit AHDVR040B
- Page 1 VIDEOREGISTRATORE DIGITALE IBRIDO STAND ALONE CON 4‐8-16-32 INGRESSI GUIDA RAPIDA ART. AHDVR040B-AHDVR080B-AHDVR160B ART. AHDVR042B-AHDVR082B-AHDVR162B ART. AHDVR0320A ART. AHDVR043A-AHDVR083A-AHDVR163A ART. AHDVR045A-AHDVR085A-AHDVR165A Leggere questo manuale prima dell’uso e conservarlo per consultazioni future...
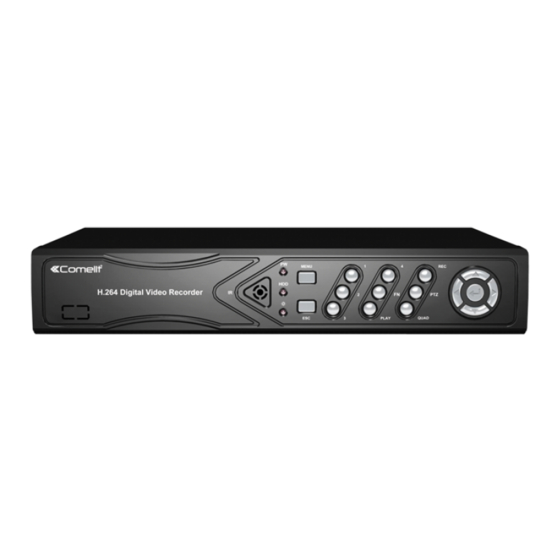
- Page 2 6. Fissare le viti della copertura superiore. 5. Fissare le viti del disco rigido. Descrizione dei pannelli Descrizione pannello anteriore art. AHDVR040B, AHDVR042B, AHDVR043A, AHDVR045A 1. PW: led di alimentazione 9. PTZ: tasto PTZ 2. 1 – 4: tasti pieno schermo CH1 – CH4 10.
- Page 3 Descrizione pannello anteriore art. AHDVR080B, AHDVR082B, AHDVR083A, AHDVR085A 1. Led HDD 8. REC: tasto registrazione manuale 2. Led di stato, riservato 9. PLAY: tasto riproduzione 3. 1 – 8: tasti pieno schermo CH1 – CH8 10. ESC: tasto Esci 4. ▲▼◄►: tasti direzionali 11.
- Page 4 1. Led HDD 8. PLAY: tasto riproduzione 2. Led di stato, riservato 9. PTZ: tasto PTZ 3. Tasti pieno schermo 10. MULTI: tasto multischermo 4. ▲▼◄►: tasti direzionali 11. ESC: tasto uscita 5. PW: led di alimentazione 12. MENU: tasto per l'accesso al menu 6.
- Page 5 Introduzione al menu principale Premere il tasto MENU o il tasto destro del mouse per visualizzare il menu principale. Il menu principale è costituito dai seguenti componenti: Suddivisione schermo: è possibile selezionare la modalità di anteprima. Menu di scelta rapida: Configurazione, Riproduzione video, Backup video, Regolazione colore, Modalità canale, Controllo PTZ, Registrazione manuale, Volume, Procedura guidata e Uscita dal sistema.
- Page 6 Generali Selezionando "Generali" è possibile passare alla relativa pagina di interfaccia comprendente i seguenti parametri. Logout automaticao: se abilitata il DVR effettua automaticamente la disconnessione in assenza di attività entro 10 minuti. Nel caso sarà necessario effettuare nuovamente l'accesso. Buzzer: Abilita: la pressione di un tasto sul telecomando o sul pannello anteriore genera un riscontro acustico; Disabilita: non viene emesso alcun suono.
- Page 7 Copia in: selezionare il canale di destinazione nell'apposito campo a destra del pulsante "Copia in" e fare clic sul tale pulsante e su ''OK". Il sistema procede quindi a copiare le impostazioni del canale corrente sul canale di destinazione. Fare clic sul pulsante "Annullare" per non salvare le impostazioni effettuate e uscire. Rete In Configurazione selezionare "Rete".
- Page 8 Manuale d'uso del servizio Esee 1. Collegare il DVR in rete, accertandosi del corretto funzionamento della rete. 2. Per la visualizzazione in remoto su computer, collegarsi al sito www.dvrskype.com oppure www.e-seenet.com N.B.: impostazione di Internet Explorer. Se al primo utilizzo il programma non può essere installato, effettuare la seguente impostazione: Opzioni Internet ...
- Page 9 NOTA: per la visione da smartphone (con OS Android o iOS) delle immagini di questa serie di DVR, utilizzare la app denominata “Comelit View S” che è liberamente scaricabile dai rispettivi store (Apple Store e Play Store) e che deve essere impiegata anche per dispositivi Tablet.
- Page 10 ENREGISTREUR VIDÉO NUMÉRIQUE HYBRIDE AUTONOME 4-8-16-32 ENTRÉES MINI GUIDE ART. AHDVR040B-AHDVR080B-AHDVR160B ART. AHDVR042B-AHDVR082B-AHDVR162B ART. AHDVR0320A ART. AHDVR043A-AHDVR083A-AHDVR163A ART. AHDVR045A-AHDVR085A-AHDVR165A Lire attentivement ce manuel avant d'utiliser et le conserver pour référence future...
- Page 11 5. Visser les vis du disque dur. 6. Visser les vis du boîtier. Description du tableau Description du tableau avant ref. AHDVR040B, AHDVR042B, AHDVR043A, AHDVR045A 1. PW: led état alimentation 9. PTZ: bouton PTZ 2. 1 – 4: bouton écran simple 10.
- Page 12 Description du tableau avant ref. AHDVR080B, AHDVR082B, AHDVR083A, AHDVR085A 1. Led état Disque Dur 8. REC: bouton enregistrement manuel 2. Led d'état, réservé 9. PLAY: bouton lecture enregistrement 3. 1 – 8: bouton écran simple 10. ESC: bouton pour quitter 4.
- Page 13 3. Boutons écran simple 10. MULTI: bouton multi-écran 4. ▲▼◄►: bouton fléché 11. ESC: bouton pour quitter 5. PW: led état alimentation 12. MENU: bouton menu 6. Récepteur IR 13. N. C. 7. REC: bouton enregistrement manuel Description du tableau arrière LAN: Port Ethernet standard 10/100 Mbit/sec.
- Page 14 écran partagé: sélectionnez le mode Aperçu. Menu raccourci: Configuration, Lecture vidéo, Sauvegarde vidéo, Réglage couleur, Mode canal, PTZ, Enregistrement manuel, Volume, Assistant et Sortie du système. Mode canal Dans le menu raccourci, sélectionnez "Mode canal". Dans ce menu, vous pouvez, en utilisant la barre de défilement et les box [1], sélectionner le mode des canaux qui seront connectés au DVR (caméras AHD, caméras analogiques, caméras TVI, caméras IP de la série Easy).
- Page 15 Général Sélectionnez « Général » et entrez dans l'interface de paramétrage. Auto déconnexion: le DVR s'éteint si aucune opération n'a lieu pendant 10 minutes. Dans ce cas, reconnectez-vous. Buzzer touche: si Activé une sonnerie retentit avec la commande ou lorsque le bouton sur le tableau avant est enfoncé;...
- Page 16 Réseau Sélectionner « Réseau » dans le menu « Configuration ». entend activé ;« □ » entend désactivé. DHCP:sélectionne DHCP pour définir automatiquement l'IP. ESee (P2P): après vous être connecté à Internet, cliquez sur Esee et mémorisez le paramètre: vous obtiendrez une ID Esee.
- Page 17 Manuel de l'utilisateur pou le service Esee Connectez le DVR au réseau après avoir vérifié que le réseau fonctionne correctement. Pour l'affichage sur un ordinateur distant, allez à www.dvrskype.com www.e-seenet.com Note: Paramètres Internet Explorer. S’'il s'agit d'une première utilization et le logiciel ne peut pas être chargé, effectuez les réglages suivants: Options Internet ...
- Page 18 NOTE: pour visualiser les images des cette série d'enregistreurs sur les smartphones (iOS ou Android OS) utiliser l'app "Comelit View S" qui peut être déchargée des store concernés (Apple Store et Play Store). La même App pour smartphones doit être utilisée aussi pour les tablets.
- Page 19 4-8-16-32 INPUTS STAND-ALONE HYBRID DIGITAL VIDEO RECORDER QUICK GUIDE ART. AHDVR040B-AHDVR080B-AHDVR160B ART. AHDVR042B-AHDVR082B-AHDVR162B ART. AHDVR0320A ART. AHDVR043A-AHDVR083A-AHDVR163A ART. AHDVR045A-AHDVR085A-AHDVR165A Please read this manual thoroughly before use and keep it for future reference...
- Page 20 HDD Installation Make sure to install the HDD when you first use it. Panels Description Art. AHDVR040B, AHDVR042B, AHDVR043A, AHDVR045A front panel description 1. POWER led 9. PTZ: PTZ key 2. 1 ~ 4: CH1 ~ CH4 Single-Screen keys 10. ESC: Exit key 3.
- Page 21 Art. AHDVR080B, AHDVR082B, AHDVR083A, AHDVR085A front panel description 1. HDD led 8. REC: Manual recording key 2. State led, reserved 9. PLAY: Playback key 3. 1 ~ 8: CH1 ~ CH8 Single-Screen key 10. ESC: Exit key 4. ▲▼◄►: Direction key 11.
- Page 22 4. ▲▼◄►: Direction key 11. ESC: Exit key 5. POWER led 12. MENU: main menu key 6. IR receiver 13. N.C. 7. REC: Manual recording key DVR rear panel LAN: 10/100 Mbit/sec. standard Ethernet port DC12V: 12 VDC power supply connector VGA: VGA video output connector HDMI video output USB: USB connectors...
- Page 23 Split screen: select the corresponding preview mode. Shortcut menu: System setup, Video playback, Video backup, Color adjust, Channel mode, PTZ control, Manual record, Volume, Setup wizard and Exit System. Channel mode In the shortcut menu, choose "Channel mode". In this menu you can, using the scroll bar and the box [1], select the mode of the channels that will be connected to the DVR (AHD cameras, 960H analog cameras, TVI cameras, IP cameras Easy series).
- Page 24 General setup Choose the "General setup" and turn into it's setup interface. Auto Logout: DVR will log off if there is no operation within 10 minutes, it needs login again. Key Buzzer: Enable: there is sound with the controller or pressing key on front panel; Disable: without sound. Language:There is multiple choice according to users Standard:PAL and NTSC are available.
- Page 25 Network setup Select “network setup” from “system setup” menu. DHCP:select DHCP to get IP automatically. “☑”means works ;“□” means non-work. ESee (P2P): after connecting internet , click“☑ Esee (P2P)” and save the setting, user will get an Esee ID. You can remote DVR with this ID by www.dvrskype.com.
- Page 26 Esee User Manual 1. Connect DVR with network, make sure network working fine 2. For remote view in computer, go to www.dvrskype.com www.e-seenet.com Do the following setup before you log in Esee on computer Note: Internet Explorer setting. If use it for the first time and the software can't load, then need to make the following setting: Internet options ...
- Page 27 NOTE: to view images of this series of DVRs from smartphones (iOS or Android OS) please use the app "Comelit View S" which is freely downloadable from the relative stores (Apple Store and Play Store). The same app for smartphones has to be used for tablet devices.
- Page 28 VIDEOGRABADOR DIGITAL HÍBRIDO INDEPENDIENTE, 4-8-16-32 ENTRADAS GUÍA RÁPIDA ART. AHDVR040B-AHDVR080B-AHDVR160B ART. AHDVR042B-AHDVR082B-AHDVR162B ART. AHDVR0320A ART. AHDVR043A-AHDVR083A-AHDVR163A ART. AHDVR045A-AHDVR085A-AHDVR165A Lea este manual antes uso y consérvelo para consultarlo en el futuro...
- Page 29 5. Fije los tornillos del disco duro. 6. Fije los tornillos de la cubierta superior. Descripción del panel Descripción del panel frontal DVR art. AHDVR040B, AHDVR042B, AHDVR043A, AHDVR045A 1. PW: led de estado de alimentación 9. PTZ: tecla de PTZ 2.
- Page 30 Descripción del panel frontal DVR art. AHDVR080B, AHDVR082B, AHDVR083A, AHDVR085A 1. Led de estado de la HDD 8. REC: tecla de grabación manual 2. Led de estado, reservado 9. PLAY: tecla de reproducción 3. 1 – 8: tecla de pantalla única 10.
- Page 31 1. Led de estado de la HDD 8. PLAY: tecla de reproducción 2. Led de estado, reservado 9. PTZ: tecla PTZ 3. Teclas de pantalla única 10. MULTI: tecla de pantalla multiple 4. ▲▼◄►: tecla de dirección 11. ESC: tecla de salida 5.
- Page 32 Introducción al menú principal Pulse la tecla MENU o el botón derecho del ratón; aparecerá el menú principal. El menú principal consta de los siguientes componentes: Pantalla dividida: seleccione el modo de vista previa. Menú de acceso directo: Config. del Sistema, Reproducción de vídeo, Copia de video, Ajustar color, Modo canal, Control PTZ, Grabación manual, Volumen, Asistente, Salir.
- Page 33 General Elija "General" y acceda a su interfaz de configuración. Cierre sesión auto: la videograbadora se desactivará si no se realiza ninguna operación en 10 minutos y será necesario volver a iniciar sesión. Zumbador: Activar: se oirá un sonido con el controlador o al pulsar una tecla en el panel frontal; Desactivar: sin sonido.
- Page 34 Seleccione "Red" en el menú "Configuración del sistema". significa que funciona;"□" significa DHCP: seleccione DHCP para obtener una IP automáticamente. que no funciona ESee (P2P): tras conectarse a Internet, haga clic en Esee (P2P)" y guarde la configuración; el usuario obtendrá...
- Page 35 Manual de usuario de Esee Conecte la videograbadora a la red y compruebe que la red funciona bien. Para la vista remota en un ordenador, vaya a www.dvrskype.com www.e-seenet.com Realice la siguiente configuración antes de iniciar sesión en Esee en un ordenador. Nota: configuración de Internet Explorer.
- Page 36 NOTA: para visualizar imágenes de esta serie de DVR desde smartphones (iOS o Android OS), utilizar la aplicación "Comelit View S" que se puede descargar libremente desde los store relacionados (Apple Store y Play Store). La misma aplicación para smartphones tiene que ser utilizada también para...
- Page 37 SNELGIDS VOOR HYBRID STANDALONE DIGITALE VIDEORECORDER 4-8-16-32 INGANGEN ART. AHDVR040B-AHDVR080B-AHDVR160B ART. AHDVR042B-AHDVR082B-AHDVR162B ART. AHDVR0320A ART. AHDVR043A-AHDVR083A-AHDVR163A ART. AHDVR045A-AHDVR085A-AHDVR165A Lees deze handleiding vóór gebruik zorgvuldig door en bewaar hem voor toekomstig gebruik...
- Page 38 6. Bevestig de bovenste afdekking met de bijbehorende schroeven. bijbehorende schroeven. Beschrijving van de panelen Voorpaneel DVR art. AHDVR040B, AHDVR042B, AHDVR043A, AHDVR045A 1. Led voeding 9. PTZ: PTZ-toets 2. 1 t/m 4: toetsen CH1 t/m CH4 enkelvoudig scherm 10. ESC: toets voor afsluiten 3.
- Page 39 Voorpaneel DVR art. AHDVR080B, AHDVR082B, AHDVR083A, AHDVR085A 1. Led harde schijf 8. REC: toets voor handmatig opnemen 2. Statusled, gereserveerd 9. PLAY: afspeeltoets 3. 1 t/m 8: toetsen CH1 t/m CH8 enkelvoudig scherm 10. ESC: toets voor afsluiten 4. ▲▼◄►: Pijltoetsen 11.
- Page 40 2. Statusled, gereserveerd 9. PTZ: toets voor PTZ 3. Toetsen enkelvoudig scherm 10. MULTI: toets voor multi-screen 4. ▲▼◄►: Pijltoetsen 11. ESC: toets voor afsluiten 5. Led voiding 12. MENU: menutoets 6. IR-ontvanger 13. Accessoire niet aanwezig 7. REC: toets voor handmatig opnemen Achterpaneel DVR LAN: 10/100 Mbit/sec.
- Page 41 Split-screen: selecteer de corresponderende voorbeeldmodus. Snelmenu: Configuratie, Video afspelen, Back-up van video, Kleur instellen, Kanalmodus, PTZ, Opname, Volume, Setup-Assistenten en Afmelden van het systeem. Kanalmodus Selecteer in het snelmenu Kanalmodus. Dit menu kunt u, met behulp van de schuifbalk scrollbalk en box [1], selecteert u de modus van de kanalen die zullen worden aangesloten op de DVR (AHD camera's, 960H analoge camera's, TVI camera's, IP-camera's serie Easy).
- Page 42 Algemene Selecteer Algemene en open de bijbehorende interface. Automatisch afmelden: de DVR wordt afgemeld als er binnen 10 minuten geen activiteit is. In dat geval moet de DVR weer worden aangemeld. Zoemer sleutel: Inschakelen: er klinkt een geluid bij gebruik van de afstandsbediening of indien er op een toets op het frontpaneel wordt gedrukt;...
- Page 43 Netwerk Selecteer Netwerk in het menu Configuratie. DHCP: selecteer DHCP om automatisch het IP-adres op te halen. ☑ betekent dat het correct functioneert; □ betekent dat het niet functioneert. ESee (P2P): nadat de internetverbinding tot stand is gebracht, klikt u op '☑ Esee (P2P' en slaat u de instelling op.
- Page 44 Gebruikershandleiding Esee 1 . Sluit de DVR aan op het netwerk en zorg ervoor dat het netwerk correct werkt 2 . Voor weergave op afstand op uw computer gaat u naar www.dvrskype.com www.e-seenet.com Opmerking: Internet Explorer instellen: als u de DVR voor het eerst met Internet Explorer gebruikt, kan de software niet worden geladen.
- Page 45 Opmerking: voor de visie van deze reeks DVR van smartphones (iOS of Android OS) dient u de app "Comelit View S" te gebruiken. Deze kunt u gratis downloaden in de Apple Store of Play Store. De app voor smartphones wordt ook gebruikt voor tablets.
- Page 46 1 – check the firmware version of the device. If necessary, update the firmware 2 – verify that on the device, nearby label showing the model, is present the label with the univocal code for service registration. In case it was not present, contact Comelit Technical support 3 –...
- Page 47 80) COMELIT DNS SERVICE Voor deze reeks DVR’s is een eigen Comelit dynamische DNS Service beschikbaar. Voor het gebruik van de dienst volgt u deze stappen: 1 – verifieer de firmware versie van het toestel. Indien nodig, de firmware bijwerken 2 –...
Need help?
Do you have a question about the AHDVR040B and is the answer not in the manual?
Questions and answers