
Related Manuals for Benchmark Scientific Bioclave


Summary of Contents for Benchmark Scientific Bioclave
- Page 1 Operations Manual For Research Use Only PH: 908-769-5555 EM: info@BenchmarkScientific.com WEB: www.BenchmarkScientific.com...
-
Page 2: Table Of Contents
Thank you for choosing the BioClave Benchtop Sterilizer. TABLE OF CONTENTS Prior to operating this instrument, please read the operations manual carefully and follow all installation instructions. 1.GENERAL ------------------------------------------------------- 2.TECHNICAL SPECIFICATIONS --------------------------------- 2 3.PACKING CONTENT ------------------------------------------ 4.INSTALLATION ----------------------------------------------- 5.OPERATION ----------------------------------------------------- 5.1 SETUP --------------------------------------------------------... -
Page 3: General
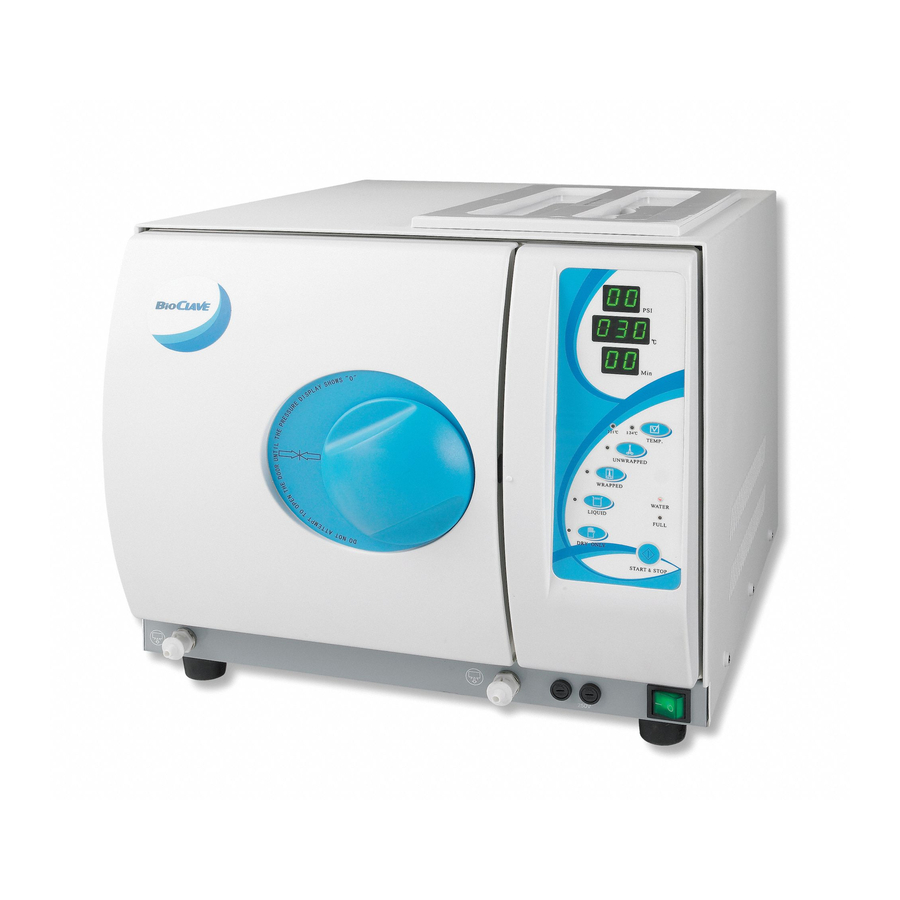
1 General 2 Technical Specifications The sterilizer described in this manual is intended for the sterilization of research tools. It operates automatically with 134°C and 121°C sterilization temperatures. This sterilizer is in compliance with the Item European Directive 93/42/CEE and it has been produced in accordance Chamber Φ230mmX360mm with the EN 13060. -
Page 4: Packing Content
4 Installation 3 Packing Content Ensure that the sterilizer is installed with 2.5in. (10cm) Item Quantity ventilation space on all sides of the sterilizer, and 5 in. (20cm) Steam sterilizer on top side. The clearance required to open the door is 15.5in. (40cm). -
Page 5: Operation
5.1.4 Filling the distilled water 5 Operation Remove the cover, and fill the tank with distilled water. 5.1 Setup When you hear a beep signal, it means the water level exceeds the 5.1.1 Open the door and remove all of the inner contents for unpacking. max. -
Page 6: Selecting The Sterilization Program
5.3 Selecting the sterilization program 5.4 Running the sterilization program. 5.3.1 LCD After selecting program, the materials The panel displays the cycle temperature, pressure, error code, to be sterilized can now be placed on the sterilization state and program. tray and the tray placed inside the 5.3.2 Temperature button chamber using the tray handle... - Page 7 5.4.2 Start the sterilization program. Always use the tray handle to load or unload the tray into the Press START button, the machine will begin the cycle automatically. autoclave. Failure to do so can result in burning. It will take 30-75 minutes. (See Appendix 2) If you need to interrupt a cycle and remove materials urgently.
-
Page 8: Advanced Settings
6 Advanced Setting 6.4 S3 state 6.1 Enter the setting 6.4.1 Adjust the length of sterilization and drying time. 6.1.1 Power on the machine while Holding the Press program button to select the program.( START button and hold for 5seconds. Thiw Press temperature button to select the temperature of program. - Page 9 ========================= ========================= 6.6 USB Flash memory (Optional) Program: WRAPPED Program: WRAPPED A USB drive can be used as a method of storing a report of the Temperature: 274 F Temperature: 274 F Pressure:30.5 psi Pressure:30.5 psi cycle. To do so, insert the USB drive to the slot on the right side of Dry Time: 03Min Dry Time: 03Min the instrument.
-
Page 10: Maintenance
7.4 Clean the door seal 7 Maintenance 7. Maintenance Clean the door seal weekly, with a smooth cloth saturated with the distilled water. Frequency Maintenance Operation Clean the door seal Daily Clean the external surface Clean the distilled water tank Weekly Clean the sterilization chamber Replace the door seal... - Page 11 7.6 Replacement of the door seal 7.7 The drain valve 7.6.1 Open the chamber door. 7.6.2 Remove the door seal ring carefully by hand. 7.6.3 Clean the door seal ring carefully with a smooth cloth saturated with distilled water. 7.6.4 Moisten the new seal with medical disinfectant or 2.Set the drain valve to the open isopropyl alcohol.
-
Page 12: Error Codes
9 Error codes 10 Safety devices (1)Main fuses Protect the instrument against possible failures of the Code Description Proposed solution heating resistor . Steam generator temperature Power off & run a new cycle Action: Interruption of the electric power supply. sensor error Contact your Supplier if error persists Power off &... -
Page 13: Appendix 1
APPENDIX 2 APPENDIX 1 Water Properties/Characteristics DIAGRAMS OF THE STERILIZATION PROGRAMS FEED WATER CONDENSATE DESCRIPTION PROGRAM TYPE 。 ≥10 mg/l ≥1.0 mg/kg Evaporate residue 30.5 14 30 ≥0.1 mg/kg Silicium oxide sio UNWRAPPED Unwrapped solid ≥1 mg/l 4 00 1 20 material 16.0 30 45... - Page 14 Pressure(bar) Pressure(bar) DRYING UNWRAPPED Time(min) Time(min) Pressure(bar) Pressure(bar) LIQUID WRAPPED DRYING EXTENSIVE Time(min) Time(min) - . 0 8 Instructions manual Instructions manual...
-
Page 15: Wiring Diagram
APPENDIX 3 APPENDIX 4 WIRING DIAGRAM HYDRAULIC DRAWING USB DATA OUTPUT THERMAL PROTECTOR CHAMBER Safety valve HEATER STEAM Pressure HEATER sensor THERMAL PROTECTOR WATER PUMP VACUUM PUMP ~ 230V(120V) Pump PRINTER OUTPUT ~ 9V(2.5A) ~ 0V Chamber Condenser ~ 9V(0.2A) TANK MIN.
Need help?
Do you have a question about the Bioclave and is the answer not in the manual?
Questions and answers