
Related Manuals for Benchmark Scientific TC9639


Summary of Contents for Benchmark Scientific TC9639
- Page 1 TC9639 Thermal Cycler User Manual Document Version 5.2 Benchmark Scientific, Inc, PO Box 709 Edison, NJ 08818 Phone 908 769-5555 - Fax 732 313-7007 Email info@BenchmarkScientific.com www.BenchmarkScientific.com...
-
Page 2: Table Of Contents
Contents Introduction ............Instrument Overview 1. - Page 3 Perform Run 1. Load Samples ............2.
-
Page 4: Introduction
Introduction This manual provides instructions on the set up and use of the Benchmark TC9639 Thermal Cycler. Benchmark reserves the right to modify this manual at any time without prior notice. This manual uses the following conventions: • Bold text indicates user operation. -
Page 5: Instrument Overview
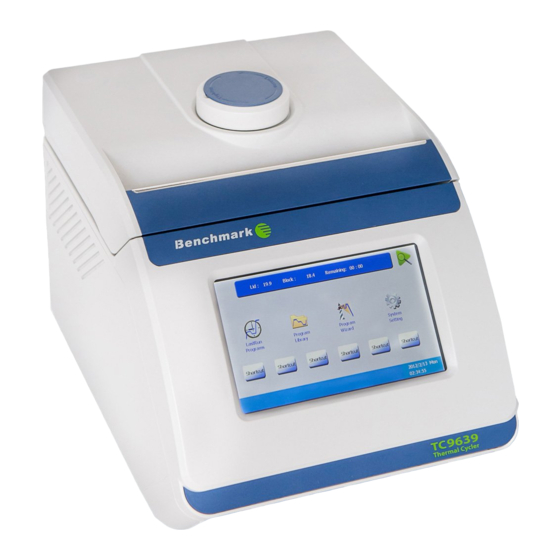
[Chapter 1] Instrument Overview 1. Instrument Components Lid Knob Lid Handle Touchscreen USB –A Port Air Vent Figure 1 Front View of the Thermal Cycler Air Vent Power Switch USB - B Port Power Inlet Ethernet Port Figure 2 Rear View of the Thermal Cycler Table 1 Function of the Thermal Cycler Components Component Function... -
Page 6: Touchscreen Buttons
2. Touch screen Buttons Table 2 and Figure 3 describe the buttons and virtual keyboard common to many of the screens. IMPORTANT! Do not use sharp object (e. g., a pencil) on the touch screen as they may scratch the surface. Table 2 Functions of various buttons Button Function... -
Page 7: Getting Started
[Chapter 2] Getting Started 1. Install the Thermal Cycler 1.1 Site Requirements The Thermal Cycler is intended for indoor use. Ensure that the installation site meets conditions below. Power supply The Thermal Cycler requires 85-265V, 50-60Hz and grounded outlet. The power cord supplied is rated to carry 10A at 125V or 250V. -
Page 8: Open And Close Lid
IMPORTANT! Temperature of the lid can be very high (105°C). Never touch the inner surface of the lid when the temperature is above 50°C. To open the lid: 1. Turn the lid knob counterclockwise (see the ‘Loosen’ arrow symbol on the top surface of the lid knob) to raise the pressure plate. -
Page 9: Manage Folders And Programs
The bottom of the Home Screen shows the user, time and date. Buttons on Home Screen Button Function New Program Creates new programs. All Program Open and view all saved programs. Tools Sets instrument parameters and shows other tools. Running/Pause/Idle Opens Run Status screen. -
Page 10: Manage Folders And Programs
Buttons on All Button Function Program Screen Back Return to the Home screen. Folders Create a new folder, rename or delete a selected folder. Files Copy a program file, rename or delete a selected program file. Edit Edit a selected program. Run a selected program. -
Page 11: Copy Folder
2.4 Copy Folder To copy all programs in Folder A to Folder B: 1. In the All Program screen, select the Folder A to be copied. 2. Touch Folders>Copy to open the Copy Folder keyboard. 3. In the Copy Program keyboard, enter the target Folder’s name “B”, and then touch Ok to copy all program to Folder B. -
Page 12: Create And Edit Program
[Chapter 4] Create and Edit Program 1. Create New Program 1.1 Program Edit Screen 1. In the Home screen, touch New Program to open the Edit Program screen. Items in the Edit Program screen: a: Login user name/Program name b: Sample volume c: Lid temperature d: Step number e: Target temperature for a constant temperature step or gradient temperature step... -
Page 13: Changing Temperature And Hold Time In A Constant Temperature Step
3. Touch Constant to add a constant temperature step. Touch Gradient to add a gradient temperature step. Touch Goto to add a “go to" step. 1.3 Changing Temperature and Hold Time in a Constant Temperature Step 1. In the Edit Program screen, touch the temperature or hold time box of a step. 2. -
Page 14: Changing Temperature And Hold Time In A Gradient Temperature Step
Note: The allowable temperature range is from 4°C to 100°C, in 0.1°C intervals. The allowable hold time range is from 0:00:00 to 9:99:99 hour: min: sec. Touching ∞(Forever) in the keyboard will cause the program to hold indefinitely after reaching this step until it stopped manually. 1.4 Changing Temperature and Hold Time in a Gradient Step (Applicable to gradient versions only) To change temperature value:... -
Page 15: Dtime, Dtemp, Ramp Rate And Pause
1.5 dTime, dTemp, Ramp Rate and Pause To add dTime, dTemp, Ramp Rate and Pause to a temperature step: 1. In the Edit Program screen, select a step. Touch Options to open the Step Options window. 2. To edit an item, click on the appropriate text box. 3. -
Page 16: Switching Between Constant Temperature And Gradient Temperature
• If you touch Pause, the program will automatically pause as soon as the desired step temperature is reached and the instrument will beep twice. Touch Resume to continue with the program. Pause can be used to add reagents (i.e. hot start) or when adding or removing tubes during a step. -
Page 17: Set Cycle
1.7 Set Cycle 1. In the Edit Program screen, select a goto step. 2. Touch Step box, select the start step number of the cycle in the pop-up box and touch Ok. The steps between the last step and the start step will run repeatedly for the specified cycle numbers. -
Page 18: Delete Step
accurate dwell time. For lid temperature control, it is recommend to select a temperature five to ten degrees above the highest temperature of the program steps (e. g., the pre-denaturation step) to protect sample from evaporation and condensation. Note: Setting a lid temperature below ambient will prevent a program from starting. 1.9 Delete Step 1. -
Page 19: Perform Run
[Chapter 5] Perform Run 1. Load Samples 1. Place PCR tubes or a microplate in the wells of the sample block. IMPORTANT! Do not touch the surface of the sample block or lid surface as they may be very hot (105°C for lid)! Note: •... -
Page 20: View Run State And Control Run
3. View Run State and Control Run 3.1 View Run State You can view the status of run using the Run Status screen below. The items displayed on the Run Status screen: a: Status: the current status - Lid heat, Run, Pause, Idle Program: the program name Remaining: the estimated remaining time Sample: the sample temperature... -
Page 21: View Temperature Record Curve
Step Time: the countdown holding time of the current step after the step temperature reached the setting value. 2. Touch Status to return to the Run Status screen. View Curve 1. In the Run Status screen, touch Curve to view the temperature record graph. 2. -
Page 22: About
Tools Screen Button Function Buttons About View product information about the Thermal Cycler. Run Record View stored run records. Run Set Configure parameters for run. System Set Set instrument system parameters. User PIN (visible when When a user other than “Admin” logs in, the Admin Options non-admin logs in) icon will change to Login Password’s icon. -
Page 23: Run Set
2. Select a record and double click it or touch View to open the View Record screen. 3. When finished, touch to return to the Run Record screen. 4. In the Run Record screen, touch Clear to clear all records, touch Delete to delete a selected record or touch the USB icon to export a selected record to a USB flash drive. -
Page 24: System Set
primer dimers. • Enter a ‘Lid temp. when running’ to pre-heat lid to a desired temperature before running a program. We recommend you select a temperature five to ten Celsius above the highest temperature of the program steps (e. g., the denaturation step) to protect samples from evaporation and condensation. -
Page 25: Service
2. Enter the salt concentration and the primer concentration. 3. Enter each primer sequence and then touch Calculate to view the Tm value of each primer, the average Tm value and the Ta value. 4. After you finish, touch to return to the Tools screen. 7. -
Page 26: Reset System
• Admin: can control all functions in the Admin Menu screen. The default password for Admin is ADMIN. • Normal user account: can create, rename and delete non system folders; can create, rename, copy, modify, save, delete and run programs; can modify his or her login password (in the Tools>Login PIN screen after login). -
Page 27: Configure Network Connection
8.4 Configure To control the Thermal Cycler via network, first the network must be Network configured. You can view IP address (wired connection) and set Wi-Fi Connection (wireless connection) in the Network screen. 8.4.1 To view IP address: 1. In the Network screen, touch IP Set. 2. -
Page 29: [Appendix I] Troubleshooting
[APPENDIX I] Troubleshooting Problem Cause Possible Remedies No line voltage Move to a location where there is power No display and no fan sound when power on Power cord damaged Check power cord and plug, replace if needed Unstable bench Move to a stable bench Abnormal vibrating noise Uneven bench...
Need help?
Do you have a question about the TC9639 and is the answer not in the manual?
Questions and answers