Table of Contents
Advertisement
Quick Links
Version: V1.00.001
Revised date: 03-18-2019
Statement: LAUNCH owns the complete intellectual property rights for the
software used by this product. For any reverse engineering or cracking actions
against the software, LAUNCH will block the use of this product and reserve the
right to pursue their legal liabilities.
Advertisement
Table of Contents

Related Manuals for Launch X-431 V+


Summary of Contents for Launch X-431 V+
- Page 1 Statement: LAUNCH owns the complete intellectual property rights for the software used by this product. For any reverse engineering or cracking actions against the software, LAUNCH will block the use of this product and reserve the right to pursue their legal liabilities.
- Page 2 LAUNCH is not responsible for any use of this information as applied to other units. Neither LAUNCH nor its affiliates shall be liable to the purchaser of this unit or third parties for damages, losses, costs, or expenses incurred by purchaser or...
- Page 3 LAUNCH X-431 V+ User Manual — Safety Precautions Important Safety Precautions Important: To avoid personal injury, property damage, or accidental damage to the product, read all of the information in this section before using the product. Never collide, throw, or puncture X-431 V+, and avoid falling, extruding and bending it.
- Page 4 LAUNCH X-431 V+ User Manual — Safety Precautions various poisonous compounds (hydrocarbon, carbon monoxide, nitrogen oxides, etc.) Do not connect or disconnect any test equipment while the ignition is on or the engine is running. Put blocks in front of the drive wheels and never leave the vehicle unattended while testing.
-
Page 5: Table Of Contents
LAUNCH X-431 V+ User Manual — Table of Contents TABLE OF CONTENTS 1 INTRODUCTION .................... 1 1.1 P ..................1 RODUCT ROFILE 1.2 F ....................3 EATURES 1.3 K X-431 V+ ................ 4 NOWLEDGE OF 1.3.1 X-431 V+ tablet ................4 1.3.2 VCI connector (Only for Passenger Vehicle Version) ....... - Page 6 LAUNCH X-431 V+ User Manual — Table of Contents 4.1 D ................19 IAGNOSIS LOWCHART 4.2 U & D EGISTRATION ONNECTOR CTIVATION IAGNOSTIC OFTWARE ....................19 OWNLOAD 4.2.1 User registration ................19 4.2.2 Diagnostic software layout ............. 22 4.2.3 Function menu ................23 4.3 C...
- Page 7 ETTINGS 4.9.1 Units of measurement ..............45 4.9.2 Orientation ..................45 4.9.3 Print information ................45 4.9.4 Launch wireless printer connection ..........45 4.9.5 Diagnostic feedback ............... 48 4.9.6 Network test ................... 48 4.9.7 About ....................48 5 OTHERS ....................... 49 5.1 E...
-
Page 8: Introduction
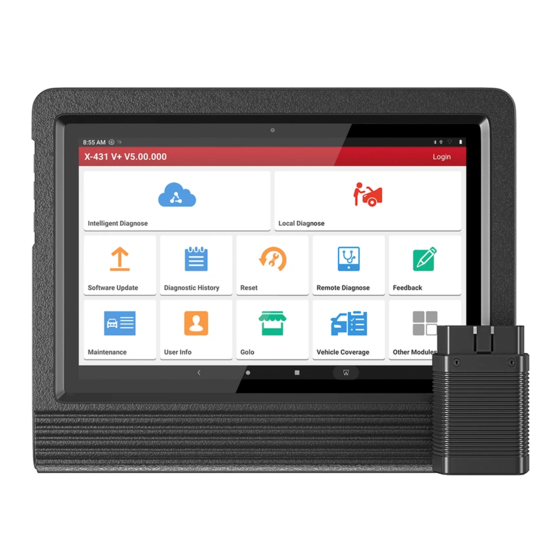
LAUNCH X-431 V+ User Manual — General Operations 1 Introduction 1.1 Product Profile X-431 V+ is a new Android-based vehicle trouble diagnostic tool. It is characterized by featuring powerful functions, and providing precise test result. Through simple wireless communication between VCI and X-431 V+ tablet, it... - Page 9 LAUNCH X-431 V+ User Manual — General Operations Commercial Vehicle version X-431 V+ is compatible with the following two Heavy-duty VCI modules. For different VCI modules, the communication methods vary. Below shows how the X-431 V+ system works. A. HD-II module: B.
-
Page 10: Features
X-431 V+ User Manual — General Operations LAUNCH 1.2 Features 1. Diagnose: Diagnose the electronic control system of prevailing vehicle models covering Asian, European, American and Chinese. Diagnosis functions include: Read DTCs, Clear DTCs, Read Data Stream, Special Functions etc. -
Page 11: Knowledge Of X-431 V
LAUNCH X-431 V+ User Manual — General Operations revenue: Electronic throttle position reset/learn and gear learning etc. 2. Repair Data: Provides a mass of service information for various vehicle models, which enables users to retrieve service data of some vehicle online. - Page 12 X-431 V+ User Manual — General Operations LAUNCH In Off mode, press it for 3 seconds to turn the tablet on. In On mode: Press it to activate the LCD if the LCD is off. POWER Key Press it to turn off the LCD if the LCD lights up.
-
Page 13: Vci Connector (Only For Passenger Vehicle Version)
X-431 V+ User Manual — General Operations LAUNCH 1.3.2 VCI connector (Only for Passenger Vehicle Version) The VCI connector works as a vehicle communication interface device, which is used to connect to the vehicle’s DLC (Data Link Connector) socket directly or via OBD II extension cable to read the vehicle data and then send it to the X-431 V+ tablet via wireless BT communication. -
Page 14: Vci Module (Only For Commercial Vehicle Version)
LAUNCH X-431 V+ User Manual — General Operations This port is temporarily disabled and reserved for Data I/O port subsequent function extension. 1.3.2 VCI module (Only for Commercial Vehicle Version) A. HD-II Module As the 2 generation of heavy-duty module, it mainly functions as a VCI device for accessing vehicle data. - Page 15 X-431 V+ User Manual — General Operations LAUNCH Communication LED of PC Data I/O LED Data I/O port Communication Port of PC Diagnostic Socket: To connect the included diagnostic cable. DC-IN power jack: To connect the power adaptor.
-
Page 16: Technical Parameters
X-431 V+ User Manual — General Operations LAUNCH DC-IN power jack: For connecting the power adaptor. Diagnostic socket: For connecting the diagnostic cable. LED indicators: It is defined as follows: Vehicle: While communicating with the vehicle, the indicator lights up and flashes. -
Page 17: Vci Connector (Only For Passenger Vehicle Version)
X-431 V+ User Manual — General Operations LAUNCH WLAN (802.11b/g/n) Connectivity BT 4.0 ℃ Working temperature 45℃ ℃ Storage temperature 70℃ 1.4.2 VCI connector (Only for Passenger Vehicle Version) Working voltage DC 9 ~18V Average working current About 128mA... -
Page 18: Package List (For Passenger Vehicle Version)
LAUNCH X-431 V+ User Manual — General Operations Communication Via wireless BT/WLAN or data cable Working temperature -10 to 55℃ HLK-RM08K Frequency range: 2412-2472MHz WIFI module Transmit power: 19.29dBm YG-218M-A2 Frequency range: 2402-2480MHz Wireless BT module Transmit power: 16.62dBm 1.5 Package List (For Passenger Vehicle Version) -
Page 19: Package List (For Commercial Vehicle Version)
LAUNCH X-431 V+ User Manual — General Operations Battery clamps To supply power to the non-16pin cable connector from the vehicle’s battery. For connecting the VCI connector and OBD I adaptor box (Optional) non-16pin adaptor cable. Non-16pin adaptor To connect to the vehicle equipped... - Page 20 X-431 V+ User Manual — General Operations LAUNCH Power adaptor For charging the tablet via AC outlet. To supply power to the non-16pin Cigarette lighter connector from the vehicle’s cigarette cable lighter receptacle. Battery clamps To supply power to the non-16pin cable connector from the vehicle’s battery.
- Page 21 LAUNCH X-431 V+ User Manual — General Operations Battery clamps To supply power to the non-16pin cable connector from the vehicle’s battery. Non-16pin adaptor To connect to the vehicle equipped (Optional) cable kit with non-OBD II management system.
-
Page 22: Preparations
X-431 V+ User Manual — General Operations LAUNCH 2 Preparations 2.1 Charging X-431 V+ There are two charging methods available: Via Power adaptor: 1. Insert one end of the included charging cable into the power adaptor. 2. Connect the other end into the charging port of the tablet. -
Page 23: Power On/Off
To perform a forced shutdown, press [POWER] for more than 8 seconds until the screen goes dark. 2.4 Tips on finger operations Single-tap: To select a item or launch a program. Double-tap: To zoom in so that the text on a webpage appears in a column that fits your device’s screen. -
Page 24: Adjust Brightness
LAUNCH X-431 V+ User Manual — General Operations Tap and hold any blank area on the home screen, a function menu will pop up at the bottom of the screen. It mainly includes wallpapers, lock screen wallpapers, widgets, settings and apps. -
Page 25: Network Setup
X-431 V+ User Manual — General Operations LAUNCH 3 Network Setup Note: Once WLAN is set as ON, the tablet will consume more power. While WLAN keeps unused, please turn it off to conserve battery power. The tablet has a built-in WLAN module that can be used to get online. Once you’re online, you can register your diagnostic App, activate VCI device, update... -
Page 26: How To Diagnose
Fig. 4-1 4.2 User Registration, Connector Activation & Diagnostic Software Download 4.2.1 User registration Tap the X-431 V+ icon on the home screen to launch the application, and then tap “Login” to enter the login interface of diagnosis software. - Page 27 X-431 V+ User Manual — Vehicle Diagnosis LAUNCH Fig. 4-2 1. If you are a new user, tap “New Registration” to enter registration page. See Fig. 4-3. Fig. 4-3 In Fig. 4-3, fill in the information in each field (Items with * must be filled). After inputting, tap “Register”, a screen similar to the following will appear:...
- Page 28 LAUNCH X-431 V+ User Manual — Vehicle Diagnosis Product SN Product SN Activation code Fig. 4-5 Note: To exit and activate it later, tap “Skip”. In this case, you can activate your connector by tapping “Activate Connector” in “Profile”. For details, please refer to Chapter 4.8.3 Activate Connector.
-
Page 29: Diagnostic Software Layout
LAUNCH X-431 V+ User Manual — Vehicle Diagnosis Fig. 4-7 In Fig. 4-7, tap “Update” to start downloading. To pause downloading, tap “Stop”. To resume it, tap “Continue”. Once download is complete, the system will install the software package automatically. -
Page 30: Function Menu
X-431 V+ User Manual — Vehicle Diagnosis LAUNCH Login button/User image: Tap it to login or register the diagnostic system. Once users have logged in successfully, it will change to your username or photo. 4.2.3 Function menu to unfold function menu, it mainly includes the following items:... -
Page 31: Vehicle Connection (For Passenger Vehicle Version)
LAUNCH X-431 V+ User Manual — Vehicle Diagnosis vehicle’s on-board computer. The DLC is usually located 12 inches from the center of the instrument panel (dash), under or around the driver’s side for most vehicles. If Data Link Connector is not located under dashboard, a label should be there telling location. - Page 32 X-431 V+ User Manual — Vehicle Diagnosis LAUNCH A. Power adaptor: Connect one end of the included power adaptor to DC IN port of X-431 V+ tablet, and the other end to AC outlet. B. Internal battery pack For non-OBDII vehicle, proceed as follows: 1.
-
Page 33: Vehicle Connection (For Commercial Vehicle Version)
X-431 V+ User Manual — Vehicle Diagnosis LAUNCH 4.3.3 Vehicle connection (For Commercial Vehicle Version) The method used to connect the VCI module to a vehicle’s DLC depends on the vehicle’s configuration as follows: 1. OBD II Vehicle Connection: Plug one end of the diagnostic cable into the vehicle’s DLC, and the other end into the diagnostic socket of the VCI module,... -
Page 34: Communication Setup (For Passenger Vehicle Version )
LAUNCH X-431 V+ User Manual — Vehicle Diagnosis Fig. 4-15 *Notes: a). For commercial vehicles, refer to the above connection method to proceed. b). For passenger vehicles, replace the “Non-16pin connector” with “OBD I adaptor” + “non-16pin connector (for passenger vehicles)”. Other connections shall also apply. -
Page 35: Communication Setup (For Commercial Vehicle Version)
4.4.2 WLAN communication Refer to Chapter 4.3.4 Vehicle Connection to connect the tablet and VCI module. 1. Tap X-431 V+ icon on the home screen to launch it and login the system. After logging successfully, tap -> “Profile” -> “Diagnostic connector... - Page 36 X-431 V+ User Manual — Vehicle Diagnosis LAUNCH Fig. 4-18 2. Check the box “Use WIFI communication mode”, the system will search for VCI module automatically. See Fig. 4-19 & Fig. 4-20. Fig. 4-19 Fig. 4-20 3. Tap the desired VCI module and a pairing request similar to Fig. 4-21 will...
- Page 37 X-431 V+ User Manual — Vehicle Diagnosis LAUNCH Fig. 4-21 4. Tap “PAIR” to start pairing. Once the pairing is successfully done, the screen displays: Fig. 4-22 5. There are two communication modes available for the VCI module. Work as WIFI hotspot: Once enabled, the VCI module and the tablet automatically connect and form a LAN network to make communication.
- Page 38 X-431 V+ User Manual — Vehicle Diagnosis LAUNCH Fig. 4-23 Input the network name and access password (if the network is encrypted) until it is properly connected. In this case, the tablet can surf the Internet and communicate with the VCI module.
-
Page 39: Start Diagnostics
X-431 V+ User Manual — Vehicle Diagnosis LAUNCH 4.5 Start Diagnostics -> “Diagnostic” to enter the vehicle selection page. 2 approaches are provided for you to access the vehicle diagnostic software. Choose any one of the following ways: 1. VINSCAN enables you to access it more quickly. - Page 40 X-431 V+ User Manual — Vehicle Diagnosis LAUNCH Fig. 4-25 Input the VIN, and tap “Confirm” to enter the diagnostic software of the vehicle. 2. Tap a corresponding diagnostic software logo, and then follow the on-screen instruction to access the diagnostic software.
-
Page 41: Read Dtc
X-431 V+ User Manual — Vehicle Diagnosis LAUNCH 3). Tap “Engine”, the system will jump to the function menu. Fig. 4-28 4.5.1 Read DTC This function displays the detailed information of DTC records retrieved from the vehicle’s control system. Tap “Read DTC” in function menu, the screen will display the diagnostic result. -
Page 42: Clear Fault Memory
X-431 V+ User Manual — Vehicle Diagnosis LAUNCH must be followed to confirm the location of the problem. This information can be found in the vehicle’s service manual. On-screen Buttons: New Session: Tap it to return to the home screen. - Page 43 New Session: Tap it to return to the home screen. Print: Tap it to print the current screen. To perform printing, you need to purchase a Wi-Fi printer manufactured by LAUNCH separately. Confirm: Tap it to confirm and jump to the next step.
- Page 44 X-431 V+ User Manual — Vehicle Diagnosis LAUNCH Fig. 4-31 On-screen Buttons: New Session: Tap to return to the home screen. Graph: After selecting, tap it to view the waveform. There are 3 types of display modes available for data viewing, allowing you to view various types of parameters in the most suitable way.
-
Page 45: Special Function
X-431 V+ User Manual — Vehicle Diagnosis LAUNCH Combine – this option is mostly used in graph merge status for data comparison. In this case, different items are marked in different colors. See Fig. 4-33. Fig. 4-33 Record: Tap to start recording diagnostic data for future playback and analysis. -
Page 46: How To View History
X-431 V+ User Manual — Vehicle Diagnosis LAUNCH 4.5.5 How to view History? Generally once a vehicle diagnosis is performed, X-431 V+ will record the every details of diagnostic process. The History function provides a quick access to the tested vehicles and users can resume from the last operation, without starting from scratch. - Page 47 X-431 V+ User Manual — Vehicle Diagnosis LAUNCH to reset the service lamp. Steering Angle Calibration 1. To reset the steering angle, first find the relative zero point position for the car to drive in straight line. Taking this position as reference, the ECU can calculate the accurate angle for left and right steering.
- Page 48 LAUNCH X-431 V+ User Manual — Vehicle Diagnosis Battery Register/Battery Maintenance This function enables you to perform a resetting operation on the monitoring unit of vehicle battery, in which the original low battery fault information will be cleared and battery matching will be done.
-
Page 49: Repair Data
LAUNCH X-431 V+ User Manual — Vehicle Diagnosis DPF regeneration is used to clear PM (Particulate Matter) from the DPF filter through continuous combustion oxidation mode (such as high temperature heating combustion, fuel additive or catalyst reduce PM ignition combustion) to stabilize the filter performance. -
Page 50: Profile
X-431 V+ User Manual — Vehicle Diagnosis LAUNCH Fig. 4-34 By default, all diagnostic software is selected. To select certain software, tap “Unselect”, and then uncheck the box next to car make. Tap “Update” to start downloading. Once downloading is finished, the software packages will be installed automatically. -
Page 51: Activate Connector
LAUNCH X-431 V+ User Manual — Vehicle Diagnosis Fig. 4-35 * Note: please be sure to keep the VCI connector powered on while performing the operation. 4.8.3 Activate connector It is used to activate your diagnostic connector. Input the Serial Number and Activation Code, and then tap “Activate” to activate the connector. -
Page 52: Settings
Wi-Fi printer (sold separately) while performing printing operations. Follow the steps below to connect the printer. 1. Tap “Launch Wireless Printer Connection”. Fig. 4-36 A. If it is the first time you have operated this printer, please proceed the following: 2. - Page 53 X-431 V+ User Manual — Vehicle Diagnosis LAUNCH & [FEED] for 8 seconds, the following resetting command will be printed out: at + default = 1 at + reboot = 1 rebooting... 3. Tap “Reset” to configure Wi-Fi printer. Step 1: Connect the printer: “Scan”...
- Page 54 LAUNCH X-431 V+ User Manual — Vehicle Diagnosis Fig. 4-38 4. Once the Wi-Fi network of the printer is connected and the printer is found, tap “Printing test” to test the printing. Fig. 4-39 Now you can use the Wi-Fi printer to print!
-
Page 55: Diagnostic Feedback
X-431 V+ User Manual — Vehicle Diagnosis LAUNCH B. If you have configured the Wi-Fi printer to the LAN: 2. Tap “Connect to Printer”: a). If the local network remains as it is, tap “Test Print” directly to test the printing. -
Page 56: Others
2. Tap Add account. 3. Choose the desired account type. 5.2 Browser 5.2.1 Open browser On the home screen, tap Browser to launch the browser. You can choose the desired homepage or input the website address to browse. Fig. 5-1... -
Page 57: Download Files
X-431 V+ User Manual — Others LAUNCH Return to the previous page. Advance to the recently visited page. Refresh the current page. Close the current page. Create a new tab. Input a web address. Add the current page as bookmark. -
Page 58: Run On Pc
X-431 V+ User Manual — Others LAUNCH 5.3.2 Run on PC Perform the following steps: Locate the new disc. Copy the files. 5.3.3 Install an application Do the following steps: 1. Tap Settings > Security, and set the “Unknown sources” to ON, which allows you to install apps from unknown sources. -
Page 59: Faq
X-431 V+ User Manual — Others LAUNCH 6 FAQ 1. Communication error with vehicle ECU? Please confirm: 1) Whether the VCI is properly connected. 2) Whether the vehicle ignition switch is ON. 3) If all checks are normal, send vehicle year, make, model and VIN number to us using Dia. - Page 60 4. Open the browser and visit www.dbscar.com to download and install the latest App. 5. After the installation is complete, launch the application and login with your username and password. 6. Tap -> “Update” to download the diagnostic software. Note: For new App, the software structure and storage space occupied by the vehicle software have been optimized so as to avoid the occurrence of insufficient storage.
- Page 61 The exclusive remedy for any automotive meter found to be defective is repair or replacement, and LAUNCH shall not be liable for any consequential or incidental damages.
- Page 62 Launch website: http://www. cnlaunch.com http://www.x431.com Statement: LAUNCH reserves the rights to make any change to product designs and specifications without notice. The actual object may differ a little from the descriptions in the manual in physical appearance, color and configuration. We...
Need help?
Do you have a question about the X-431 V+ and is the answer not in the manual?
Questions and answers