Table of Contents
Advertisement
Quick Links
WIDOS
W. Dommer Söhne GmbH D-71254 Ditzingen-Heimerdingen
Working Instructions
Heating Element Butt Welding Machine
with SPA control unit, additional cylinder and T-90 / 60 / 45
Headquarters: D-71254 Ditzingen-Heimerdingen Country Court Stuttgart HRB 200973 Managing director: Jürgen Dommer
Einsteinstr. 5
Website: www.widos.de
Translation
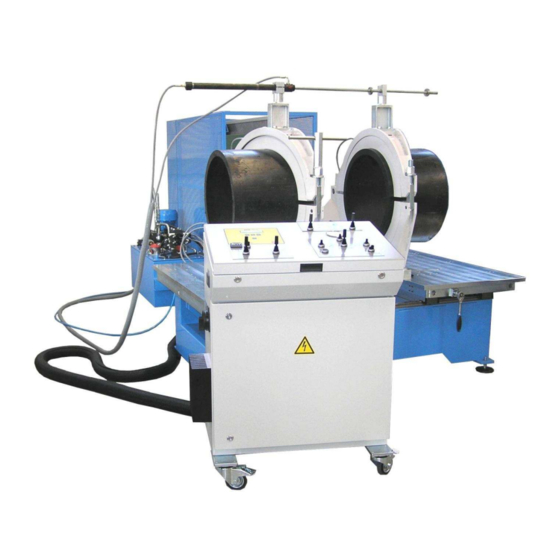
WIDOS 7000 WM
Keep for further use!
Phone +49 (0) 71 52 99 39 - 0
Fax
+49 (0) 71 52 99 39 - 40
Email:
info@widos.de
Ku nst sto ffschweißtec hni k
Advertisement
Table of Contents

Related Manuals for widos 7000 WM


Summary of Contents for widos 7000 WM
- Page 1 Ku nst sto ffschweißtec hni k Working Instructions Translation Heating Element Butt Welding Machine WIDOS 7000 WM with SPA control unit, additional cylinder and T-90 / 60 / 45 Keep for further use! Headquarters: D-71254 Ditzingen-Heimerdingen Country Court Stuttgart HRB 200973 Managing director: Jürgen Dommer...
- Page 2 ++49 (0) 3 71 / 8 15 73 - 0 Phone: ++41 (0) 71 / 388 89 79 Fax: ++49 (0) 3 71 / 8 15 73 - 20 Fax: ++41 (0) 71 / 388 89 73 25.11.11 Working Instructions WIDOS 7000 WM page 2 of 98...
- Page 3 Therefore the searched information can be easily found. 11/25/2011 WIDOS W. Dommer Söhne GmbH Einsteinstraße 5 D-71254 Ditzingen-Heimerdingen All rights reserved Reprinting only allowed with permission of the corporation. Any changes are subject to technical innovations. 25.11.11 Working Instructions WIDOS 7000 WM page 3 of 98...
-
Page 4: Table Of Contents
1.2. Safety measures......................7 1.3. Conformity........................7 1.4. Designation of product ....................8 1.4.1. Technical data ......................8 1.4.1.1. WIDOS 7000 General data ................8 1.4.1.2. Basic frame / table ..................... 8 1.4.1.3. Heating element....................8 1.4.1.4. Planer........................9 1.4.1.5. - Page 5 6.3.1. Drag pressure measurement................... 52 6.3.2. How to plane pipes....................52 6.3.3. How to compensate misalignment ................52 6.3.4. Aligning........................53 6.3.5. Heating ........................53 6.3.6. Change over ......................53 25.11.11 Working Instructions WIDOS 7000 WM page 5 of 98...
- Page 6 How to check the hydraulic oil level / refilling............67 9.7. How to clean the machine ..................67 9.8. Disposal ......................... 67 10. WIRING DIAGRAMS......................68 11. DECLARATION OF CONFORMITY................98 25.11.11 Working Instructions WIDOS 7000 WM page 6 of 98...
-
Page 7: Description Of Product
All technical details of the machine are put together as a general arrangement. 1.1. Application and intended use The WIDOS 7000 is a workshop machine for the heating element butt welding of pipes and fittings out of PE and PP from OD = 200 mm to OD = 630 / 800 mm. -
Page 8: Designation Of Product
16,5 kN (at 100 bar) max. working pressure: 160 bar 1.4.1.3. Heating element Power: 21,6 kW Voltage: 400 V (± 10%) Current: 94 A / Phase Frequency: 50 Hz (± 10%) Surface: anti-stick coating 25.11.11 Working Instructions WIDOS 7000 WM page 8 of 98... -
Page 9: Planer
Hexagon socket screw key size 30, 46 each 1 Allan key with T-grip size 6 / 7 / 8 / 10 Face spanner 4 mm, for center bolt Torx-screw driver TX10 25.11.11 Working Instructions WIDOS 7000 WM page 9 of 98... -
Page 10: Equipment
T-piece reduction insert 45°/60° for OD 315 in T-piece reduction insert 45°/60°, OD 400 mm Pan-head screw M 10 x 45 DIN 912 Order numbers and spare parts can be ordered at company WIDOS. 25.11.11 Working Instructions WIDOS 7000 WM... -
Page 11: Safety Rules
T h e r e g u l a t i o n s f o r t h e p r e v e n t i on o f a c c i d en t s a r e v a l i d ( U V V ) . 25.11.11 Working Instructions WIDOS 7000 WM page 11 of 98... -
Page 12: Obligations Of The Owner
• • • • It must be clearly defined who is responsible for transport, mounting and dismounting, and starting the operation. • • • • A person who is being trained may only work at the machine under supervision of an experienced person. 25.11.11 Working Instructions WIDOS 7000 WM page 12 of 98... -
Page 13: Dangers While Handling The Machine
Ku nst sto ffschweißtec hni k 2.7. Dangers while handling the machine The machine WIDOS 7000 WM is constructed according to the latest technical standard and the acknowledged technical safety rules. However, dangers for the operator or other persons standing nearby may occur. Also material damages are possible. -
Page 14: Risk Of Injury By Noise
In case of disrespect the warranty or liability will expire. • Machine parts which are not in a perfect condition are to be immediately replaced. • Only use original WIDOS spare and wear parts. • In case of purchase orders please always indicate the machine number! 25.11.11... -
Page 15: Warranty And Liability
• structural changes at the machine without permission • unsatisfactory checking of machine parts which are worn out • repairs performed in an inexpert way • catastrophes by external influence and Acts of God. 25.11.11 Working Instructions WIDOS 7000 WM page 15 of 98... -
Page 16: Functional Description
This is called the cooling down time. Subsequently, the welded connection can be unclamped, the welding process is completed. Heating element heats the pipes up to welding temperature Completed welding joint with in- and outside bead 25.11.11 Working Instructions WIDOS 7000 WM page 16 of 98... -
Page 17: Operating And Indicating Elements
Adjusting screw Right horizontal adjustment Holder for additional cylinder 4.2. Operator console Operator panel SD card drive Main switch Switch cabinet Type label Heat sink Guide roller, lockable Guide roller 25.11.11 Working Instructions WIDOS 7000 WM page 17 of 98... -
Page 18: Operator Panel
- To release left clamping tool (option) Joystick (cylinder 2) - To open clamping tool clamping tool (option) - To close clamping tool - To clamp clamping tool (option) - To release clamping tool (option) 25.11.11 Working Instructions WIDOS 7000 WM page 18 of 98... - Page 19 - use the aligning pressure as first cooling pressure, for this purpose you must put the <joystick 12> on: after the change-over. - You must put the <joystick 12> on for a minor (preset) cooling pressure and simultaneously press 25.11.11 Working Instructions WIDOS 7000 WM page 19 of 98...
-
Page 20: Switch Cupboard
Connection for M41, Planer out of machine compressed air hose M42, Planer into machine M21, Heating element out of machine M22, Heating element into machine M16; Stopper table M46, Planer unlock 25.11.11 Working Instructions WIDOS 7000 WM page 20 of 98... -
Page 21: Service Unit
To open left clamping tool Pressure sensor for pressure gauge To close left clamping tool Pressure sensor for SPA To open right clamping tool Proportional valve To close right clamping tool Change-over valve 25.11.11 Working Instructions WIDOS 7000 WM page 21 of 98... -
Page 22: Horizontal Adjustment (Mismatch Compensation)
If the machine has been driven without connected additional cylinder, then connect the cylinder to the hydraulic aggregate, drive the tables and cylinder entirely apart and mount the cylinder onto the clamping tools afterwards. 25.11.11 Working Instructions WIDOS 7000 WM page 22 of 98... -
Page 23: Clamping Tool
Thereto release the threaded pin, turn the adjusting screw clockwise, thus the speed reduces (but increases anti-clockwise). Afterwards safeguard this position by tightening the threaded pin. 25.11.11 Working Instructions WIDOS 7000 WM page 23 of 98... -
Page 24: How To Mount Clamping Tools On The Machine Table
Turning point „3“: for T-45° welding, (2nd welding) Turning point „4“: for T-60° welding, (2nd welding) Illustration scale on right table: Rear scales, for exchanged clamping tools Front scales, for non-exchanged clamping tools 25.11.11 Working Instructions WIDOS 7000 WM page 24 of 98... -
Page 25: Clamping Tools For Straight Pipes
Center bolt (here on changed turning point „1“) Read off angle Read off angle on upper scale on upper scale Small clamping claws for fixing the clamping tools 25.11.11 Working Instructions WIDOS 7000 WM page 25 of 98... -
Page 26: How To Adjust Clamping Tools
• Close the clamping tools and mount the parts by the cylinder head screws. Afterwards, remove the spacer again. • The order of the reducer inserts and the related screws is described in chapter 1.4.1.1). 25.11.11 Working Instructions WIDOS 7000 WM page 26 of 98... -
Page 27: Clamping Tools For T-Piece 90
The small clamping tools are mounted on the left machine table with each four screws. The large clamping tool is mounted on the right machine table with five screws. No center of rotation is used. 25.11.11 Working Instructions WIDOS 7000 WM page 27 of 98... -
Page 28: Clamping Tool For T-Piece 45
First welding with pipes being smaller than OD 400 mm: Front view Cut from above; fixing holes marked in black Fixing holes marked on machine tables, no center of rotation used. 25.11.11 Working Instructions WIDOS 7000 WM page 28 of 98... - Page 29 First welding T-45° with pipes being larger than OD 400 mm up to 630 mm: Front view Cut from above; fixing holes marked in black Fixing holes marked on machine tables, no center of rotation used. 25.11.11 Working Instructions WIDOS 7000 WM page 29 of 98...
- Page 30 Left table: fixing holes marked on machine table. Right table: center of rotation marked for left clamping tool 15°, align right clamping tool edge at marking 45° (chapter 4.7.2), and mount clamping tool with clamping claws. 25.11.11 Working Instructions WIDOS 7000 WM page 30 of 98...
-
Page 31: Clamping Tool For T-Piece 60
First welding with pipes being smaller than OD 400 mm: Front view Cut from above; fixing holes marked in black Fixing holes marked on machine tables, no center of rotation used. 25.11.11 Working Instructions WIDOS 7000 WM page 31 of 98... - Page 32 First welding T-60° with pipes from OD 400 - 630 mm: Front view Cut from above; fixing holes marked in black Fixing holes marked on machine tables, no center of rotation used. 25.11.11 Working Instructions WIDOS 7000 WM page 32 of 98...
- Page 33 Left table: fixing holes marked on machine table. Right table: center of rotation (4) marked for left clamping tool 15°, align right clamping tool edge at marking 60° (chapter: 4.7.2), and mount clamping tool with clamping claws. 25.11.11 Working Instructions WIDOS 7000 WM page 33 of 98...
-
Page 34: How To Clamp Pipes In The T-Tools
For the transport, the hexagon socket screws are fixed to the clamping tool from below, please mount screws from above upon clamping pipes. Dimension appr. 20 mm 25.11.11 Working Instructions WIDOS 7000 WM page 34 of 98... -
Page 35: Starting And Operating
The machine has been fixed to a wooden pallet for the transport; detach all bolts. Take the machine at the front e. g. by a forklift and bring it to its destination. Fix the six supporting feet (packed in cardboard) into the machine feet. 25.11.11 Working Instructions WIDOS 7000 WM page 35 of 98... -
Page 36: How To Adjust The Heating Element Temperature
The standard value for heating element temperature is 210°C +/- 10°C *. PVDF The standard value for heating element temperature is 240°C +/- 8°C *. * The smaller the pipe wall the higher the temperature. 25.11.11 Working Instructions WIDOS 7000 WM page 36 of 98... -
Page 37: Sd Card And Drive
• The card can be read out with a WICON program (optional). • The card may not be bent, opened, overheated and become wet! Please only use SD cards purchased from WIDOS. We will not be liable for any cards from other manufactures! 5.5. -
Page 38: How To Switch On The Spa
• The pipe data can also be read from the pipe data card with the bar code reading pen. • Setting the machine type and printing the welding data by pressing simultaneously <-> and <Enter>. • Diagnosis menu by pressing simultaneously <+> and <Enter>. 25.11.11 Working Instructions WIDOS 7000 WM page 38 of 98... -
Page 39: How To Set The Machine Type
- Prefabrication under workshop conditions - Low additional pressure at unclamp - No additional pressure during further cooling down - Load onto the workpieces only after being completely cooled down 25.11.11 Working Instructions WIDOS 7000 WM page 39 of 98... - Page 40 Either press <Enter> repeatedly until the basic menu appears, or wait until the basic menu automatically appears after a short time WIDOS 70032 Display: Basic menu 09:43 03.05.2004 2nd line: 25.11.11 Working Instructions WIDOS 7000 WM page 40 of 98...
-
Page 41: How To Set Language, Time And Date
Display: 09:43 03.05.2004 2nd line: Enter date Enter the date with buttons <+> and <-> Next menu by pressing button <Enter> WIDOS 70031 Display: Basic menu 09:43 25.10.2008 2nd line: 25.11.11 Working Instructions WIDOS 7000 WM page 41 of 98... -
Page 42: How To Set The Pipe Data
2nd line: Adjust diameter By <+> and <-> the diameter is changed, confirmed by <Enter> thus jumping to the next parameter. diam wall Display: PE80 00.0 2nd line: Adjust wall thickness 25.11.11 Working Instructions WIDOS 7000 WM page 42 of 98... - Page 43 By <+> and <−> the weld number is changed, (after each welding process without error, the weld number automatically steps forward), confirm by <Enter>; WIDOS 70031 Display: Basic menu 09:43 25.10.2008 2nd line: 25.11.11 Working Instructions WIDOS 7000 WM page 43 of 98...
-
Page 44: Welding Process
Open left and right clamping tool with <joysticks 7 + 9> on: Insert pipes into the clamping tools in a way that they butt against the planer. Use WIDOS roller stands for the aligning in case of long pipe ends. -
Page 45: Welding Process With Spa 600
2nd line: P0 = desired pressure; Pi = actual pressure P0=0 Pi=4 When pressing <Enter>, the actual pressure is taken over as drag pressure. Open tables with <joystick 13> on: 25.11.11 Working Instructions WIDOS 7000 WM page 45 of 98... -
Page 46: Dimension
Simultaneously pres all buttons <+ / - / Enter>. Then manually enter barcode of 2 pipe: Select first digit with <+/-> and jump to the next digit with <Enter>. 25.11.11 Working Instructions WIDOS 7000 WM page 46 of 98... -
Page 47: Planing
T=210°C Pi=12 2nd line: heating element temperature and actual pressure Release pressure, press <button 17, >. alignment Display: Display of: T=210°C Pi=12 2nd line: heating element temperature and actual pressure 25.11.11 Working Instructions WIDOS 7000 WM page 47 of 98... -
Page 48: Bead Up
Reduce pressure, press <button 17, > the SPA control switches to heating. heat up Display: Display of: t=54s Pi=0 2nd line: Remaining time for heating and actual pressure alternating with: 25.11.11 Working Instructions WIDOS 7000 WM page 48 of 98... -
Page 49: Change Over
Display: Ps=12 Pi=12 2nd line: Comparison nominal and actual pressure In case of decreased pressure during cooling time, a beeping sound can be heard. Readjust pressure to nominal pressure. 25.11.11 Working Instructions WIDOS 7000 WM page 49 of 98... -
Page 50: Completion Of Welding
• R Pressure ramp display during the welding process • t Cooling time • p Cooling pressure • 9 Ambient temperature < 0 °C 25.11.11 Working Instructions WIDOS 7000 WM page 50 of 98... -
Page 51: How To Copy Internal Data On Sd Card And Deleting Internal Data (Ram)
When pressing button <->, the internal memory (RAM) will not be deleted. copy Display: 2nd line: Press several times button <Enter> or after a short while appears automatically: WIDOS 70031 Display: Basic menu 09:43 03.05.2004 2nd line: 25.11.11 Working Instructions WIDOS 7000 WM page 51 of 98... -
Page 52: How To Read Out The Welding Data
In case the mismatch is too large, align the pipes horizontally at the right table with the ratchet tightener, resp. readjust the pipe ends within the clamping tools. As soon as mismatch compensation is effected, the pipes have to be planed again. 25.11.11 Working Instructions WIDOS 7000 WM page 52 of 98... -
Page 53: Aligning
• Release the clamping nuts and swivel out spindles. • When using machines with clamping cylinders (option), release them with <joystick 7 + 9> • Open the clamping tools, <joystick 6 + 8> on: 25.11.11 Working Instructions WIDOS 7000 WM page 53 of 98... -
Page 54: Factors For The Welding Of Angle And T-Piece
90° bend in 4 pieces (6 welding surfaces) Example: 1 90° Cutting angle = ----- = 15° Example: 2 45° bend in 3 pieces (4 welding surfaces) 45° Cutting angle = ----- = 11,25° 25.11.11 Working Instructions WIDOS 7000 WM page 54 of 98... -
Page 55: How To Prepare The Pipes For T-Pieces
Welding process Chapter 6 Ku nst sto ffschweißtec hni k 6.5. How to prepare the pipes for T–pieces 25.11.11 Working Instructions WIDOS 7000 WM page 55 of 98... -
Page 56: Diagnosis Program
- The automatic change to summer or winter time may be switched on or off 0: change summer / winter time switched off 1: change summer / winter time switched on 25.11.11 Working Instructions WIDOS 7000 WM page 56 of 98... - Page 57 - Bit values from 0-1023 appear which will change together with the change of the corresponding analog values 8 Environmental temperature 9 Heating element temperature NTC 10 Pressure (4-20 mA) 11 Heating element temperature PT 1000 25.11.11 Working Instructions WIDOS 7000 WM page 57 of 98...
-
Page 58: Welding Logs And Tables
Phone +49 (0) 71 52 99 39 - 0 W. Dommer Söhne GmbH D-71254 Ditzingen-Heimerdingen +49 (0) 71 52 99 39 - 40 Website: www.widos.de Email: info@widos.de Ku nst sto ffschweißtec hni k 8. Welding logs and tables 25.11.11 Working Instructions WIDOS 7000 WM page 58 of 98... - Page 59 [bar] time [mm] [mm] [mm] time pressure [min] 11,4 17,6 11,9 18,2 27,4 10,8 12,8 17,6 13,4 20,5 30,8 11,9 14,2 17,6 14,8 22,7 34,2 25.11.2011 Working instructions WIDOS 7000 WM Page 59 / 1 of 98...
- Page 60 [mm] [mm] [mm] time pressure [min] 10,7 13,4 15,9 17,6 16,6 25,4 38,3 12,1 15,0 17,9 17,6 18,7 28,6 43,1 10,9 13,6 16,9 20,1 17,6 21,1 32,2 48,5 25.11.2011 Working instructions WIDOS 7000 WM Page 59 / 2 of 98...
- Page 61 [min] 12,3 15,3 19,1 22,7 17,6 23,7 36,3 54,7 11,0 13,8 17,2 21,5 25,5 17,6 26,7 40,9 61,5 12,3 15,3 19,1 23,9 28,4 17,6 29,7 45,4 68,3 25.11.2011 Working instructions WIDOS 7000 WM Page 59 / 3 of 98...
- Page 62 [mm] time pressure [min] 13,7 17,2 21,4 26,7 31,7 17,6 33,2 50,8 15,4 19,3 24,1 30,0 35,7 17,6 37,4 57,2 17,4 21,8 27,2 33,9 40,2 17,6 42,1 64,5 25.11.2011 Working instructions WIDOS 7000 WM Page 59 / 4 of 98...
- Page 63 • low additional pressure at unclamping • no additional pressure during further cooling down • load onto the workpieces only after being completely cooled down 25.11.2011 Working instructions WIDOS 7000 WM Page 59 / 5 of 98...
- Page 64 [bar] time [mm] [mm] [mm] time pressure [min] 11,4 17,6 18,2 27,4 33,2 12,8 17,6 20,5 30,8 37,4 14,2 17,6 22,7 34,2 10,7 15,9 17,6 25,4 38,3 25.11.2011 Working instructions WIDOS 7000 WM Page 60 / 1 of 98...
-
Page 65: Equipment Care / Maintenance / Repair
[min] 12,1 17,9 17,6 28,6 10,9 13,6 20,1 17,6 32,2 12,3 15,3 22,7 17,6 36,3 11,0 13,8 17,2 25,5 17,6 40,9 12,3 15,3 19,1 28,4 17,6 25.11.2011 Working instructions WIDOS 7000 WM Page 60 / 2 of 98... - Page 66 • low additional pressure at unclamping • no additional pressure during further cooling down • load onto the workpieces only after being completely cooled down 25.11.2011 Working instructions WIDOS 7000 WM Page 60 / 3 of 98...
- Page 67 [bar] min. over welding [bar] time [mm] [mm] [mm] time pressure [min] 13,5 10,5 10,8 15,0 11,0 11,9 16,5 12,5 13,5 Working Instructions WIDOS 7000 WM Page 61 of 98...
- Page 68 [bar] time [mm] [mm] [mm] time pressure [min] 11,4 17,6 11,9 18,2 27,4 10,8 12,8 17,6 13,4 20,5 30,8 11,9 14,2 17,6 14,8 22,7 34,2 25.11.2011 Working instructions WIDOS 7000 WM Page 62 / 1 of 98...
- Page 69 [mm] [mm] [mm] time pressure [min] 10,7 13,4 15,9 17,6 16,6 25,4 38,3 12,1 15,0 17,9 17,6 18,7 28,6 43,1 10,9 13,6 16,9 20,1 17,6 21,1 32,2 48,5 25.11.2011 Working instructions WIDOS 7000 WM Page 62 / 2 of 98...
- Page 70 [min] 12,3 15,3 19,1 22,7 17,6 23,7 36,3 54,7 11,0 13,8 17,2 21,5 25,5 17,6 26,7 40,9 61,5 12,3 15,3 19,1 23,9 28,4 17,6 29,7 45,4 68,3 25.11.2011 Working instructions WIDOS 7000 WM Page 62 / 3 of 98...
- Page 71 [mm] time pressure [min] 13,7 17,2 21,4 26,7 31,7 17,6 33,2 50,8 15,4 19,3 24,1 30,0 35,7 17,6 37,4 57,2 17,4 21,8 27,2 33,9 40,2 17,6 42,1 64,5 25.11.2011 Working instructions WIDOS 7000 WM Page 62 / 4 of 98...
- Page 72 • low additional pressure at unclamping • no additional pressure during further cooling down • load onto the workpieces only after being completely cooled down 25.11.2011 Working instructions WIDOS 7000 WM Page 62 / 5 of 98...
- Page 73 [bar] min. over welding [bar] time [mm] [mm] [mm] time pressure [min] 11,4 17,6 18,2 27,4 33,2 12,8 17,6 20,5 30,8 37,4 14,2 17,6 22,7 34,2 25.11.2011 Working instructions WIDOS 7000 WM Page 63 / 1 of 98...
- Page 74 [min] 10,7 15,9 17,6 25,4 38,3 12,1 17,9 17,6 28,6 10,9 13,6 20,1 17,6 32,2 12,3 15,3 22,7 17,6 36,3 11,0 13,8 17,2 25,5 17,6 40,9 25.11.2011 Working instructions WIDOS 7000 WM Page 63 / 2 of 98...
- Page 75 • low additional pressure at unclamping • no additional pressure during further cooling down • load onto the workpieces only after being completely cooled down 25.11.2011 Working instructions WIDOS 7000 WM Page 63 / 3 of 98...
- Page 76 [bar] min. over welding [bar] time [mm] [mm] [mm] time pressure [min] 13,5 10,5 10,8 15,0 11,0 11,9 16,5 12,5 13,5 25.11.2011 Working instructions WIDOS 7000 WM Page 64 of 98...
-
Page 77: Maintenance And Care
For machines with an especially high usage percentage the testing cycle should be shortened to 1000 welds. The work have to be performed at the WIDOS GmbH company or by an authorized partner. • In general, take care for cleanness! •... -
Page 78: Transport
Unscrew the filter bowl in an anti-clockwise direction; Hold new filter element only at lower end; • • Mount parts in the reverse order from dismantling: • Restarting as described in chapter “settings" (see chapter: 4.3.1). 25.11.11 Working Instructions WIDOS 7000 WM page 66 of 98... -
Page 79: How To Check The Hydraulic Oil Level / Refilling
(e.g. AVILUB NCI 9840). 9.8. Disposal At the end of the life time, the machine has to be disposed of properly, non- polluting and in accordance with the national laws of waste disposal. 25.11.11 Working Instructions WIDOS 7000 WM page 67 of 98... -
Page 80: Wiring Diagrams
Phone +49 (0) 71 52 99 39 - 0 W. Dommer Söhne GmbH D-71254 Ditzingen-Heimerdingen +49 (0) 71 52 99 39 - 40 Website: www.widos.de Email: info@widos.de Ku nst sto ffschweißtec hni k 10. Wiring diagrams 25.11.11 Working Instructions WIDOS 7000 WM page 68 of 98... - Page 81 Wiring diagrams Chapter 10 Ku nst sto ffschweißtec hni k 25.11.11 Working Instructions WIDOS 7000 WM page 69 of 98...
- Page 82 Wiring diagrams Chapter 10 Ku nst sto ffschweißtec hni k 25.11.11 Working Instructions WIDOS 7000 WM page 70 of 98...
- Page 83 L1.1 L1.2 L1.3 L1.2 L1.4 L1.2/2.5 N.2/2.5 X3.24 24V/6.1 W110 X3.0 0V/6.1 revision Date Name...
- Page 84 Wiring diagrams Chapter 10 Ku nst sto ffschweißtec hni k 25.11.11 Working Instructions WIDOS 7000 WM page 72 of 98...
- Page 85 HE1/2.4 HE2/2.4 HE3/2.4 P E/4.8 /3.3 W120 W120 revision Date Name...
- Page 86 X3.24 24V/3.4 24V/7.1 X3.0 0V/3.4 0V/7.1 W100 W100 W100 W100 /12.2 /12.3 /12.4 W100 /12.1 revision Date Name...
- Page 87 X3.24 X3.24 24V/6.8 24V/12.1 24K/8.1 24KS/9.1 /12.1 /12.2 /12.3 /12.4 /14.1 /14.2 /14.5 /14.6 /15.1 /15.2 /15.3 /15.4 /14.3 /14.4 /14.7 /14.8 /15.5 /15.6 /15.7 /15.8 X3.0 0V/6.8 0V/8.1 revision Date Name...
- Page 88 24K/7.3 /12.1 /12.2 /12.3 /12.4 /12.1 /12.2 /12.3 /12.4 S19/12.5 X3.0 X3.0 X3.0 X3.0 0V/7.8 0V/9.1 revision Date Name...
- Page 89 24KS/7.8 24KS/10.1 /14.1 /14.2 /14.5 /14.6 /14.3 /14.4 /14.7 /14.8 /15.1 /15.2 /15.3 /15.4 /15.5 /15.6 /15.7 /15.8 X3.0 0V/8.8 0V/10.1 revision Date Name...
- Page 90 24KS/9.8 24KS/11.1 /14.1 /14.2 /14.5 /14.6 /14.3 /14.4 /14.7 /14.8 X3.0 X3.0 X3.0 X3.0 X3.0 X3.0 X3.0 X3.0 0V/9.8 0V/11.1 revision Date Name...
- Page 91 24KS/10.8 /15.1 /15.2 /15.3 /15.4 /15.5 /15.6 /15.7 /15.8 X3.0 X3.0 X3.0 X3.0 X3.0 X3.0 X3.0 X3.0 0V/10.8 0V/12.1 revision Date Name...
- Page 92 X3.24 24V/7.8 24V/13.1 24.6/13.1 X3.0 X3.0 X3.0 X3.0 0V/11.8 0V/13.1 revision Date Name...
- Page 93 X3.24 24V/12.8 24V/14.1 24.6/12.8 X3.0 X3.0 X3.0 X3.0 X3.0 X3.0 X3.0 X3.0 0V/12.8 0V/14.1 revision Date Name...
- Page 94 X3.24 24V/13.8 24.S/15.1 0KS/15.1 X3.0 0V/13.8 revision Date Name...
- Page 95 24.S/14.8 0KS/14.8 revision Date Name...
- Page 96 Se riel Se riel Druc ke r Druc ke r Druc ke r Druc ke r PCMCIA PCMCIA ST10 ST10 ST20 ST20 revision Date Name...
- Page 97 Copying or dissemination only allowed by our w ritten approval. 5V/3.7 0/3.7 12V+/3.7 12V-/3.7 TF3/5.7 TF4/5.7 ST15:E...
-
Page 98: Declaration Of Conformity
Wiring diagrams Chapter 10 Ku nst sto ffschweißtec hni k 25.11.11 Working Instructions WIDOS 7000 WM page 86 of 98... - Page 99 Wiring diagrams Chapter 10 Ku nst sto ffschweißtec hni k 25.11.11 Working Instructions WIDOS 7000 WM page 87 of 98...
- Page 100 Wiring diagrams Chapter 10 Ku nst sto ffschweißtec hni k 25.11.11 Working Instructions WIDOS 7000 WM page 88 of 98...
- Page 101 Wiring diagrams Chapter 10 Ku nst sto ffschweißtec hni k 25.11.11 Working Instructions WIDOS 7000 WM page 89 of 98...
- Page 102 revision Date Name...
- Page 103 revision Date Name...
- Page 104 revision Date Name...
- Page 105 Wiring diagrams Chapter 10 Ku nst sto ffschweißtec hni k 25.11.11 Working Instructions WIDOS 7000 WM page 93 of 98...
- Page 106 Wiring diagrams Chapter 10 Ku nst sto ffschweißtec hni k 25.11.11 Working Instructions WIDOS 7000 WM page 94 of 98...
- Page 107 Wiring diagrams Chapter 10 Ku nst sto ffschweißtec hni k 25.11.11 Working Instructions WIDOS 7000 WM page 95 of 98...
- Page 108 Wiring diagrams Chapter 10 Ku nst sto ffschweißtec hni k 25.11.11 Working Instructions WIDOS 7000 WM page 96 of 98...
- Page 109 Wiring diagrams Chapter 10 Ku nst sto ffschweißtec hni k 25.11.11 Working Instructions WIDOS 7000 WM page 97 of 98...
- Page 110 6. DIN EN 60950 Safety of equipments of the information technology The technical documentation is completely available. The working instructions are available in the user’s language. Ditzingen-Heimerdingen, the 25.11.11 Martin Dommer (Technical director) 25.11.11 Working Instructions WIDOS 7000 WM page 98 of 98...
Need help?
Do you have a question about the 7000 WM and is the answer not in the manual?
Questions and answers